


Results 2,301 to 2,310 of 4110
Thread: Qidi Tech 1 - Replicator 1 clone
-
07-10-2016, 10:32 PM #2301Engineer

- Join Date
- May 2016
- Location
- Annapolis, MD
- Posts
- 523
Use http://www.thingiverse.com/apps/cust...hing_id=735213 Originally Posted by wirlybird

Then apply the values for: 51mm tube diameter, 85mm spool diameter, 17mm height. 5 arms will work well. I like the "right" version.
-
07-11-2016, 05:45 AM #2302Super Moderator
- Join Date
- Jun 2016
- Location
- Oklahoma
- Posts
- 904
Thanks, will get it going today. Originally Posted by DaveB
I saw in your other post that you have glue sticks. Are you using those for the glass? I am having a little trouble with corner lifting with ABS, hair spray may be worn but was wondering how it works. Is that also the magnetic set up? What do you think of that?Last edited by wirlybird; 07-11-2016 at 05:56 AM.
-
07-11-2016, 05:53 AM #2303Super Moderator
- Join Date
- Jun 2016
- Location
- Oklahoma
- Posts
- 904
Digging the setup. I may come after that manifold or the new and improved version!! I am going to set up the dry boxes directly behind my unit - when I get to it!! Originally Posted by DaveB
-
07-11-2016, 09:48 AM #2304Engineer
- Join Date
- May 2016
- Location
- Annapolis, MD
- Posts
- 523
Yes, the glue sticks are for the glass. In desperation I've used them on everything, but they are my go to solution for ABS on glass. For PLA the BuildTak is often too easy to pass up. Getting the glue stick off is easy, just add water. Elmers is completely water soluble. Originally Posted by wirlybird
Yes it is the Maghold build plate. Usually I love it. A few days ago when I was separating the steel sheet from the glass, not so much. There is a tirade from yours truly on this BBs about the pain of removing the 3M adhesive from between the glass and the steel sheet. Just doing that once was enough to make me doubt my sanity.
Big advantage of glass: It is flat. Really, really flat. No bubbles, no warps, no nothing, just flat. Makes leveling and adjusting the height of the entire build surface a lot more predictable. You just need a little patience as it cools so the print will pop off without you prying at it and adding stress points to the glass.
-
07-11-2016, 09:55 AM #2305Engineer
- Join Date
- May 2016
- Location
- Annapolis, MD
- Posts
- 523
One other thought on hairspray, are you sure you are using enough? Originally Posted by wirlybird
 Originally Posted by cncartist
This video has great instructions on how to coat the glass build plate with
the Aquanet hairspray - https://www.youtube.com/watch?v=wzCcTCXGiDU
-
07-11-2016, 10:06 AM #2306Super Moderator
- Join Date
- Jun 2016
- Location
- Oklahoma
- Posts
- 904
I am using a pretty heavy coat. I may need to prep for these prints with a fresh coat. Originally Posted by DaveB
The aquanet I am using doesn't spray in a mist like spray paint, it more splurts out. It seems ok as it sits and dries. There may be two types in the purple can!
-
07-11-2016, 12:14 PM #2307Super Moderator
- Join Date
- Apr 2014
- Location
- KS
- Posts
- 907

What I was getting at on the water tight is if you do soak it for a week and it isn't water tight then the water will get all inside the print infill and will most likely never come out or dry out. So by sealing the outer shells by a quick acetone dip will at least for the most part seal the gaps in the outermost layers which should limit the water absorption. Acetone fully evaporates in a matter of minutes so it won't be a toxic by product.
While not FDA approved, some stuff called Silicon conformal coating works well for sealing. It also has a nice smoothing effect also since it contains acetone. I spray a lot of my parts with it and it leaves a nice soft matte appearance.
Heat gun and ABS is tough since ABS doesn't have a true melt point like other plastics. It just slowly gets softer then boom the part will just collapse. Acetone is the best chemical treatment. I usually don't use vapor with acetone anymore. Either I will quick dip a part in acetone, spray a mist on, or sometimes just use a rag and do an acetone quick wipe. Most of the time I prefer the acetone mist or using the Conformal Coating though.
Originally Posted by Syd_Khaos
-
07-11-2016, 05:24 PM #2308Super Moderator
- Join Date
- Jun 2016
- Location
- Oklahoma
- Posts
- 904
Ok guys, here is a test of the layer issue I am having. The cube is a 1" solid cube in white ABS bed at 110 and extruder at 240. Simplify3D at default settings for ABS.
The left cube is solid with default infill etc. The second has a cutout going through it from left to right. The third (right one) has a cut out going from top to 1" down.
You can see the changes in how the layer is printed on the side where the hollow part of the cube is. I know these look pretty good but there is a definite dimension change where the change in the layers takes place.
On the much larger part this layer change is much more pronounced as can be seen in the other photos.
The bottom print is a redo of my part last night and same settings as the cube. It has the same issue but not as bad. You can see how the top and bottom are bowing toward the right.
I am at a loss on this but it seems parts with some type of internal changes now have issues printing.
[IMG] [/IMG]
[IMG]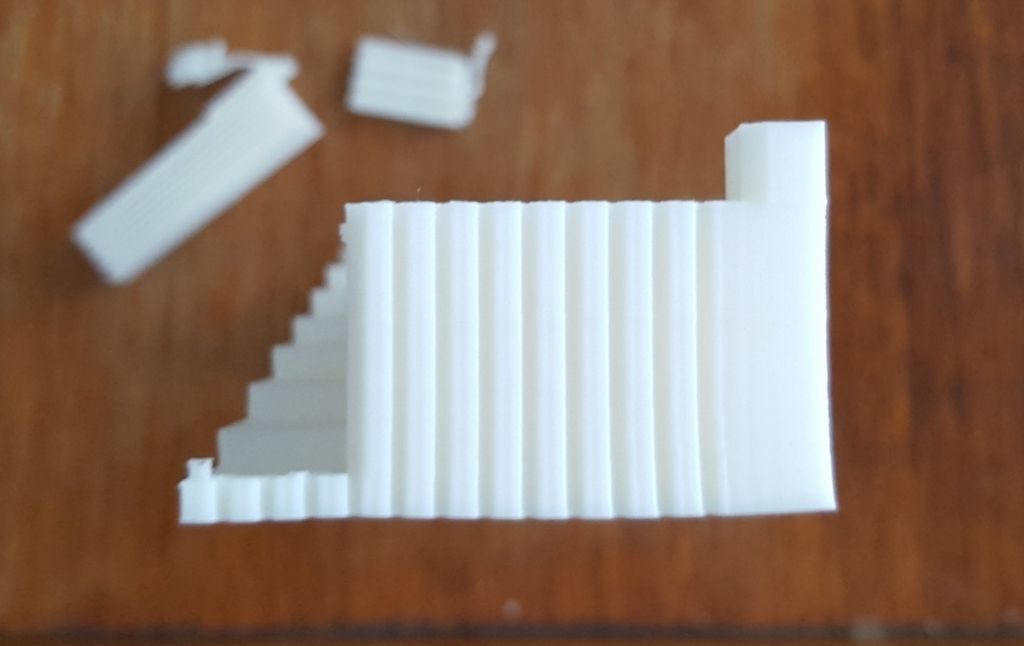 [/IMG]
-
07-11-2016, 08:34 PM #2309Engineer
- Join Date
- May 2016
- Location
- Annapolis, MD
- Posts
- 523
W, I really don't have a clue about this. Maybe S3D could help you? I have to wonder if there is some value / setting within S3D that might cause this behavior. The issue is not very obvious to me in the test cubes you have printed. I just do not see it. Maybe measurements would make it more obvious for those examples? It's rather blatant in the larger object, although I am puzzled why it seems to show up in your pix as a more gradual change as opposed to a single event stepped change. Originally Posted by wirlybird
-
07-11-2016, 08:37 PM #2310Super Moderator
- Join Date
- Jun 2016
- Location
- Oklahoma
- Posts
- 904
Did the customization deal. I gave me 5 different ones and 4 of them look the same except for left and right even though they have different names. I don't see a difference anyway! Originally Posted by DaveB

 Reply With Quote


Holes and pockmarks in print walls
Today, 09:14 AM in General 3D Printing Discussion