


Results 1 to 10 of 110
Thread: Dollo 3D Printable 3D Printer
Hybrid View


-
05-12-2015, 12:04 PM #1Administrator

- Join Date
- Jan 2014
- Posts
- 7,697

Dollo 3D Printable 3D Printer
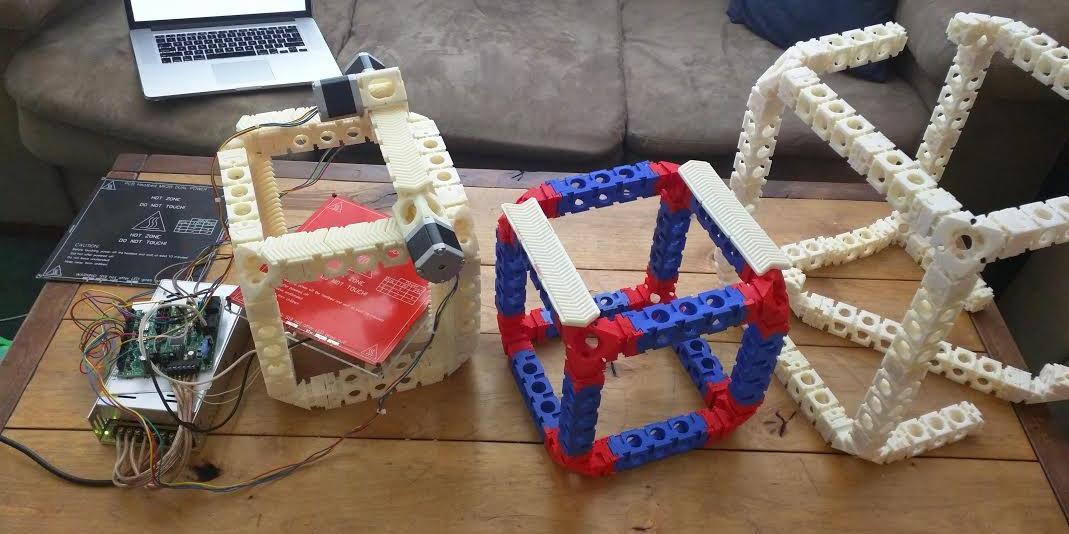
3D printers 3D printing more 3D printers isn't any longer that far-flung of an idea, thanks to initiatives like the RepRap Project. While electronics and other parts keep this complete self-replicating system from being fully realized, advances are getting ever closer. Benjamin Engel and his father have now produced the most self-replicating 3D printer yet, with their Dollo 3D printer. Able to be printed with just 1kg of filament, the Dollo can be 3D printed in about 18 hours. It is also scalable, and the Engels are looking to put their machine on Kickstarter in the near future, for only about $300 and with a planned optional CNC router. Read more details about their clever 3D printer in the full article: http://3dprint.com/63229/dollo-3d-pr...prints-itself/
Below is a photo of the Dollo 3D printer:
-
05-12-2015, 02:18 PM #2Staff Engineer
- Join Date
- Dec 2013
- Location
- Georgia
- Posts
- 934
Oh man that looks like fun. Not a workhorse printer by any strech, but probably good for a kids' project (with supervision of course, the hot end is no children's toy.) Speaking of which, what kind of hotend does it use, is that an E3D Volcano, or is it a proprietary one?
Also, I notice you missed the build plate in the list of non-printed parts, I guess the hot bed is optional?
-
05-13-2015, 11:35 AM #3Student
- Join Date
- Mar 2015
- Posts
- 1
I created the dollo
We are going to be making them with e3D hot-ends, but its a modular design and you could make a mount for any hot-end really. Secondly the bed wasn't on the list on non printed parts because we are planning on printing the lower bed, and a heated bed is not needed for milling or laser etching, but if you want to print with ABS then yes a heated bed is needed and not printable, and thirdly its more than just for kinds (although great for kids), if you want you can put some metal rods in it (I made it so you can if you want) and make the printer as large as you want, their is nothing stopping you from making it large enough to print a car, most kinds wont be going that deep into what it is capable of doing. Originally Posted by Feign

-
05-14-2015, 06:01 AM #4Student
- Join Date
- May 2015
- Posts
- 1
 Cool
Smart thinking, really. I whish you the best on KS!! Originally Posted by benengel94
Cool
Smart thinking, really. I whish you the best on KS!! Originally Posted by benengel94
-
05-18-2015, 01:12 AM #5Technologist
- Join Date
- Apr 2015
- Location
- china
- Posts
- 121


I find it very interesting, very good idea, I would like to see it complete.
www.reprapmall.com
-
11-02-2016, 02:38 PM #6Technologist
- Join Date
- Oct 2016
- Posts
- 184
I've been printing and hacking away with the design for some time and I've got a build that works quite well. The quality isn't very good at the moment but getting there. The design itself is not the problem, getting the parts printed right is. For me the whole process of building this has been a bit of a learning experience in part tolerances and printer calibration
 . Also I've done some remodeling and new models as needed.
Couple of latest prints:
https://www.dropbox.com/s/u3nggb3wrmjklb4/2016-11-01%2016.28.36.jpg?dl=0
https://www.dropbox.com/s/u510cxwljbilwdy/2016-11-01%2016.29.35.jpg?dl=0
https://www.dropbox.com/s/drrf72g6yuout2b/2016-11-01%2016.29.49.jpg?dl=0
Anyone else with working Dollo or printing one?Last edited by spegelius; 05-03-2017 at 10:30 AM. Reason: links
-
12-12-2016, 01:05 PM #7Technologist
- Join Date
- Oct 2016
- Posts
- 184
Been creating models and printing stuff quite a lotfor Dollo so here's some updates about my build:
- created a model to attach PSU underneath the frame
- adapter for RAMPS box mount to Dollo bow tie setup (excuse the messy cables)
https://dl.dropboxusercontent.com/u/...2021.59.16.jpg
- printed some extension parts and now Z-axis gows up to 41 cm
https://dl.dropboxusercontent.com/u/...2021.58.29.jpg
- fixed problem with Z-wobble caused by bent threaded rods. I created a rail setup that makes the bed move straight:
https://dl.dropboxusercontent.com/u/...2021.58.45.jpg
https://dl.dropboxusercontent.com/u/...2021.59.01.jpg
- assorted parts
The build volume is now 120x93x413mm. I haven't yet tried how well very tall prints work, planning to do that this week. I fear that the frame isn't rigid enough and causes too much play, especially when Z-height grows. A short ~3cm box was fine, but doesn't tell anything.
I also printed enough parts to expand X and Y axes so the build volume would be 210x210x413mm. That'll need some more parts for the X and Y rails, though and I'll probably need to lengthen some cables also.
-
12-14-2016, 11:51 AM #8Technologist
- Join Date
- Oct 2016
- Posts
- 184
Yesterday I printed a 40cm model: http://www.thingiverse.com/thing:157102 Z scaled 200%. It went better than expected, my worries about the plastic frame giving too much was unwarranted, at least with this model. There's some distortion at couple of places, probably dues to the slider's not moving equally due to different PLA types used. Also some Z-wobble still, the printed nut is too tight and bent rod twists the bed. Need to print a looser one or figure some kind of joint system, dunno. Anyways, the print went better than I hoped, maybe this'll be a printer yet
.
0.3mm layer, Esun green PETG @240C. Roughly 5h 20min
https://dl.dropboxusercontent.com/u/45385735/3dprinting/Dollo/2016-12-14 19.29.30.jpg
https://dl.dropboxusercontent.com/u/45385735/3dprinting/Dollo/2016-12-14 19.29.42.jpg
https://dl.dropboxusercontent.com/u/45385735/3dprinting/Dollo/2016-12-14 19.29.59.jpg
-
12-22-2016, 12:28 PM #9Technologist
- Join Date
- Oct 2016
- Posts
- 184
Some finetuning to Z-axis rails and getting quite good results:
https://dl.dropboxusercontent.com/u/...2020.00.58.jpg
https://dl.dropboxusercontent.com/u/...2020.01.09.jpg
https://dl.dropboxusercontent.com/u/...2020.01.21.jpg
https://dl.dropboxusercontent.com/u/...2020.01.36.jpg
Slight deformation, but I can live with it for now.
-
01-29-2017, 08:07 AM #10Technologist
- Join Date
- Oct 2016
- Posts
- 184
Finally got to expanding my Dollo printer in X and Y axes (sorry about the bad quality, Jolla C doesn't have very good camera...). Needed to print lot of extension parts and ties, also some of the older extensions needed to be replaced as they were printed badly (bad printer, bad settings...)
The axis dimensions are 240mm x 210mm x 435mm (x y z) currently.
https://dl.dropboxusercontent.com/u/...2021.48.22.jpg
I use PETG for the ties, they are bit more flexible than PLA and seem to make tighter joints. Also it helps when joining parts that are printed on different printers and don't have 100% same dimensions.
https://dl.dropboxusercontent.com/u/...2015.51.02.jpg
I also did bit better cable management and designed these clips that attach to the bow tie grooves on the frame. It helps, but there's still room for improvement , especially around the RAMPS box. Z motor wires needed to be extended too.
https://dl.dropboxusercontent.com/u/...2018.25.57.jpg
https://dl.dropboxusercontent.com/u/...2021.48.57.jpg
The bed looks quite small now and is bit too small compared to the X axis. Also the bolt heads stick out and care needs to be taken so that nozzle doesn't hit them. The current bed carriage setup is too flimsy due to the extra lenght, but works for the time being. Need to design much beefier parts and maybe move the rails inside the frame.
https://dl.dropboxusercontent.com/u/...2017.14.46.jpg
https://dl.dropboxusercontent.com/u/...2021.49.27.jpg
The X and Y racks were also updated as more length was needed. For X rack, I did some redesignin of the motor mount and the rack. For Y, I used the leftover X rack (it was two 9cm rack parts joined) on both sides. Also finally found out why I had some artifacts in prints:
1. the bolts that fastens the gears to the motor shafts were bit too long and would hit the rack once in revolution and cause a bump
2. the rack joints weren't completely smooth, so I took some time to sand them properly
Now they move quite smoothly, without extra bumps.
https://github.com/spegelius/Dollo/b...L/rackv4_4.stl
https://github.com/spegelius/Dollo/b...t_small_v4.stl
https://dl.dropboxusercontent.com/u/...2017.15.05.jpg
Currently printing Benchy (scaled to 200%):
https://dl.dropboxusercontent.com/u/...2015.51.35.jpg
Current problems I need to address:
- frame isn't that rigid, as I've already mentioned. Especially the corners give way too much. So far doesn't seem to affect quality much, when printing moderately slowly, but then again I haven't done too many prints yet. This'll need some experimenting about how to fix. Maybe some corner pieces to make it more stiff
- related to the above, the angles aren't straight. So calibration is needed.
- bed carriage too flimsy.
- X and Y motor gears will probably start slipping after a while. I've seen it happen. Current design use M3 bolts to fasten them to the motor shaft, but the gears are plastic and they start to give after a while, causing backlash. X and Y axes put quite a strain on them as the racks have bit of friction. I've been contemplating about changing the M3 bolts to M4 and also annealing the gears: https://www.youtube.com/watch?v=CZX8eHC7fws. Maybe even drill a hole through the motor shaft for the bolt
- no part cooling fan. Need to design one.
- bed bolt heads.
- other stuff I forget...


 Reply With Quote


Please explain to me how to...
Yesterday, 02:43 PM in 3D Printer Parts, Filament & Materials