


Results 21 to 30 of 166
Thread: New 12" user and I am LOST!
Hybrid View


-
02-05-2015, 04:11 PM #1Engineer-in-Training

- Join Date
- Feb 2015
- Posts
- 371
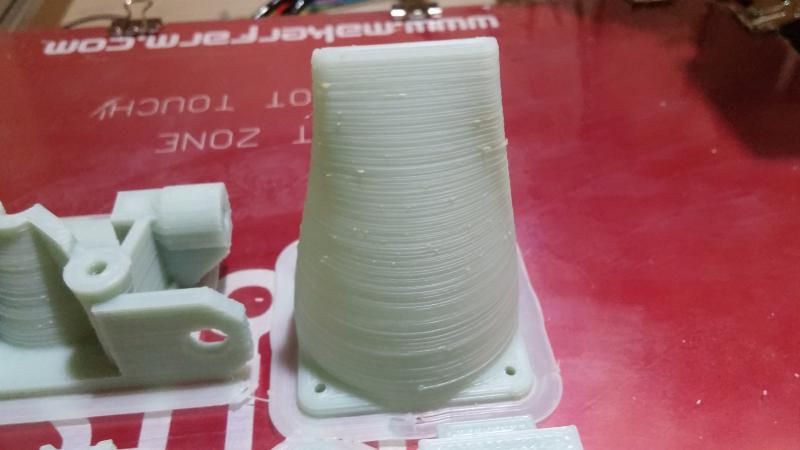
In the top pic of the knob (Afinia) I like how the surface is nice and uniform. The bottom pic (maker) is all snaggy and ugly. You can even see where it looks like the nozzle scrapped across the print it looks like. Are the retractions not setup right?
I am just using the config that Colin posted.
-
02-05-2015, 04:06 PM #2Engineer
- Join Date
- Nov 2014
- Posts
- 522
just comparing the two pictures your printer is printing a lot hotter than your school one. not that fine tunning via pictures is the point right now, but dull prints mean a cooler extrude, shiny means a hotter extrude
-
02-05-2015, 04:21 PM #3Engineer
- Join Date
- Nov 2014
- Posts
- 522
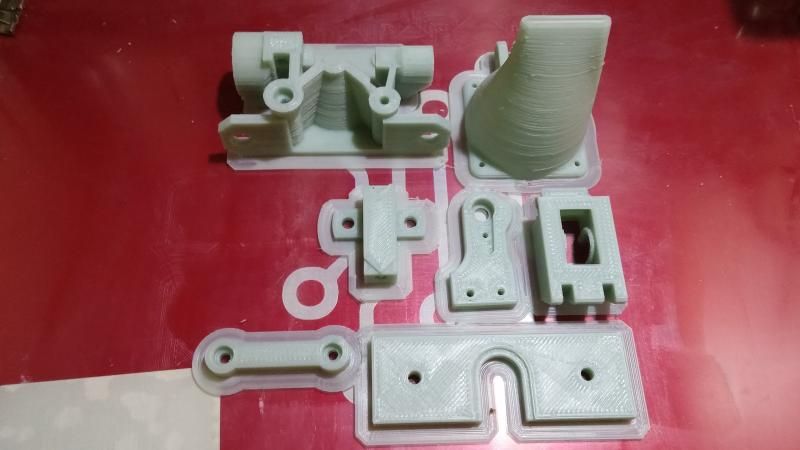
I just finished printing these... It's very possible to get it to work and well be patient we'll get you there :-) just keep an open mind to learning
-
02-05-2015, 04:33 PM #4Engineer-in-Training
- Join Date
- Feb 2015
- Posts
- 371
Those are amazing! In one of the last emails from Colin, he stated that the nozzle will be below the glass level in some cases to get a good first layer print. I just can't accept that as true. There exists the possibility for damage in my mind.
What problem should I tackle first as I feel like I am running in too many directions first.
Pronterface?
Z-Axis?
Filament calibration?
-
02-05-2015, 04:38 PM #5Technologist
- Join Date
- Aug 2014
- Location
- Oklahoma
- Posts
- 191


I know you are going off of what you have used before, but I am not sure it is fair to compare a Professional model that comes pre-assembled with proprietary software that costs what looks like $1900, vs a $600 build your own kit with free software. They want you to use their filament, and print at - ABS filament is extruded at 260° Celsius to .15mm onto the bed. I have never gone that high with my settings. I would guess you could print at .15, I am sure your printer is not set at that for a default. more like .2ish.
-
02-05-2015, 04:40 PM #6Engineer
- Join Date
- Nov 2014
- Posts
- 522
without pronterface you can't truly calibrate the Z axis or Filament, i mean you can but it's a headache... for now i would work on trying to get your USB to recognize the printer, and manually level your Xcarraige to the frame so that it is level, which will make bed leveling easier in the future. from there i would level the bed meticulously, and then calibrate e-steps of the extruder.
try reinstalling the mac drivers for the arduino, reinstalling the arduino software, try different USB ports on the mac, and try different cables.
that's a good start
-
02-05-2015, 05:59 PM #7Engineer-in-Training
- Join Date
- Feb 2014
- Location
- CT
- Posts
- 345
To me it looks like your slice settings are wacked. Here is a gcode if you want to try it. make sure your zHome is set to one sheet of paper. Also keep a finger on the power button "Just in Case" LOL. OK it wont let me upload due to size. OK try here
https://drive.google.com/file/d/0B410XJG4pOFAWTBLNTY2MGVZV2c/view?usp=sharing
-
02-05-2015, 10:06 PM #8Engineer
- Join Date
- Nov 2014
- Posts
- 522
Well if all of your python stuff is up to date hopefully thats all that was needed to get it connected.
After that its reinstalling any arduino drivers you might need, trying different usb ports on the mac, and trying a new usb cable... After that i dont know... If you have a non mac computer or laptop laying around try setting it up and see if it recognizes the printer that will narrow the issue to strictly being the usb cable which if you try another and it still doesnt work you have then narrowed it down to being the board itselfs usb connection and that is grounds for colin to replace the board and he will hes good like that.
Basically what i am saying is, use the process of elimination to rule out any and all possible causes for the printer and computer to not communicate. Once you do that you can with confidence tell colin everything you have done and there will be no doubt as to what the issue is. Hopefully... Because you will either eliminate all options to be the rumba board or you will eliminate all options to be your mac. Either or you will k ow whats going wrong and can take steps to fix the problem.
-
02-06-2015, 02:28 PM #9Engineer-in-Training
- Join Date
- Feb 2015
- Posts
- 371
Gonna follow the steps outlines in post #14 a bit closer. For now, the test code I generated has G1 Z0.350 F6000.000 listed. I am still learning but this is the first line with a z in it. Does this mean my first layer would be printing at .35 plus what ever height I have the endstop set at?
-
02-06-2015, 07:08 PM #10Staff Engineer
- Join Date
- May 2014
- Location
- Highlands Ranch, Colorado USA
- Posts
- 1,437
Yes. You're likely using Slic3r as your slicer. It defaults to a first layer height of 0.35mm. Originally Posted by tsteever


 Reply With Quote


Please explain to me how to...
05-17-2024, 12:15 PM in 3D Printer Parts, Filament & Materials