Close


Page 300 of 411 FirstFirst ... 200250290298299300301302310350400 ... LastLast
Results 2,991 to 3,000 of 4110
  1. #2991
    Super Moderator
    Join Date
    Jun 2016
    Location
    Oklahoma
    Posts
    902
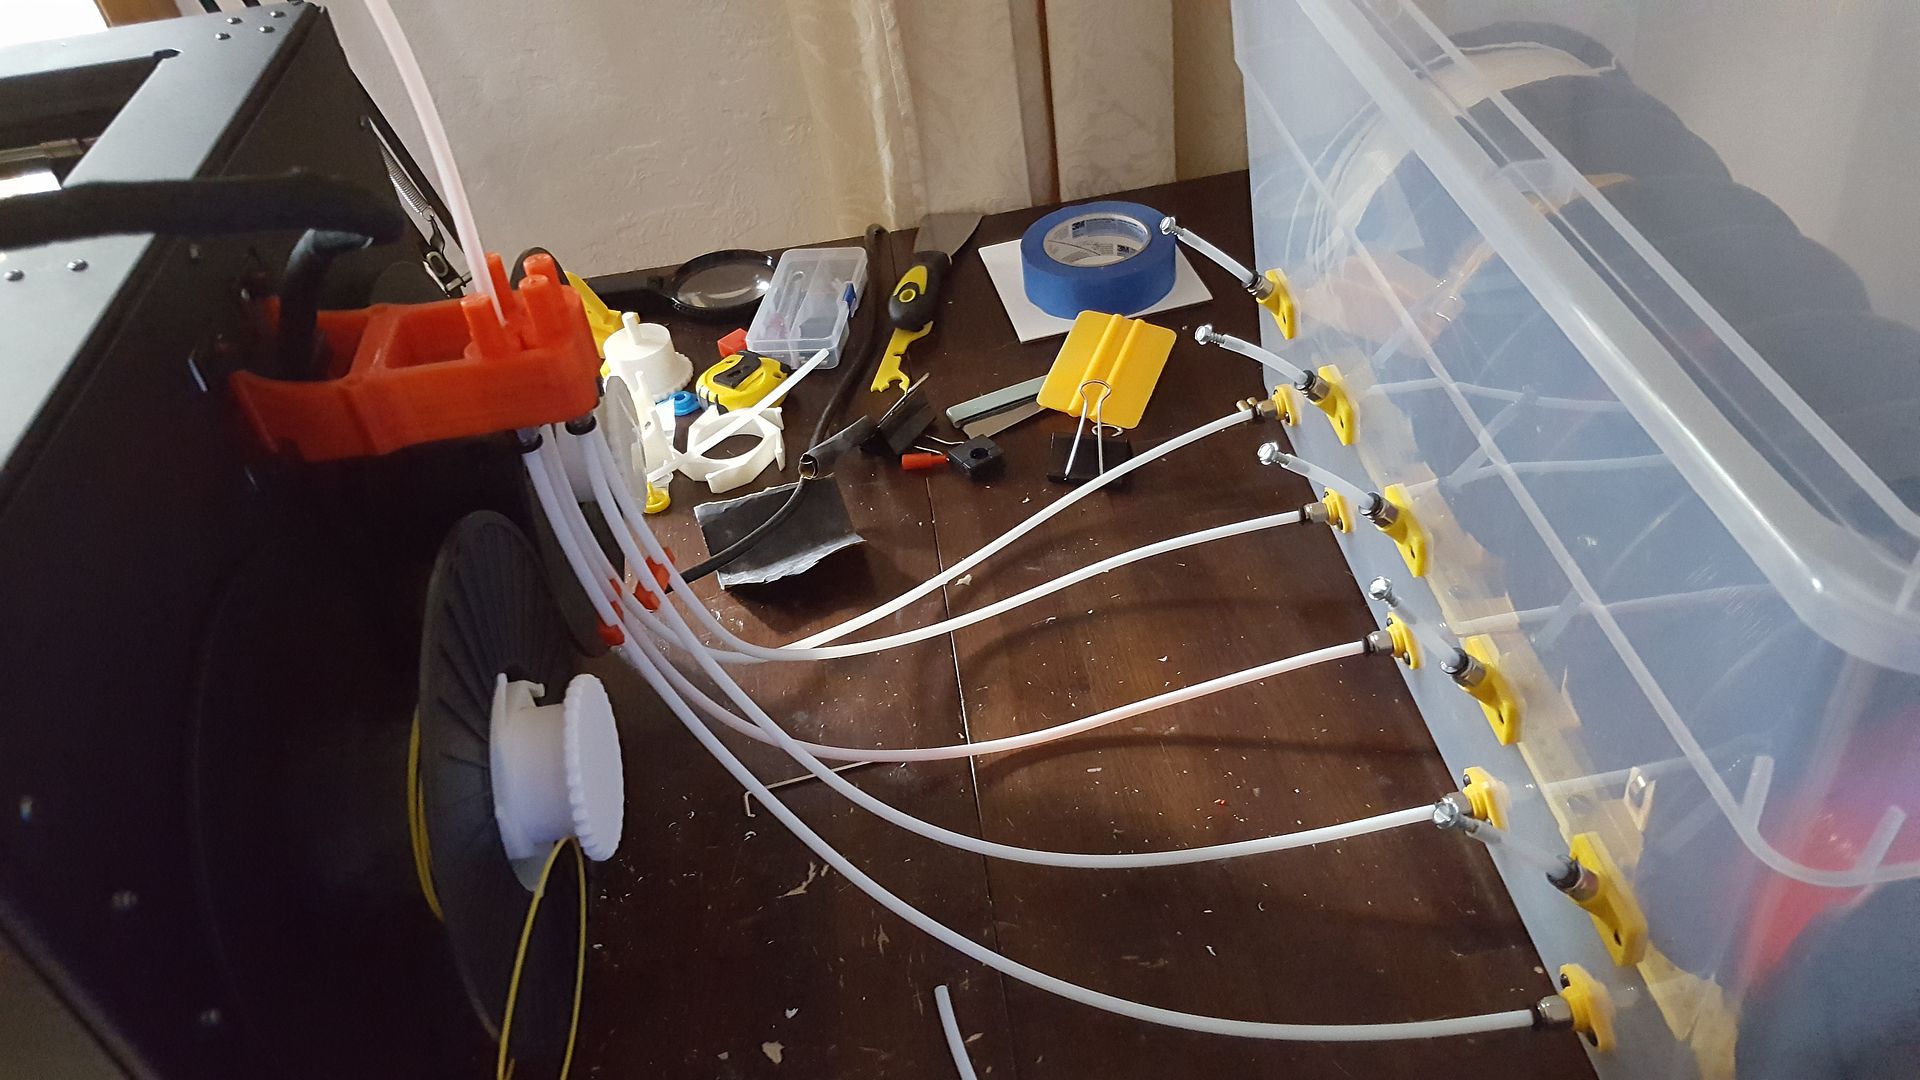
    OK!! The dry box project is now functional. The first pic is the overall setup - pardon the mess in the background. The upper filament flanges where a first design where the box was going to be below the printer and that is why they are angled up. For now it will sit behind the printer hence the lower flanges. Five rolls can be loaded at once each on its own roller base making changes easier.
    The feed tubes go into the manifold on the back of the printer. The manifold has plugs for the filament that is not in use. The filament goes up through a small hole in the plug which allows you to grab the one you want and feed it from there rather than opening the dry box.


    [IMG][/IMG]

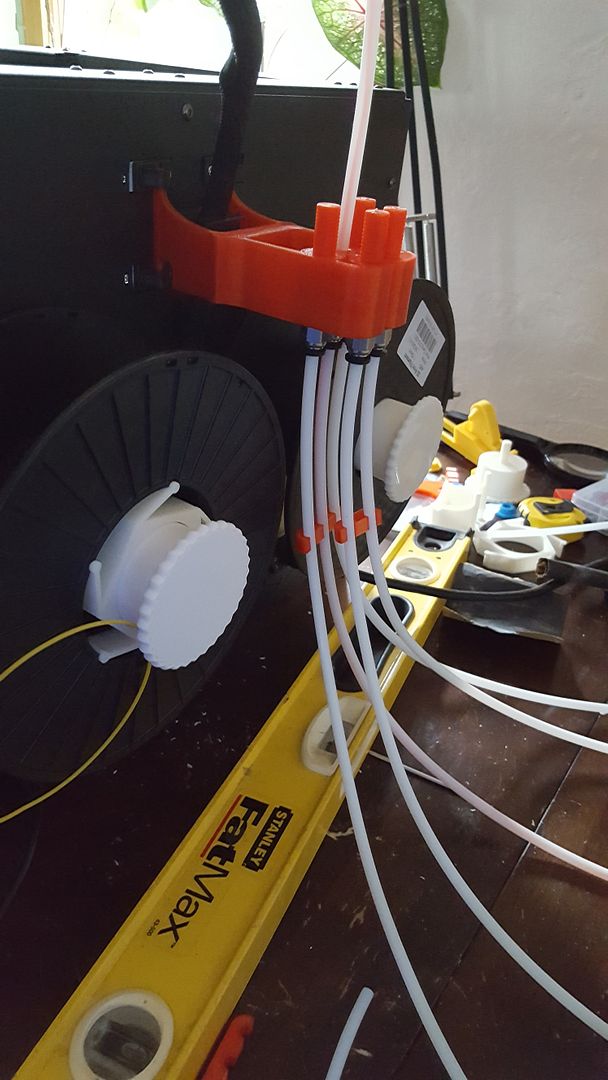
    A closer look at the manifold and the plugs. Also my first attempt at knurling.

    The tubes go in between and further out from the back of the two spools on the back of the printer allowing easy access to throw on a roll for a quick (in 3D printing terms) print.


    [IMG][/IMG]

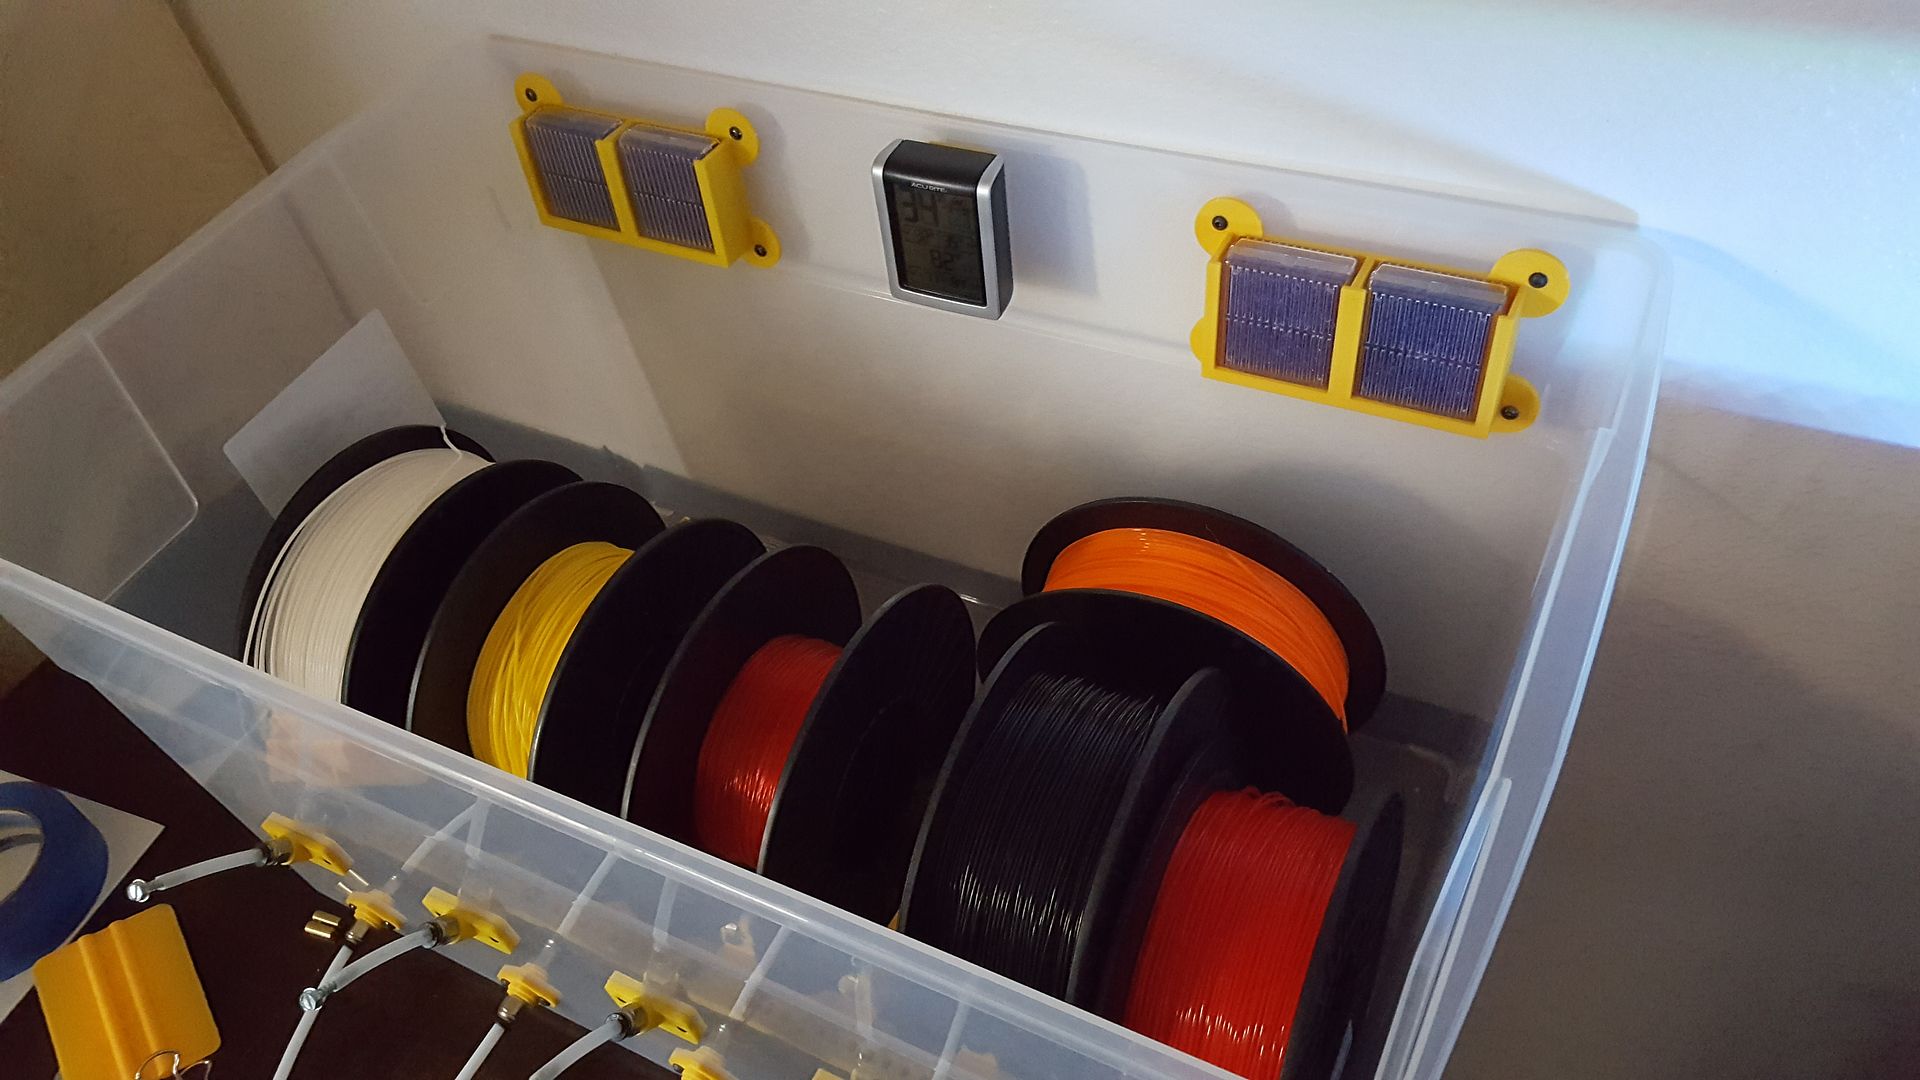
    ON the inside we have dual rechargeable desiccant packs and a temp/humidity sensor in the middle.

    Each roll is on its own roller base so change out is easy and quick. There is also storage space behind the active rolls.


    [IMG][/IMG]

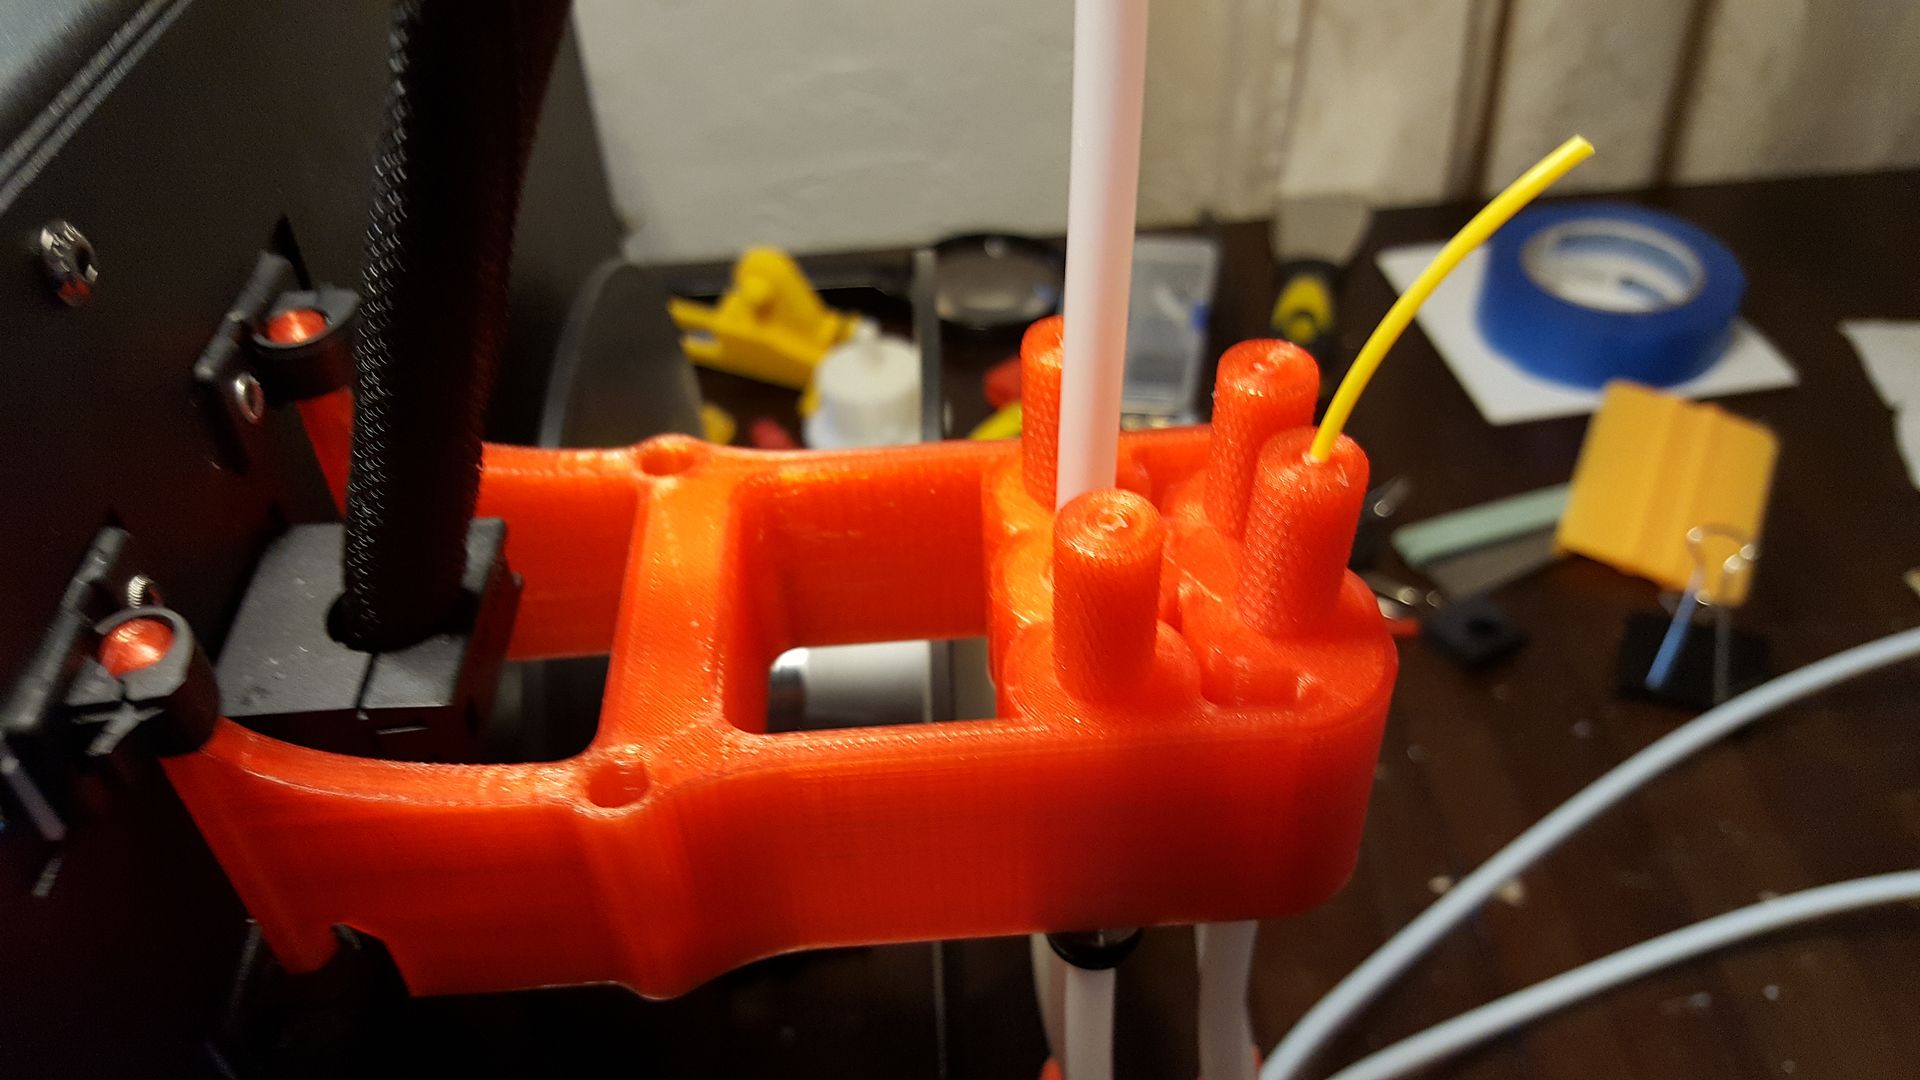
    Here is a close up of how the filament holder/plug works. I am guessing not much humidity will get past this.


    [IMG][/IMG]
  2. #2992
    Engineer
    Join Date
    May 2016
    Location
    Annapolis, MD
    Posts
    523
    Quote Originally Posted by wirlybird View Post
    OK!! The dry box project is now functional. The first pic is the overall setup - pardon the mess in the background. The upper filament flanges where a first design where the box was going to be below the printer and that is why they are angled up. For now it will sit behind the printer hence the lower flanges. Five rolls can be loaded at once each on its own roller base making changes easier.
    The feed tubes go into the manifold on the back of the printer. The manifold has plugs for the filament that is not in use. The filament goes up through a small hole in the plug which allows you to grab the one you want and feed it from there rather than opening the dry box.

    A closer look at the manifold and the plugs. Also my first attempt at knurling.
    The tubes go in between and further out from the back of the two spools on the back of the printer allowing easy access to throw on a roll for a quick (in 3D printing terms) print.

    ON the inside we have dual rechargeable desiccant packs and a temp/humidity sensor in the middle.
    Each roll is on its own roller base so change out is easy and quick. There is also storage space behind the active rolls.

    Here is a close up of how the filament holder/plug works. I am guessing not much humidity will get past this.
    W, that is looking real fine and I expect it will work perfectly. I really like the drop-in spool access that you did. I put the spools on an axle in mine which requires a much more involved process to swap in a new roll. I am considering changing to your approach.

    For future dry-boxes, I did see a new option at my local Target store that has a gasket in the lid: Sterilite 20Qt Air Tight Storage Tote:
    http://www.target.com/p/sterilite-ai...t/-/A-15066036 . There were also several other sizes at Target, here is a larger example: http://www.target.com/p/sterilite-ai...t/-/A-15079778

    Are you going to write this one up?

  3. #2993
    Super Moderator
    Join Date
    Jun 2016
    Location
    Oklahoma
    Posts
    902
    Quote Originally Posted by DaveB View Post
    W, that is looking real fine and I expect it will work perfectly. I really like the drop-in spool access that you did. I put the spools on an axle in mine which requires a much more involved process to swap in a new roll. I am considering changing to your approach.

    For future dry-boxes, I did see a new option at my local Target store that has a gasket in the lid: Sterilite 20Qt Air Tight Storage Tote:
    http://www.target.com/p/sterilite-ai...t/-/A-15066036 . There were also several other sizes at Target, here is a larger example: http://www.target.com/p/sterilite-ai...t/-/A-15079778

    Are you going to write this one up?

    I like those boxes. I looked for ones with gaskets but the ones I found, I think Target, they didn't have in store and they wouldn't ship .. so how the hell you get them was beyond me!

    They look like a flat bottom also. That was the other problem was most of the good ones had irregular bottoms which made it hard to set things in flat. That's what gave me the idea for the rail system I developed.

  4. #2994
    Engineer
    Join Date
    May 2016
    Location
    Annapolis, MD
    Posts
    523
    Quote Originally Posted by wirlybird View Post
    I like those boxes. I looked for ones with gaskets but the ones I found, I think Target, they didn't have in store and they wouldn't ship .. so how the hell you get them was beyond me!

    They look like a flat bottom also. That was the other problem was most of the good ones had irregular bottoms which made it hard to set things in flat. That's what gave me the idea for the rail system I developed.
    www.sterilite.com is the mfg's website, and they call them a "gasket box" on their site. They are available in 4 sizes. I have one of the smallest (#1932 20 Quart size) and it will easily hold 3 rolls of MG filament. They do indeed have a flat interior bottom, and aside from the lid gasket, are quite similar to the Ikea "Samla" series. Their cost at Target (where I picked up this one) are about 160% of the Ikea prices. The size of the 1932 unit is ~1/2" larger than the Samla equivalent size.

  5. #2995
    Super Moderator
    Join Date
    Jun 2016
    Location
    Oklahoma
    Posts
    902
    Has anyone done an extruder calibration? Measure 100mm of filament and see if it extrudes 100mm? S3D suggested this due to an issue I was having so just wanted opinion from the group on this.

  6. #2996
    Super Moderator
    Join Date
    Apr 2014
    Location
    KS
    Posts
    907
    Add jfkansas on Thingiverse
    Quote Originally Posted by wirlybird View Post
    Has anyone done an extruder calibration? Measure 100mm of filament and see if it extrudes 100mm? S3D suggested this due to an issue I was having so just wanted opinion from the group on this.
    That is for marlin software or repitier I think. 100mm of filament will extruded way more than 100 mm of filament.

    Best filament calibration is a 20x20x10 100% infill cube. Follow sailfish recommendations for sailfish software.

    In S3d a good starting point for extrusion volume is 90%.

  7. #2997
    Super Moderator
    Join Date
    Jun 2016
    Location
    Oklahoma
    Posts
    902
    Quote Originally Posted by jfkansas View Post
    That is for marlin software or repitier I think. 100mm of filament will extruded way more than 100 mm of filament.

    Best filament calibration is a 20x20x10 100% infill cube. Follow sailfish recommendations for sailfish software.

    In S3d a good starting point for extrusion volume is 90%.

    Ok, thanks. You may have told me that stepper calibration or this test is not needed on the QIDI/Sailfish.

  8. #2998
    Super Moderator
    Join Date
    Apr 2014
    Location
    KS
    Posts
    907
    Add jfkansas on Thingiverse
    Quote Originally Posted by wirlybird View Post
    Ok, thanks. You may have told me that stepper calibration or this test is not needed on the QIDI/Sailfish.
    Calibration is arbitrary for the most part as a lot of other settings can affect extrusion volume. It is better to go by print quality and make adjustments from there.

  9. #2999
    I have been having the same issue. I cleaned everything and replaced the PTFE, cleaned the nozzle and extruder gear as well as tightened it. Now no clicking but the filament extrudes thin. I changed out several. Using Hatchbox black right now for the last test running now. Temp 215c with 110c bed temp. Usually that is my perfect setting for this filament. My test print which usually works great still does not work. It stops laying down filament after about 3 to 4 layers.


    Quote Originally Posted by Warren O'neill View Post
    i experienced the same problem a few weeks ago.
    i took apart the drive mechanism and cleaned out the drive gear and all the scrap that had built up in there and i haven't had a problem since

  10. #3000
    Wow that is nice work. I like the setup.
    Great work.

    Quote Originally Posted by wirlybird View Post
    OK!! The dry box project is now functional. The first pic is the overall setup - pardon the mess in the background. The upper filament flanges where a first design where the box was going to be below the printer and that is why they are angled up. For now it will sit behind the printer hence the lower flanges. Five rolls can be loaded at once each on its own roller base making changes easier.
    The feed tubes go into the manifold on the back of the printer. The manifold has plugs for the filament that is not in use. The filament goes up through a small hole in the plug which allows you to grab the one you want and feed it from there rather than opening the dry box.


    [IMG][/IMG]


    A closer look at the manifold and the plugs. Also my first attempt at knurling.

    The tubes go in between and further out from the back of the two spools on the back of the printer allowing easy access to throw on a roll for a quick (in 3D printing terms) print.


    [IMG][/IMG]


    ON the inside we have dual rechargeable desiccant packs and a temp/humidity sensor in the middle.

    Each roll is on its own roller base so change out is easy and quick. There is also storage space behind the active rolls.


    [IMG][/IMG]


    Here is a close up of how the filament holder/plug works. I am guessing not much humidity will get past this.


    [IMG][/IMG]

Page 300 of 411 FirstFirst ... 200250290298299300301302310350400 ... LastLast

Tags for this Thread

Posting Permissions

  • You may not post new threads
  • You may not post replies
  • You may not post attachments
  • You may not edit your posts
  •