Results 21 to 30 of 189
Thread: Show your MODS
-
08-11-2014, 01:35 AM #21
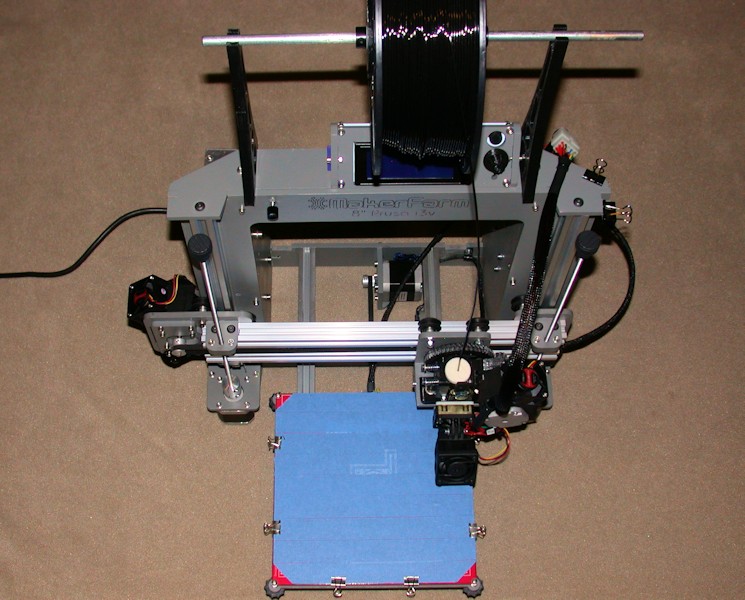
I didn't care for the add-on spool mount MakerFarm includes for the i3v, so I went with a top-side mount - http://www.thingiverse.com/thing:192510 (not my design). There are several designs that hang a spool off to the rear of the i3/i3v , but these brackets keep the weight of the spool in-line with the frame uprights. I've had three full spools on this mount with no issue. The 1.75mm filament clip I found that fits on all three of the different types of spools that I have is http://www.thingiverse.com/thing:181356.
Rather than repeat them here, all my details for "modding" the 8-inch i3v kit into a fairly refined printer are in my build thread at MakerFarm 8" i3v Prusa build by Printbus.

Last edited by printbus; 05-29-2015 at 11:37 AM. Reason: migrated to offsite image storage due to 3DPrintBoard issues
-
08-11-2014, 10:11 AM #22
-
08-11-2014, 10:48 AM #23
I was going to ask about the sleeves on the cables. Glad you mentioned the name of it. It looks nice.
I also see a new connection method for the Z Rods to the stepper motors. Is that a standard part for the i3v or a mod? I find that my rubber connections are prone to slipping. They do provide some protection in a head crash as they will release and push off, but as even the lightest lubrication eventually makes its way to the bottom, it discolors in the vinyl tubes, so I know it's there. They aren't as tight as they used to be.Bambu P1S/AMS
NVision4D http://nvision4d.com
-
08-11-2014, 10:59 AM #24
I replaced the vinyl tubing with aluminum Z couplers for the reasons you mentioned. Oil was getting down into the tubes and I figured it would eventually cause a problem. Also, the tubes don't really center the threaded rod up very well, so the Z rods wobble when printing.
The coupler is designed to allow the shaft to flex as it rotates, but it also essentially suspends the weight of the X assembly on an aluminum spring, and it rings as the Z axis turns. They're really designed to be used with ball screws that have thrust bearings in the mounts. I went ahead and slid the threaded rods all the way down so they actually contact the motor shaft, and this stopped the ringing noises.
I'm not worried about a crash, because the nuts will ultimately pop out of the traps, limiting the downward force that can be applied.
-
08-11-2014, 11:24 AM #25Bambu P1S/AMS
NVision4D http://nvision4d.com
-
08-11-2014, 11:52 AM #26
The braided sleeving is great, but it can be a pain to work with. Unless it is cut with a hot-knife machine, the cut end on many kinds will tend to unravel as you do anything with it. TechFlex is a company name, with a wide range of products. I highly recommend searching specifically for the TechFlex Clean Cut material. It tends to unravel less when cut with just a scissor. I purchased a couple of different sizes from eBay for using in my build. I found the 1/4-inch size especially good at remaining intact.
-
08-11-2014, 12:02 PM #27
Good tip. I'll have to try the clean cut.
I've been using the cheap stuff, sold on eBay by seller "furryletters". It can unravel, but I just cut it with scissors and try to be careful with it. I secure the ends with heat shrink and zip ties. Another approach is hot glue lined heat shrink. I've been known to cut a sliver off a hot glue stick and shove it in the heat shrink to help secure the sheathing so it doesn't pull out. Zip ties are easier.
One other tip: the sleeving melts very easily. Be careful when shrinking the tubing. I actually use a hot air solder rework station, which is way overkill, but really easy to control.
-
08-11-2014, 12:03 PM #28
-
08-11-2014, 12:06 PM #29
The v-slot is nice because it's quiet. It doesn't resonate and since it's screwed to the frame, you don't have the vibration of the rod ends clamped in the X assembly. You also don't have to worry about lubrication.
Is that worth $200 to you? It was to me.
It also gave me the chance to lacquer the frame black.
-
08-11-2014, 12:38 PM #30
Oh man, I had forgot about that and it's good you pointed that out. You definitely don't want to try and use a lighter on the heatshrink ends with this stuff. I've melted several braided sleeves that way. I think I've even melted a few using the usual paint-stripper kind of heat gun that big box stores sell when I wasn't careful with it. I forgot about it since a number of years ago I splurged for a 250W Weller 6966C hot air gun. It's specifically intended for delicate electronic stuff like working with heatshrink. That was definitely one of my smarter purchases for my electronics hobby work.
Last edited by printbus; 08-11-2014 at 12:42 PM.


 Reply With Quote


Kickstarter campaing LEGENDARY...
Today, 08:02 AM in Free Self Promotion