Results 11 to 20 of 173
Thread: My First CoreXY
-
10-08-2020, 11:36 AM #11
lol well the pet-g I was playing with was creality.
Nothing wring with their parts - it's just the way they bolt them together that's so awful :-)
You do know that even for PEEK you 'only' need a bed that goes to 250c ?
400c would seem like overkill - even for you :-)
As far as functional parts goes - nope pla is a lot more rigid, a lot harder and won't be used for anything that gets hot. Petg is really soft and flexible by comparison.
Also the layer bonding on pla is at least as good as pet-g.
The 20x20 extrusion I made with pla was impossible to break just using your hands.
My dad did manage, but only by using a metal rail as a lever (a man who see's the phrase: 'virtually indestructible' as a challenge rather than a statement). But even then it did not snap cleanly across layers, but at a diagonal. And those I rattled off at 0.4mm layer and 150mm/s speed.
Not maiing a corexy - thinking about making a tiny belt machine :-)
I still have a bunch of miniature stepper motors.
And i figure I can make the triagonal (triangular ? lol) frame ends in one piece on the sapphire. Rigid they will be.
I figure I can probably make everything needed without any metal frame pieces. It's not go9ing to be a speed demon.
Any metal necessary i can get in aluminium. Oh yeah and i can cut my own acrylic - keep forgetting about that lol
Plus I do have abunch of 20x20 and 20x40 aluminium extrusion in my original diode laser engraver. As I now have a modified k40, the diode frame and motors are basically there for parts.
Just looking at the actual belt machine, it seems pretty simple. dual z screws for the up and down z-axis, simple belt setup for the x axis. The firmware is available. The black knight project (something like that anyway) - WHITE knight :-)
https://www.thingiverse.com/thing:3324280
That's a big one 400x400xinfinity
I'm thinking a 300x100xwhatever - height really isn't important, when you can reorient and print lengthwise.
It'll be primarily for mass produced doodads, doohickeys and whatnots. As well as any really long bits - like sword blades for cosplayers etc.
the turbo skr boards have all the right connections and should take the firmware. I think I have just about everything else in here somewhere. The belt material is the only real issue.
The only slightly tricky bit is 'bed'calibration - which i suspect would make more sense adjusting the extruder height rather than adjusting the bed.
Really just an idea at the moment :-)Last edited by curious aardvark; 10-08-2020 at 11:41 AM.
-
10-08-2020, 03:49 PM #12
-
10-09-2020, 10:07 PM #13
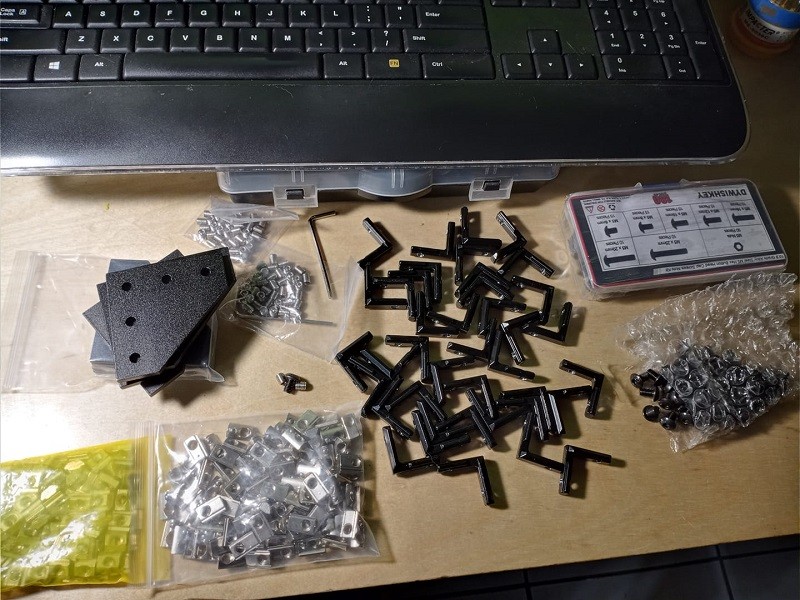
Well the parts have started to trickle in. I am still waiting for the printer but I got some of the hardware I ordered from Amazon. I have watched the build video from TronXY meticulously and many times and didnt see some of the hardware I am familiar with using on aluminum extrusion so I added that myself. The corner supports are for the bottom and maybe the top. The sides will be open squares with no corners. It is gonna look flimsy. I'm not even gonna use them angled side supports. But I am gettting ahead of myself. Check out this hardware. Aside from the corner supports that go inside the extrusion and a bunch of m5 screws There is also a bunch of sliding T slot nuts for all the horizontal beams and spring loaded sliding T slot nuts for the verticals. I do not use drop in nuts..

-
10-10-2020, 09:53 AM #14
what you got against drop in nuts ?
I actually make my own for non critical add-ons and mods and slot a 3mm nut into the plastic part :-)
The tiamet diamond dust filament makes fantastically strong drop in nuts. And polycarbonatre would as well.
have to try that :-)
the spring loaded ones are a good idea. the main hassle with pre loaded nuts is the fact that they slide all over the bloody place.
So what high temp filaments are you looking at ?
And would some of these applications be car related by any chance ;-)
Everything I can think of needs a pretty hot enclosed build volume.
The minifactory peek printer basically prints inside a hot oven.
-
10-10-2020, 11:39 AM #15
Ya that's pretty much what I'm gonna create. As much of the electronics and components as possible will be outside the enclosure. Everything inside must be able to handle the heat comfortably. It is gonna be the centerpiece in my living room to boot so I can not have this huge structure just heat soaking my home so I have been pondering a double enclosure. That is transparent walls placed around the bed and then around the outside of the frame of the structure. There is room for me to do this and I am not sure if I will but it would be a novel way to keep some of the heat off the outside walls of the enclosure. And I am most definitely aiming to print parts I can directly bolt to an engine. Like my own custom engine cover. With my logo on it that I can sell on forums for those who have modded their Corvettes. And If i can design and make a few things to bolt to an engine maybe I can go setup a store on etsy.com and start linking everyone to it. And I did order that 510x510x4mm carbon silicone glass Ultrabase Creality build surface with the 400c support. It is coming from China so it will be a while but I am very excited to have this extrelemy flat and large build surface. The TronXY has the worst reviews on it's heated bed. Complaints the aluminum is bent right out of the box, the PLA temps melt the TronXY build surface, and complaints about a 10 minute heating time are some of the things I have to correct if I hope to get decent print quality out of this thing.
-
10-11-2020, 12:49 PM #16
interesting.
At over $300 for a 500gm roll - PEEK is probably more expensive than just about any metal cover around.
have you costed this out at all ?
And if not peek - what else is there that's hitemp ?
(a few minutes later)
hang on, in your living room ?
How are you still married ?
;-)
-
10-11-2020, 06:17 PM #17
With this size extrusion if you are using drop in nuts you are sacrificing bolt diameter and contact patch for ease of assembly. If we are using printed parts then we make this problem worse. But if we use sliding T slot nuts then we do not need the thickness of the nut to be able to pass through the hole in the extrusion and instead of 4mm we can use 5mm hardware and enjoy twice the surface area biting on the extrusion..

-
10-12-2020, 12:26 PM #18
I honestly did not know how much that filament is. But since I am building I am building for it. Whether or not or how much I use that filament has yet to be seen and there is a good chance I will just make plugs out of PLA or PETG to use as a mold to then make parts out of carbon fiber. So the big takaway here is I am building for high temp but very much look forward to burning through an aweful lot of the $20 ebay spools of PETG. I do find it heart wrenching that you say the high temp filament is expensive but it does make sense. The cheapness of the ebay filaments and the ability to tune the open source printers for that cheap filament has really empowered me to play a lot here and just keep my printers running. failed prints are really gonna hurt at that price. And ya the wife does not like my printers. I put the silent drivers in there and tell her I dont hear a thing but the blue geeetech i3 printer I moved to our bedroom and it starts fights when I run it while she needs to sleep.
-
10-12-2020, 07:10 PM #19
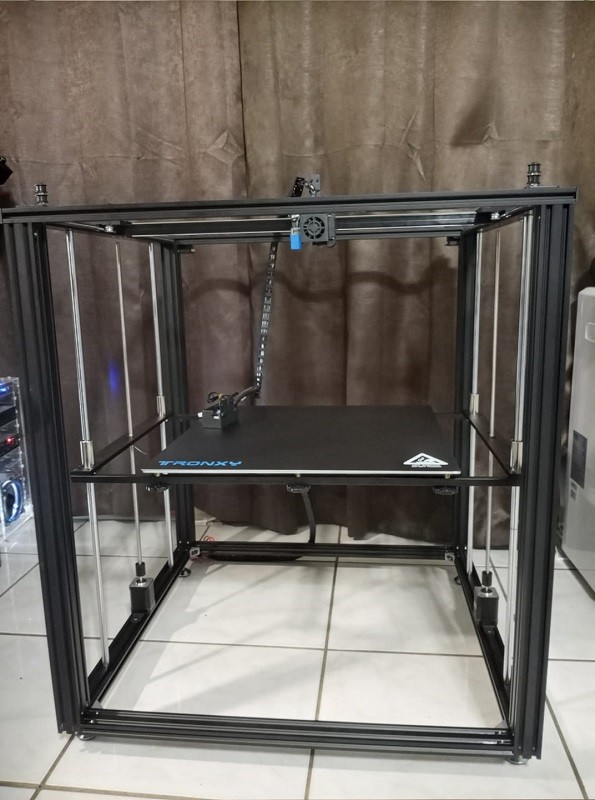
I have the printer in my possession since the weekend. I have the basic structure together but have stopped short of mounting any of the electronics. I want this machine to be able to stay on without driving up the power bill too much and I want it all to be reliable. So I am dumping the 500 watt 24v cheap power supply that came with the printer in favor of a smaller output and much more efficient MeanWell HRP-450-24 power supply. It's datasheet is right here: https://www.meanwell.com/productPdf.aspx?i=464 . I can get away with a smaller power supply because I am switching to a 120v bed heater. For this effort I have sourced a Crydom d2425 solid state relay along with a heatsink to mount it to and this here silicone bed heater from Amazon: https://www.amazon.com/KEENOVO-Indus...06Y4JBW7S?th=1 . All of these parts along with the build surface are going to show up at some point or another. The build surface is coming from China so it might be a while. No worries. I am in no rush and this build happens at it's own pace as always. I also have a BLTouch v3.1 coming because I seriously doubt the TronXY Z sensor is gonna read the 4mm thick glass bed. And I have decided to dump the notion of reprap firmware and the duet stuff For Now. I might go after it in a rework later but for now I just want to go with what I already have had success with. So the plan for now is the SKR PRO with TMC2226 drivers and a tft70 v3.0 7" touchscreen. The 32 bit controller in the tft70 is the same 168mhz chip that drives the SKR PRO. And I'm gonna list some of these new tronxy electronic parts on ebay or let go or somewhere. Also this titan knockoff extruder has to go.
Last edited by AutoWiz; 10-12-2020 at 07:31 PM.
-
10-12-2020, 08:58 PM #20


 Reply With Quote


Kickstarter campaing LEGENDARY...
Today, 08:02 AM in Free Self Promotion