Results 151 to 160 of 257
-
11-25-2014, 08:00 PM #151
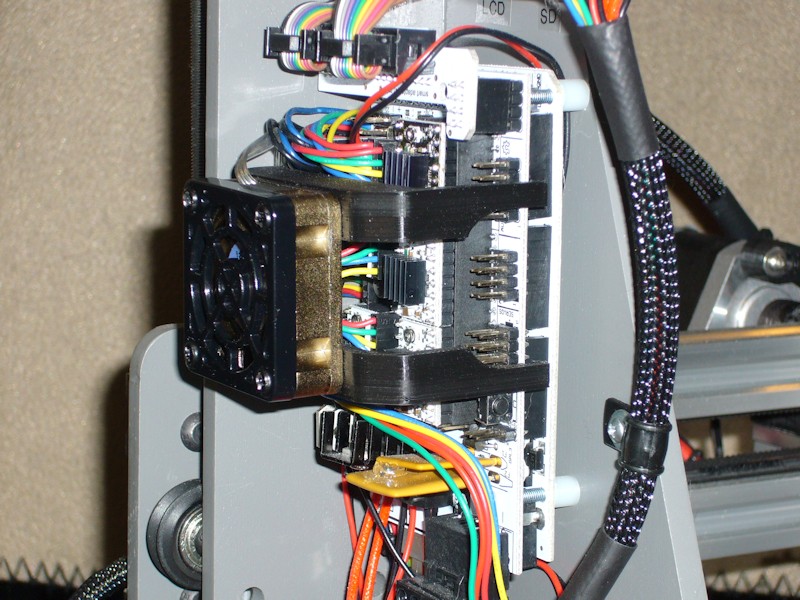
RAMPS STEPPER MOTOR DRIVER COOLING FAN
I had printed a pair of these RAMPS 40mm fan brackets a while ago, and finally got around to installing the fan. There are various similar brackets on thingiverse, but I liked how the thinner legs on this one had less of a chance at interfering with something on the RAMPS board.
I hadn't noticed any issue with the stepper motor drivers running hot, so this is just a preventive measure. The fan I used is a Silenx 40mm fan I had from experimenting with various print cooling schemes. At 14 dBa for 5 CFM airflow, it is extremely quiet. The fan was installed so that the airflow direction is down onto the board. A fan guard was installed simply because I had one available.
Since I have a heat bed relay, there isn't much heat being dissipated in the MOSFET for the RAMPS D8 output. So, I positioned the fan assembly above the center of the four stepper driver boards.
Last edited by printbus; 09-23-2016 at 11:00 PM. Reason: deleted old broken thumbnail link
-
11-30-2014, 09:25 PM #152
NOV 2014 BENCHMARKS USING MAKE:2015 TEST MODELS
Here are details related to my attempts at printing the test models used in the MAKE: 2015 Shoot Out of several 3D printers. Make: has provided the test models and a partial explanation on the performance grading process at http://www.thingiverse.com/thing:533472. Note that the scoring criteria currently provided on the instructions page at Thingiverse totals differently than the scores in the Make: Shoot Out comparisons.
The intent of the Make: Shoot Out was to evaluate the results of experts running standardized prints using the default software and recommended settings suggested by the respective printer manufacturers. My intent was different. I wanted to evaluate how well I could print with the dialed-in MakerFarm printer I have, my software suite, and the tweaking of print settings that my level of experience would know to do. I also wanted to use printing these test models as a way to learn. So, when I had an idea on how to improve on print results, I ran another with different settings. For example, I took great liberty in deciding when to apply print cooling airflow, often manually adjusting the airflow throughout a print. After all, that is how I go about printing.
All test prints were performed through Repetier-Host v1.0.6 using the integrated Cura Engine slicer. The final prints used MakerFarm black 1.75mm PLA filament. The extruder steps per unit was calibrated prior to the tests, and Cura was adjusted for the measured diameter of the filament. Elmer's Washable School Glue Stick (disappearing purple) and a 70-degree C bed were used for adhesion. Due to the low bed contact area of the bridging performance test, a brim was added to that print as a precaution. All prints started with a 220-degree nozzle temp. That may seem high for PLA, but this PLA seems to prefer it. I've seen this filament stop extruding when I've dropped to "normal" PLA temperatures. On test prints where I knew I would have print temperature issues, I manually decreased the nozzle temp to 215 degrees after initial layers were down.
NOTE: After initial completion of the prints in yellow ABS, I realized that the Combine Everything (Type A) option was enabled in the Repetier-Host Cura settings. I believe this is a default setting, likely invoked when I recently upgraded Repetier-Host. Unfortunately, that setting seemed to have a bad effect on print quality. So, the prints have all been redone. Information here and in the subsequent post has been revamped to reflect the final prints.
For my future reference as much as anything, here's a summary of key configuration aspects in place as of these updated prints. Note that this is simple text with comments; it is NOT code or an ini file that can be used as is. I'm sure there'll be a point where I look back at these settings and have a good laugh. They're just where I'm at today.
DIMENSIONAL ACCURACYCode:Printbus configuration summary 3 Dec 2014 *** MARLIN DETAILS *** dacb fork for MakerFarm as of Sept 28 2014; my personal motion related changes: HOMING_FEEDRATE {100*60, 100*60, 100, 0} mm per minute DEFAULT_AXIS_STEPS_PER_UNIT {80, 80, 4000, 900} DEFAULT_MAX_FEEDRATE {150, 150, 2, 22} mm per second (Z motors observed to skip at Z much more than 2) *** REPETIER-HOST v1.0.6 CONFIG PRINTER SETTINGS - Printer dialogue *** Travel Feed Rate: 6000 mm/min (100mm/sec) Z-axis Feed Rate: 100 mm/min (1.67mm/sec) Manual Extrusion Speed: 2 to 5 mm/sec (120 to 300 mm/min) Manual Retraction Speed: 2 mm/sec (120 mm/min) *** REPETIER-HOST v1.0.6 CONFIG PRINTER SETTINGS - Extruder dialogue *** Number of Extruder: 1 Extruder 1 diameter: 0.4 mm *** REPETIER-HOST v1.0.6 CURA ENGINE - Print Speed & Quality dialogue Print speed: 40 to 100 mm/sec (this is available range; actual print speed set by slider in print settings) Travel speed: 100 to 150 mm/sec First layer speed: 30 to 50 mm/sec Outer perimeter speed: 30 to 80 mm/sec Inner perimeter speed: 40 to 80 mm/sec Infill speed: 60 to 80 mm/sec Layer height: 0.2 mm (only a 0.2mm quality has been defined) First layer height: 0.35 mm First Layer Extrusion Width: 100% *** REPETIER-HOST v1.0.6 CURA ENGINE - Print Structures dialogue Infill shell thickness: 0.8 mm Infill Top/Bottom Thickness: 0.95 mm Infill overlap: 10% Infill pattern: Automatic Infill Solid Top and Solid Bottom: both checked Skirt Line Count: 2 Brim Width: 3 Skirt Distance: 3 mm Minimum Skirt Length: 150 mm Raft settings (undetermined; raft never used) G-code Flavor: RepRap (Repetier/Marlin/Sprinter) *** REPETIER-HOST v1.0.6 CURA ENGINE - Print Extrusion dialogue Spiralize Contour: unchecked (have not seen good results with this) Minimize Crossing Perimeters: checked Enable Retraction: checked Retraction speed: 10 mm/sec Retraction distance: 1.5 mm (but still seeing very fine strands remaining) Minimum travel before retract: 4 mm (depends on print) Minimum Extrusion Before Retract: 0.02 mm (depends on print) Z Hop: 0 mm (Z hop adds considerable print time on a lead screw system) Cut Off Object Bottom: 0 mm Nozzle Diameter: 0 mm (0 means use value from printer settings) Multi Extruder Settings: (undetermined; multiple extruders not present) Cooling fan full at height: 0.5 mm (applies only when print settings has cooling enabled) Minimum speed: 0 mm/sec (print dependent, varies with layer size and cooling approach) Cool head lift : unchecked (print dependent; often used on very small prints to help maintain a minimum print speed) *** REPETIER-HOST v1.0.6 CURA ENGINE - Print Advanced dialogue Mesh Errors: All unchecked (Combine Everything type A observed to have bad effects) *** REPETIER-HOST v1.0.6 CURA ENGINE - Filament dialogue Filament diameter: 1.74 mm (filament dependent) Filament flow: 100% Print emperature: 220 degrees C (filament dependent) Bed temperature: 70 degrees C (filament dependent) Cooling Min Fan Speed: 5 % Cooling Max Fan Speed: 25 % Minimum Layer Time: 2 sec (print dependent; varies with layer size and cooling approach) *** REPETIER-HOST v1.0.6 CURA ENGINE - Print Settings Adhesion type: none (print dependent; Brim used on prints with low bed surface area) Quality: 0.2 mm (only a 0.2 mm quality has been defined) Support type: none (print dependent) Speed: Slider usually set for 75mm print speed; this results in outer perimeter speed 59 mm/sec and infill speed 71 mm/sec Infill density: 25% (print dependent after gcode evaluation in gcode.ws viewer) Enable cooling: unchecked (manual controls normally used for varying print cooling speed) Filament settings: Extruder 1 (set to whatever filament definition is to be used)
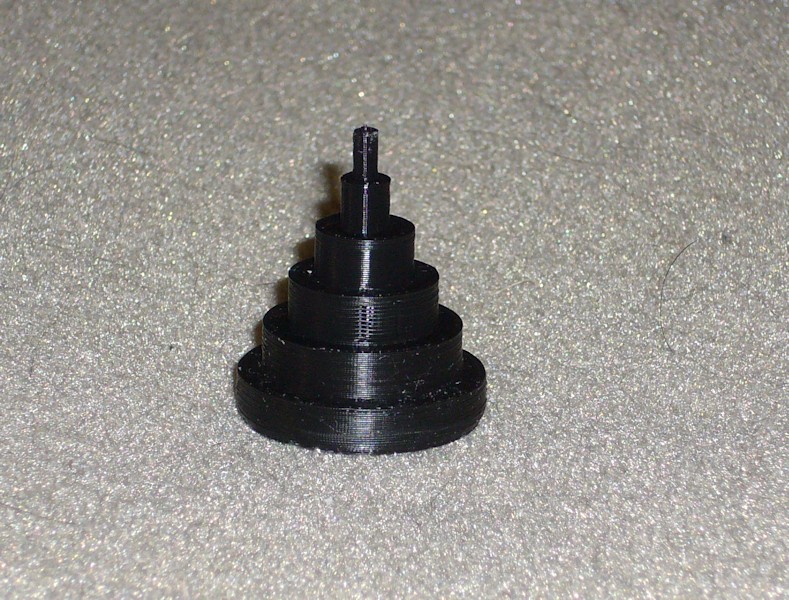
I found it easy to get good results from this one. Airflow from the print cooling blower was applied throughout the print, even though it would mostly only be required to ensure a clean uppermost post. Dimensional accuracy and X-Y difference lead to a score of 5 out of a possible 5.
OVERHANG PERFORMANCE
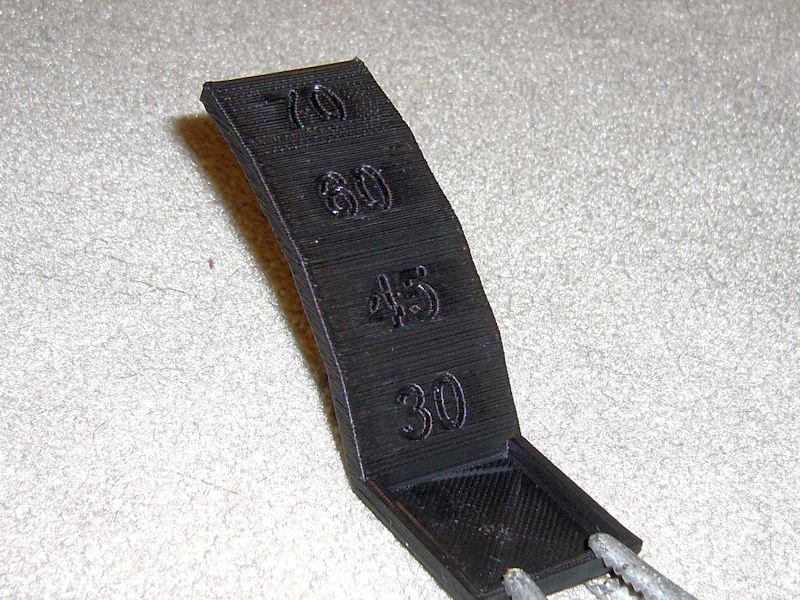
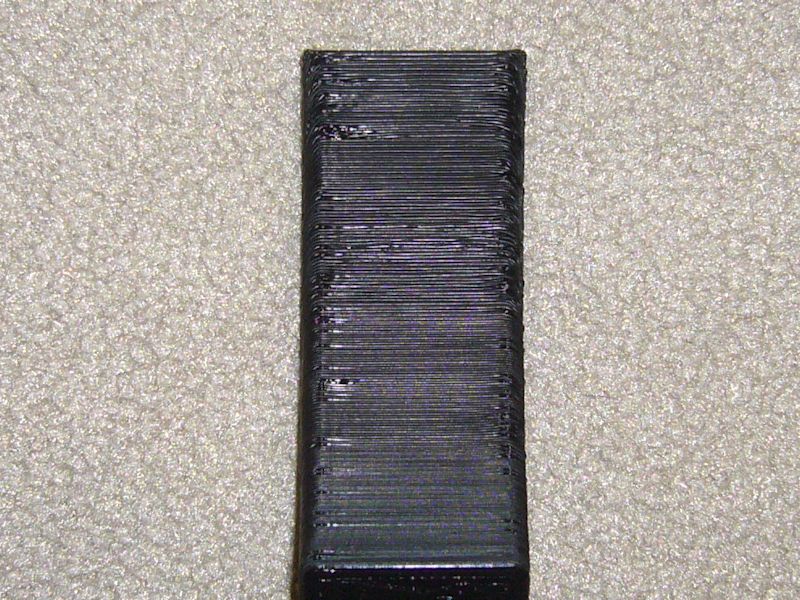
I ended up printing this multiple times, with no dropped filament on any print. The Make: scoring criteria is vague on whether the variances on the top face or the underside face are what is important. All my prints had fairly consistent appearance across all angles viewed from the top. I took on improving the underside appearance as a challenge. The underside appearance varied significantly with print cooling airflow. The best results were obtained with the print oriented so that airflow is applied on-edge to the arch, with the amount of airflow manually incremented at each angle until the blower was running at 100% for the 70-degree slope. My rationale for the airflow orientation is that the air coming out of the cooling blower is very focused, and orienting the print so that airflow hits the wider print face or underside was actually leaving much of the print outside the airflow as the nozzle moved around the layer being printed. With no dropped filament and no discernible difference across the angles on both the top and underside faces, I score this a 5 out of 5.
FINE POSITIVE SPACE FEATURES
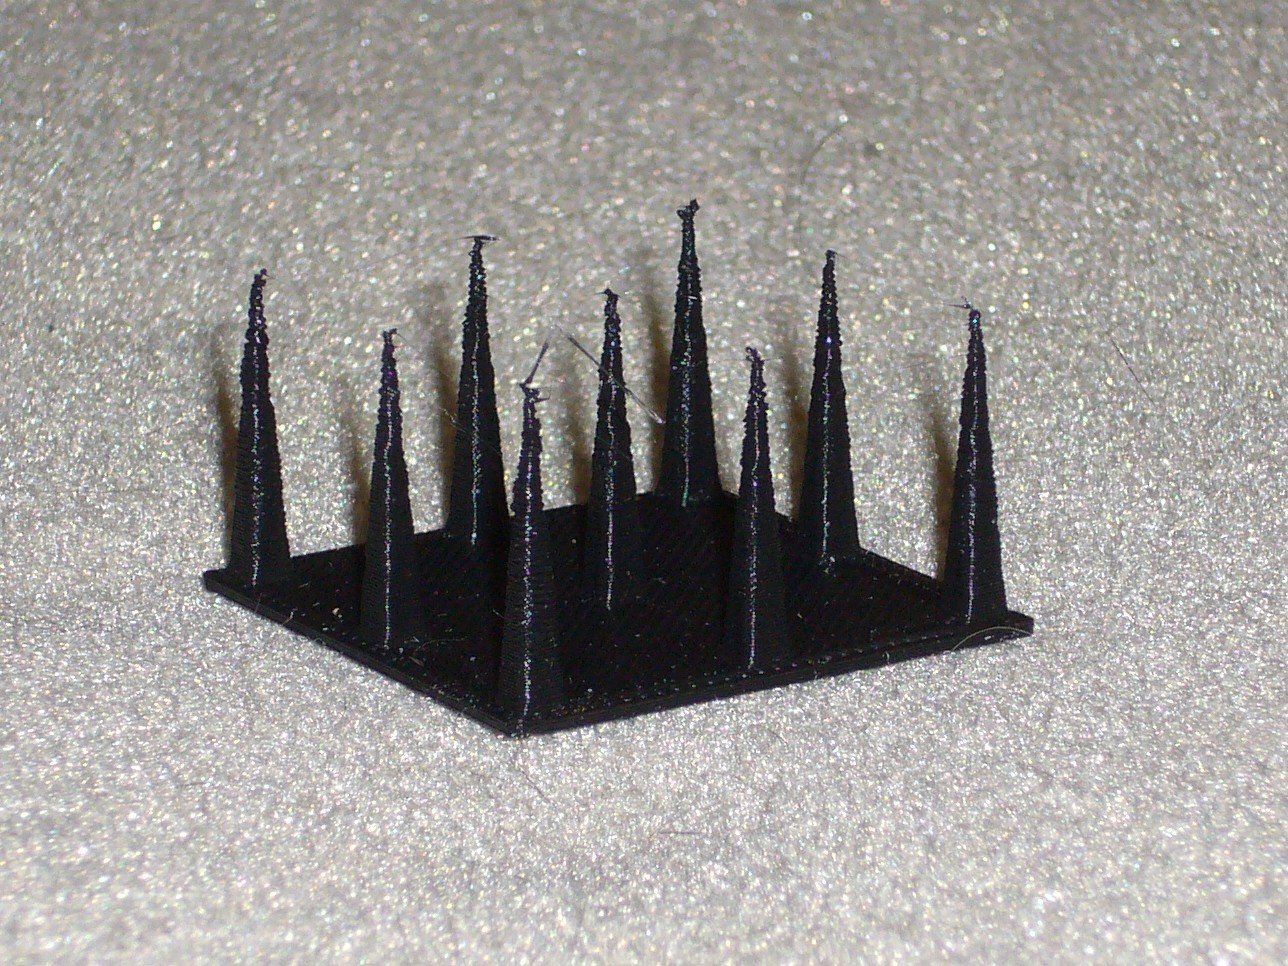
A lot of factors came into play on this model. The spires are 15mm apart, so my typical setting of 4mm for minimum travel before retraction was fine. The tips of the spires narrow to 0.4mm, so I ended up tweaking the minimum extrusion before retraction down to the 0.02mm default Cura setting (I've been printing with this at about 1.2mm). Then, the retraction distance was tweaked to minimize remaining stranding between spires - I ended up at 1.5mm. Print cooling airflow was used to help maintain the shape of the spires. Quality of the very tips of the spires was also improved by effectively removing the minimum layer print time constraint, something only possible with the use of the print cooling airflow. The final print had only a few extremely fine strands between some spires that might have been removed with an additional reduction in retraction distance. Presence of the strands lead to a score of 4 out of a possible 5.
MECHANICAL RESONANCE IN X-Y
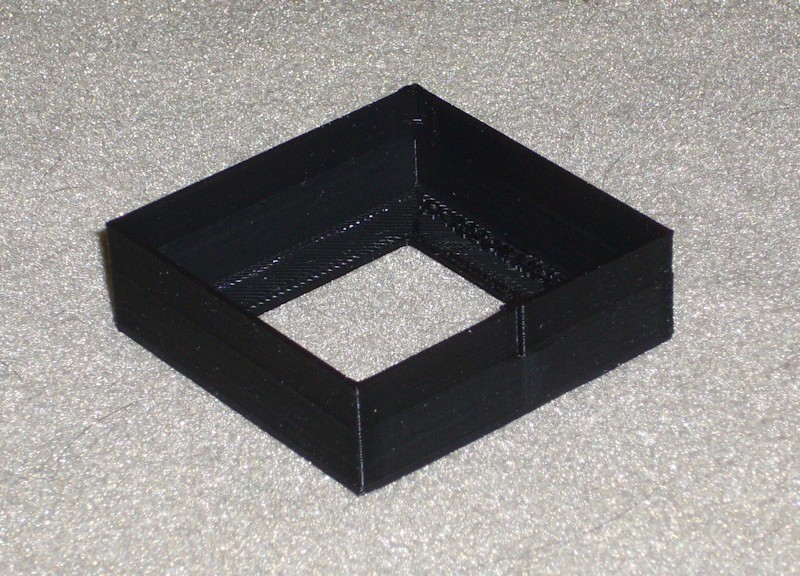
The step and notch on the front wall was troublesome in my initial round of prints. Multiple attempts at the print all led to more of smoothed over bump than a step and a notch. Unchecking the Cura Combine Everything Type A mesh correction that I didn't realize was enabled seemed to be what fixed that. The step on the inside of the print is now pretty clean, as is the notch on the upper half of the outside. Without a perfect print to compare to, I don't think I see any ripple on print corners or at the notch, so I give the final print a 2 out of 2. Printing again with infill percentage set to 0 would eliminate a very slight amount of a repetitive vertically oriented pattern showing under the right light on the top half of one wall.
Results for the Mechanical Resonance in Z, Negative Space Tolerances, and Bridging Performance tests are in the next post.Last edited by printbus; 05-02-2015 at 10:38 PM. Reason: migrated to offsite image storage due to 3DPrintBoard issues
-
12-01-2014, 12:17 PM #153
NOV 2014 BENCHMARKS USING MAKE:2015 TEST MODELS - continued
Results for the Dimensional Accuracy, Overhang Performance, Fine Positive Space Features Performance, and Mechanical Resonance in XY were discussed in the prior post.
MECHANICAL RESONANCE IN Z
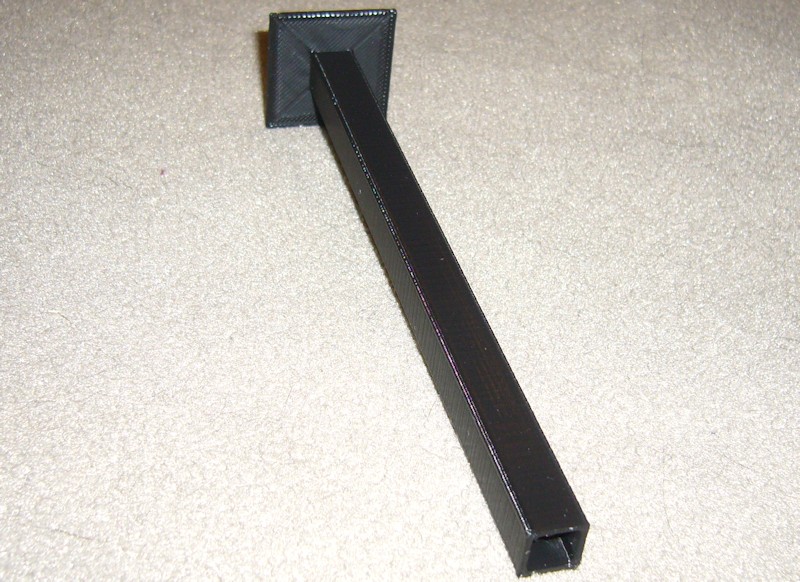
My initial round in ABS didn't fare well, possibly because as the column got taller, I could see the print moving as the nozzle moved around each layer. The final PLA print didn't have that problem and came out very clean throughout the entire column, with no discernible difference between the bottom and top of the column. This was also printed without a minimum layer time constraint, with cooling airflow applied, and zero infill to eliminate bits of infill that analysis in gcode.ws indicated would appear between the inner and outer walls. Scores a 2 out of 2.
NEGATIVE SPACE TOLERANCES
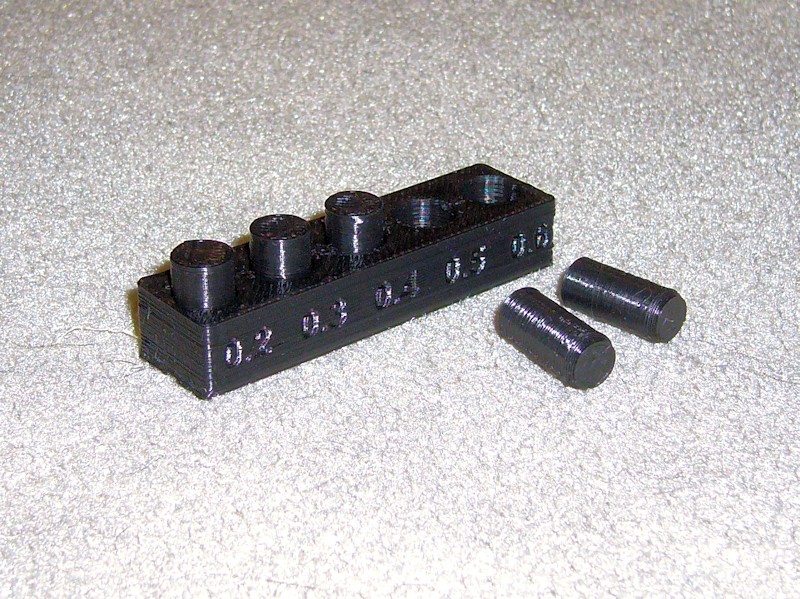
On the initial ABS print, I could remove three of the pins. On the subsequent PLA print, I could only remove two. Work remains to figure out whether this can be improved through Cura settings. This only scores 2 out of 5.
FOLLOWUP COMMENT: With Slic3r, I obtained a print with one additional peg loose. With Simplify3D, the print had four of the five pins removable.
BRIDGING PERFORMANCE
This model surprised me in both the ABS and PLA prints. I expected very poor results since Cura provides no settings specific to bridging. While there a couple of droopy ones, all spans are intact. The drooping exceeds 2mm, so this gets a 4 out of 5. Not bad for a slicer that most view as incapable of bridging. This model was printed with a brim to ensure bed adhesion. A hefty amount of print cooling airflow was applied, with the print oriented so that the airflow was in-line with the spans.
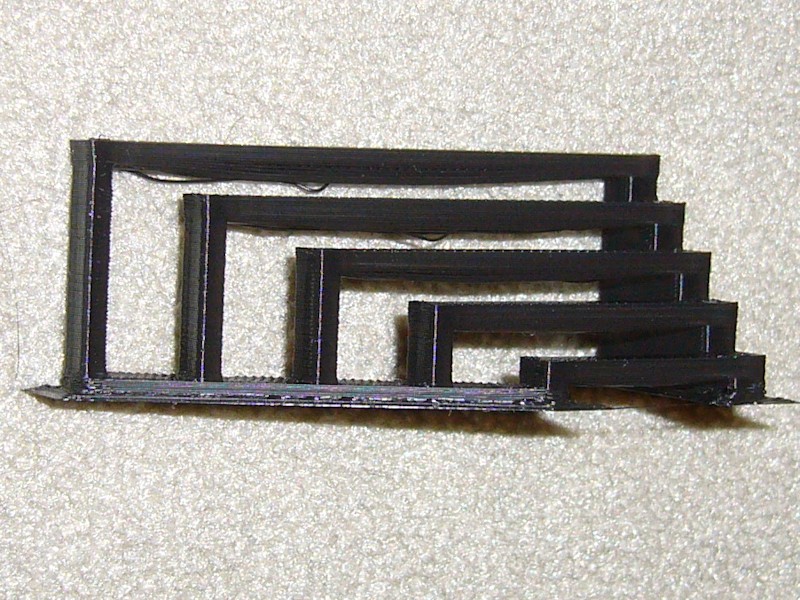
RESULTS SUMMARY
My assessment of the final prints totals to 24 points out of a possible 29. The biggest hit is the loss of three points since only two pins could be removed in the Negative Space Tolerance test. Not messing around with eliminating the fine strands left on the Fine Positive Space Features Performance test cost a point. And I'm very happy with only losing one point in the Bridging Performance test.
Note that you can't directly compare these totals to the results in the Make: Shoot Out article. Inexplicably, the article uses a different scoring structure than provided in the Thingiverse instructions for the test models. I also wish that Make: would have provided photographs of some of the scoring results in order to improve consistency in the assessment results.Last edited by printbus; 05-02-2015 at 10:43 PM. Reason: migrated to offsite image storage due to 3DPrintBoard issues
-
12-01-2014, 06:40 PM #154
This is really good. I hadn't seen these tests. Since I'm at the tail end of finalizing my dual Hexagon rig (thanks...clough42) and still tweaking it's a perfect time for me to do these test. I'll do so over the next few weeks and report back.
I have the older Makerfarm i3 8" with rods. It will be interesting to compare it to the v-slot version.Bambu P1S/AMS
NVision4D http://nvision4d.com
-
12-01-2014, 10:31 PM #155Engineer

- Join Date
- Jul 2014
- Location
- Eastern Colorado
- Posts
- 536
I liked this idea, and incorporated it in my own printer. I've got the covers on the top slots of the Y rails, the front slots, bottom slot of the top rail and top slot of the bottom rail of the X rails, and the front slots of the Z rails.
I did have some trouble with the Z covers and the lower X cover moving. The Z covers slid down due to gravity, but the lower front X cover was moved by the bolt heads holding the X carriage extruder shelf rubbing against it. The Y covers are held in place by the wood pieces front and back, plus nothing rubs them.
For the bottom of the Z rails, and the ends of the X rails, I put a washer on an M5 bolt and screwed it into the threaded center hole of the rails. The washer is just large enough to hold the covers in place, since the M5 bolt head is not. I did try to superglue the covers in place, but that just left a white film on the covers, and didn't hold long anyway. The bolts are unobtrusive and do the job well.
-
12-02-2014, 09:13 AM #156
Here's a link to the slot covers AbuMaia is referring to - http://openbuildspartstore.com/slot-cover-panel-holder/. I used some to form wiring channels in the v-rails, but never got around to installing the decorative ones facing forward.
They do fit in the slots fairly loose and tend to slide around. Use of the M5 bolts and washers on the end of the rails is a good idea - especially for the Z rails. Bending the legs apart on part of the plastic cover may help. I think I pondered using a bit of double sided tape on one end to help hold them in place. The segments I installed with wires and expandable cable wrap are held in place fine by the wiring.
For the bolt heads on the back side of the X carriage shelf, mine were rubbing into the aluminum v-rail so those bolts were replaced with button head type. I had made the problem worse by trying to use flat washers under all the bolt heads, but even without the washers there isn't much clearance there.
FOLLOWUP COMMENT: I haven't verified this, but for those wondering, I don't think you can install the channel cover over slots where the wheels will ride.Last edited by printbus; 12-05-2014 at 03:27 AM. Reason: grammar
-
12-02-2014, 07:07 PM #157Engineer

- Join Date
- Jul 2014
- Location
- Eastern Colorado
- Posts
- 536
I've verified it. You cannot put the covers on the slots where the wheels run. I've tried it, and I emailed OPBS asking about it before I bought the covers.
IMG_20141202_181035.jpg
My printer with slot covers.
IMG_20141202_181248.jpg
Bolt and washer holding the covers in place.Last edited by AbuMaia; 12-02-2014 at 07:14 PM.
-
12-13-2014, 07:23 PM #158
RUNNING SUMMARY OF CONFIGURATION SETTINGS
I dug into and adjusted several of the Marlin and slicer configuration settings after completion of the Make: benchmark prints. Some of the changes are a result of thread Marlin Motion Related Configuration.h Settings for MakerFarm i3v. The following summarizes either the current settings or the settings I last used with particular software. Note that information that follows in code dialogue boxes is simple text with comments, organized to follow the user interface structure for the applicable software. It is not an INI or other data file that can be used as is.
Anyone with suggested adjustments are welcome to post about them or send me a PM.
REPETIER-HOST/CURA ENGINE
I'd been using Repetier-Host with Cura Engine for several months, so I naturally started refining settings with this combination. As I was trying to optimize print settings, Cura became a limiting factor since it doesn't allow setting different speeds for internal infill (ideally printed fast) and solid layers like the top (ideally printed slower for quality).
Jan 11 2015: DEFAULT_STEPS_PER_UNIT back to 4000 for Z since stepper driver is reconfigured back to 1/16 microsteppingCode:Printbus Repetier-Host & Cura Engine configuration summary 11 Jan 2015 *** MARLIN DETAILS *** dacb fork for MakerFarm as of Sept 28 2014; personalized motion related changes: HOMING_FEEDRATE {100*60, 100*60, 2*60, 0} marlin_main.cpp homeaxis() feedrate in 3rd phase of homing reduced from /2 to /4 to negate faster HOMING_FEEDRATE DEFAULT_AXIS_STEPS_PER_UNIT {80, 80, 4000, 900} DEFAULT_MAX_FEEDRATE {250, 250, 2, 15} (see Marlin settings thread) DEFAULT_MAX_ACCELERATION {750,750,500,500} (see Marlin settings thread) DEFAULT_ACCELERATION 750 (see Marlin settings thread) DEFAULT_ZJERK 10 (see Marlin settings thread) DEFAULT_EJERK 10 (see Marlin settings thread) MANUAL_FEEDRATE {100, 100, 2, 5} (want less than or equal to DEFAULT_MAX_FEEDRATE; 5 is about the limit on 1.75mm, 3mm requires lower) *** REPETIER-HOST v1.0.6 CONFIG PRINTER SETTINGS - Printer dialogue *** Travel Feed Rate: 15000 mm/min (to match 250mm/sec Marlin setting) Z-axis Feed Rate: 120 mm/min (to match 2mm/sec Marlin setting) Manual Extrusion Speed: 5, 5 mm/sec (300 mm/min, not sure why there are two values; 5 is about the limit on 1.75mm, 3mm requires lower) Manual Retraction Speed: 5 mm/sec (to match 300 mm/min extrusion speed) *** REPETIER-HOST v1.0.6 CONFIG PRINTER SETTINGS - Extruder dialogue *** Number of Extruder: 1 Max Volume per second: 10mm3/sec following recommendation suggesting between 8 and 10 for 0.4mm tip Extruder 1 diameter: 0.4 mm *** REPETIER-HOST v1.0.6 CURA ENGINE - Print Speed & Quality dialogue Print speed: 50 to 100 mm/sec (unclear where this speed is applied) Travel speed: 250 to 250 mm/sec (DEFAULT_MAX_FEEDRATE for XY) First layer speed: 30 to 50 mm/sec Outer perimeter speed: 30 to 60 mm/sec (kept low for print quality) Inner perimeter speed: 40 to 80 mm/sec Infill speed: 50 to 80 mm/sec (note Cura applies this to bridging and top layers) Layer height: 0.2 mm (only a 0.2mm quality has been defined) First layer height: 0.35 mm (just seems to work with nozzle adjusted to snug paper clearance) First Layer Extrusion Width: 125% *** REPETIER-HOST v1.0.6 CURA ENGINE - Print Structures dialogue Infill shell thickness: 1.2 mm (value leads to 3 shells with 0.4mm nozzle) Infill Top/Bottom Thickness: 0.55 mm (value leads to 3 top and bottom fill layers) Infill overlap: 5% (reduced until infill didn't ripple through outer wall) Infill pattern: Automatic Infill Solid Top and Solid Bottom both checked Support Pattern: Grid Support overhang angle: 60 degrees Support fill amount: 15% Support distance XY: 0.7 mm (only minimally tested) Support distance Z: 0.15 mm (only minimally tested) Skirt Line Count: 2 Skirt distance: 3 mm Skirt minimum length: 150 mm Brim Width: 3 Skirt Distance: 3 mm Minimum Skirt Length: 150 mm Raft settings (undetermined; raft has never been used) G-code Flavor: RepRap (Repetier/Marlin/Sprinter) *** REPETIER-HOST v1.0.6 CURA ENGINE - Print Extrusion dialogue Spiralize Contour: unchecked (have not had good results with this enabled) Minimize Crossing Perimeters: checked Enable Retraction: checked Retraction speed: 15 mm/sec (consistent with E feedrate in Marlin settings thread) Retraction distance: 1.5 mm (but still seeing very fine strands remaining) Minimum travel before retract: 4 mm (depends on print) Minimum Extrusion Before Retract: 0.02 mm (depends on print) Z Hop: 0 mm (Z hop adds considerable print time on screw-based Z axis) Cut Off Object Bottom: 0 mm Nozzle Diameter: 0 mm (0 value says to use printer settings) Multi Extruder Settings: (undetermined; multiple extruders not present) Cooling fan full at height 0.5 mm Minimum speed: 0 mm/sec (print dependent, varies with layer size and cooling approach) Cool head lift : unchecked (print dependent; often used on very small prints) *** REPETIER-HOST v1.0.6 CURA ENGINE - Print Advanced dialogue Mesh Errors: All unchecked (Combine Everything type A observed to have bad effects) *** REPETIER-HOST v1.0.6 CURA ENGINE - Filament dialogue Filament diameter: 1.74 mm (filament dependent) Filament flow: 100% Print emperature: 220 degrees C (filament dependent) Bed temperature: 70 degrees C (filament dependent) Cooling Min Fan Speed: 5 % (usually manually controlled) Cooling Max Fan Speed: 25 % (usually manually controlled) Minimum Layer Time: 2 sec (print dependent; varies with layer size and cooling approach) *** REPETIER-HOST v1.0.6 CURA ENGINE - Print Settings Adhesion type: none (print dependent; Brim used on prints with low bed surface area) Quality: 0.2 mm (only a 0.2 mm quality has been defined) Support type: none (print dependent) Speed: Slider set for 75mm print speed results in outer perimeter speed 45 mm/sec and infill speed 65 mm/sec Infill density: 20% (print dependent after gcode evaluation in gcode.ws viewer) Enable cooling: unchecked (manual controls normally used for varying print cooling speed) Filament settings: Extruder 1 (set to whatever filament definition is to be used)
Jan 3 2015: Updated to final RH/CE settings before switching to Simplify3D software
Dec 25 2014: Added note that 5mm/sec manual extrusion feed rate is about the limit for 1.75mm filament
Dec 15 2014: Added DEFAULT_XYJERK tweak to the Marlin category (missing in original list)
------------------------------
REPETIER-HOST/SLIC3R
I briefly gave SLIC3R another try before moving on to Simplify3D software. I saw no improvement in Slic3r's tendency to hang or take far too long on slicing complex objects, and Slic3r also still seemed to require more moves and retractions per layer than Cura did. I used Slic3r 1.1.7 that was included with the Repetier-Host v1.0.6 distribution.
Jan 11 2015: DEFAULT_STEPS_PER_UNIT back to 4000 for Z since stepper driver is reconfigured back to 1/16 microsteppingCode:Printbus Repetier-Host & Slic3r configuration summary 11 Jan 2015 *** MARLIN DETAILS *** dacb fork for MakerFarm as of Sept 28 2014; personalized motion related changes: HOMING_FEEDRATE {100*60, 100*60, 2*60, 0} marlin_main.cpp homeaxis() feedrate in 3rd phase of homing reduced from /2 to /4 to negate faster HOMING_FEEDRATE DEFAULT_AXIS_STEPS_PER_UNIT {80, 80, 4000, 900} DEFAULT_MAX_FEEDRATE {250, 250, 2, 15} (see Marlin settings thread) DEFAULT_MAX_ACCELERATION {750,750,500,500} (see Marlin settings thread) DEFAULT_ACCELERATION 750 (see Marlin settings thread) DEFAULT_ZJERK 10 (see Marlin settings thread) DEFAULT_EJERK 10 (see Marlin settings thread) MANUAL_FEEDRATE {100, 100, 2, 5} (want less than or equal to DEFAULT_MAX_FEEDRATE; 5 is about the limit on 1.75mm, 3mm requires lower) *** SLIC3r v1.1.7 Print Settings - Layers and Perimeters Layer height: 0.2mm First layer height: 0.35mm Vertical shells on perimeters: 3 Spiral vase: unchecked (did not try this) Horizontal shells top: 3 Horizontal shells bottom: 3 Extra perimeters: checked Avoid crossing perimeters: checked Detect thin walls: checked Detect bridging perimeters: checked Seam position: random External perimeters first: checked *** SLIC3r v1.1.7 Print Settings - Infill Infill fill density: 15% (print dependent) Infill fill pattern: rectilinear Infill top/bottom fill pattern: rectilinear Combine infill every 1 layer Only infill where needed: unchecked Solid infill every 0 layers Fill angle 45 degrees (can be considered print dependent) Solid infill threshold area: 70 mm^2 Only retract when crossing perimeters: unchecked Infill before perimeters: unchecked *** SLIC3r v1.1.7 Print Settings - Speed Print speed on perimeters: 50 mm/sec Print speed on small perimeters: 50 mm/sec (IDK - just be consistent on perimeters?) Print speed on external perimeters: 50 mm/sec (IDK - just be consistent on perimeters?) Print speed on infill: 100mm/sec (fast since most time is spent printing this) Print speed on solid infill: 80 mm/sec Print speed on top solid infill: 70 mm/sec Print speed on support material: 100 mm/sec (did not test) Print speed on support material interface: 100% (did not test) Print speed on bridges: 100 mm/sec (did not test) Print speed on gap fill: 0 (a 0 disables gap filling - something I found annoying with slic3r previously) Non-printing travel speed: 250 mm/sec (to match Marlin DEFAULT_MAX_FEEDRATE settings) First layer speed: 40 mm/sec Advanced acceleration control: all 0 (a 0 leaves acceleration control to Marlin) *** SLIC3r v1.1.7 Print Settings - Skirt and Brim Skirt loops: 2 Skirt distance from object: 6mm Skirt height: 1 layer Minimum extrusion length: 0mm (2 skirt loops should provide enough priming extrusion even on small objects) Brim width: 0 mm (did not test use of a brim) *** SLIC3r v1.1.7 Print Settings - Support Material Generate support material: unchecked (did not determine any preferred settings for support) *** SLIC3r v1.1.7 Print Settings - Output options Sequential printing complete individual objects: unchecked Output file verbose g-code: unchecked *** SLIC3r v1.1.7 Print Settings - Multiple Extruders Perimeter extruder: 1 (I only have one extruder) Infill extruder: 1 (I only have one extruder) Support material extruder: 1 (I only have one extruder) Support material interface extruder: 1 (I only have one extruder) Ooze prevention enable: unchecked Interface shells: unchecked *** SLIC3r v1.1.7 Print Settings - Advanced Default extrusion width: 0 (set default width automatically) First layer extrusion width: 200% Perimeter extrusion width: 0 (use default width) Infill extrusion width: 0 (use default width) Solid infill extrusion width: 0 (use default width) Top solid infill extrusion width: 0 (use default width) Support material extrusion width: 0 (use default width) Bridge flow ratio: 1 (did not test bridging) Threads: 2 Resolution: 0 (use full resolution) *** SLIC3r v1.1.7 Filament Settings - Filament Filament diameter: 1.68mm (filament dependent) Filament extrusion multiplier: 1 (did not test other settings) Extruder temperature first layer: 215 (filament & print dependent) Extruder temperature other layers: 210 (filament & print dependent) Bed temperature first layer: 0 (filament dependent) Bed temperature other layers: 0 (filament dependent) *** SLIC3r v1.1.7 Filament Settings - Cooling Keep fan always on: unchecked (print cooler doesn't have to be on all the time) Enable auto cooling: unchecked (I normally adjust print cooling fan manually) *** SLIC3r v1.1.7 Printer Settings - General Bed size: 200mm x 200mm (printer dependent) Print center: 100mm, 100mm (printer dependent) Z offset: 0mm (no, I'm not equipped for auto bed correction) Firmware: RepRap Use relative E distances: unchecked (gcode will use absolute positioning) Extruders: 1 Use firmware retraction: unchecked (retraction is handled in gcode) Vibration limit: 0 (did not experiment with this) *** SLIC3r v1.1.7 Printer Settings - Extruder 1 Nozzle diameter: 0.4mm (hot end dependent) Retraction length: 1.5mm (seems to provide generally good retraction results) Retraction lift Z: 0 mm (i3v use of threaded Z-rods would slow down prints if lift Z is used) Retraction speed: 15mm/sec (to match Marlin DEFAULT_MAX_FEEDRATE setting) Retraction extra length on restart: 0mm Minimum travel after retraction: 1mm (print dependent) Retract on layer change: checked (retract while waiting for threaded rods to raise carriage to next layer) Wipe while retracting: unchecked (did not experiment with this; would take more time) REPETIER-HOST/Slic3r Slicer Settings Override Slic3r settings: unchecked (use settings from Slic3r configuration files)
Jan 4 2015: Initial population of settings info
------------------------------
SIMPLIFY 3D
It wasn't free, but Simplify3D is currently providing my best combination of print quality, setting flexibility, and professional user interface. I think that as a slicer, Simplify3D is giving me better results than Slic3r or Cura/Cura Engine. I do think, however, that the Machine Control Panel is weak. It is missing several features I grew used to with Repetier-Host.
Feb 21 2015: Numerous settings revised per lessons learnedCode:Printbus Simplify3D configuration summary 21 Feb 2015 *** MARLIN DETAILS *** dacb fork for MakerFarm as of Sept 28 2014 built for non-ABL; personalized motion related changes: HOMING_FEEDRATE {100*60, 100*60, 2.5*60, 0} marlin_main.cpp homeaxis() feedrate in 3rd phase of homing reduced from /2 to /4 to negate faster HOMING_FEEDRATE DEFAULT_AXIS_STEPS_PER_UNIT {80, 80, 1000, 900} (Z motor driver configured for 1/4 microstepping) DEFAULT_MAX_FEEDRATE {250, 250, 3, 15} (see Marlin settings thread; 3 on Z works with Kysan motors and 1/4 microstepping) DEFAULT_MAX_ACCELERATION {750,750,500,500} (see Marlin settings thread) DEFAULT_ACCELERATION 750 (see Marlin settings thread) DEFAULT_ZJERK 10 (see Marlin settings thread) DEFAULT_EJERK 10 (see Marlin settings thread) MANUAL_FEEDRATE {100, 100, 2.5, 5} (want less than or equal to DEFAULT_MAX_FEEDRATE; 5 is about the limit on 1.75mm, 3mm requires lower) *** Simplify3D v2.2.1 Process Settings - Extruder Nozzle diameter: 0.40mm Extrusion multiplier: 1.00 (have not tried other values; I'd normally adjust flow at the printer) Extrusion width: Auto (print dependent; using manual on many thin wall parts to reduce thin zigzag infill) Retraction box: checked Retraction distance: 2.0mm (filament and print dependent) Extra restart distance: 0mm Retraction vertical lift: 0mm (threaded rods on Z would lead this to be slow) Retraction speed: 15mm/sec (to match 15mm/sec setting in Marlin DEFAULT_MAX_FEEDRATE) Coast at end: checked and set to 1.6mm (under evaluation) Wipe at end: checked and set to 5mm (sometimes causes artifacts on external perimeters at the wipe distance) *** Simplify3D v2.2.1 Process Settings - Layer Primary layer height: 0.20mm (nozzle physically adjusted for 0.20mm gap with bed and hot end at printing temperature) Top solid layers: 3 Bottom solid layers: 3 Outline/perimeter shells: 2 Outline direction: Outside-in (print dependent) Print islands sequentially: unchecked (have not tried this) Corkscrew printing mode: unchecked (have not tried this) First layer height: 90% (note bed is adjusted for 0.20mm nozzle gap using S3D leveling tool) First layer width: 125% First layer speed: 75% Start points: use random start points for all perimeters *** Simplify3D v2.2.1 Process Settings - Additions Include skirt brim: checked (print dependent) Skirt layers: 1 Skirt offset: 4mm (set to 0mm for brim) Skirt outlines: 3 (2 was a bit lacking on some small prints) Include raft: unchecked (I've never tried a raft) *** Simplify3D v2.2.1 Process Settings - Infill External fill pattern: rectilinear Interior fill percentage: 20% (print dependent but 20% seems to provide adequate top layer support) Outline overlap: 15% (been experimenting with different values but back to this currently) Infill extrusion width: 100% (have not experimented with other values) Minimum infill length: 5mm (have not experimented with other values) Print sparse infill every 1 layer Include solid diaphragm: unchecked Random infill placement: unchecked (not sure where one would want this) Infill angles: 45, -45 degrees *** Simplify3D v2.2.1 Process Settings - Support Generate support material: unchecked (print dependent) Support extruder: Primary (only have one) Support infill percentage: 20% (print dependent) Extra inflation distance: 0 (have not experimented with other values) Dense support layers: 0 (have not experimented with other values) Dense infill percentage: 70% (have not experimented with other values) Print support every 1 layer (print dependent?) Horizontal offset from part: 0.80mm (easier to remove than the 0.3mm default) Upper vertical separation layers: 1 (have not experimented with other values) Lower vertical separation layers: 1 (have not experimented with other values) *** Simplify3D v2.2.1 Process Settings - Temperature Extruder temperature identifier: T0 Extruder temperature controller type: Extruder Extruder relay temperature between each: (neither layer or loop selected) Extruder wait for temperature controller to stabilize: checked Extruder layer 1 temperature: 215 degrees (filament dependent) Extruder layer 4 temperature: 210 degrees (filament dependent) Heated bed temperature identifier: T2 Heated bed temperature controller type: heated build platform Heated bed relay temperature between each: (neither layer or loop selected) Heated bed wait for temperature controller to stabilize: checked Heated bed layer 1 temperature: 0 (this and subsequent layer temps print filament dependent) *** Simplify3D v2.2.1 Process Settings - Cooling Layer 1 fan speed: 0 Layer 4 fan speed: 2% (print and blower dependent) Blip fan to full power when increasing from idle: unchecked (leads to undesired pause with nozzle sitting on print) Adjust print speed for layers below set duration: unchecked (print cooler used instead) Increase fan speed for layers below set duration: unchecked (print dependent) Bridging fan speed override: unchecked (have not experimented with bridging) *** Simplify3D v2.2.1 Process Settings - G-code Option for 5D firmware: checked Option for relative extrusion distances: unchecked Option to allow zeroing of extrusion distances: checked Option to use independent extruder axes: unchecked Option to include M101/M102/M103 commands: unchecked Option for firmware supporting sticky parameters: checked G-Code axis offsets all set to 0 Update machine definition using settings: checked Machine type: Cartesian Build volume: 200mm x 200mm x 200mm (printer dependent) Origin offset: 0, 0, 0 Homing direction: all set to min Flip build table axis: Y checked *** Simplify3D v2.2.1 Process Settings - Other Default printing speed: 100 mm/sec (6000mm/min) Outline underspeed: 50% (seems to be optimal value) Solid fill underspeed: 50% (seems to optimal value) Support structure underspeed: 80% (have not tested) X/Y axis movement speed: 250 mm/sec (to match setting in DEFAULT_MAX_FEEDRATE) Z axis movement speed: 2.5 mm/sec (to match setting in DEFAULT_MAX_FEEDRATE) Filament diameter: 1.68mm (filament dependent) Bridging unsupported area threshold: 50 sq mm (untested) Bridging extrusion multiplier: 100% (untested) Bridging speed multiplier: 100% (untested) *** Simplify3D v2.2.1 Process Settings - Advanced Start printing at set height: unchecked Stop printing at set height: unchecked Non-manifold segments: heal Merge all outlines into solid model: unchecked Thin wall behavior: Allow gap fill when necessary Allowed perimeter overlap: 10% (have not tried other values) Only retract when crossing open spaces: checked Force retraction between layers: checked (retract while we wait on slow Z movement) Minimum travel for retraction: 2mm (print dependent) Extruder ooze rate: unchecked Only wipe extruder for outer-most perimeters: checked (need to better understand this) Tool change retraction: settings ignored since I only have one extruder *** Simplify3D v2.2.1 Machine Control Panel Settings X/Y axis jog speed: 100 mm/sec Z axis jog speed: 2.5 mm/sec (OK with Kysan motors and 1/4 microstepping) Extruder jog speed: 4 mm/sec (5 is about the limit for 1.75mm filament and 0.40mm nozzle)
Feb 15 2015: Infill percentage to 15%, outline underspeed to 80%
Jan 21 2015: updated misc to reflect baseline for ripple test prints
Jan 21 2015: unchecked the wipe option due to external perimeter artifacts noticed at the end of the wipe distance
Jan 17 2015: increased Z in MANUAL_FEEDRATE to 2.5 mm/sec as well
Jan 15 2015: retuned Z motion settings again; added support detail; added machine control panel settings
Jan 14 2015: checked coast at end and wipe nozzle options in extruder settings
Jan 12 2015: checked Y axis in flip build table axis
Jan 11 2015: DEFAULT_STEPS_PER_UNIT back to 4000 for Z since stepper driver is reconfigured back to 1/16 microstepping; updated to Simplify3D version 2.2.1
Jan 5 2015: unchecked blip print cooling fan to full when coming up from idle
Jan 4 2015: Initial population of current settingsLast edited by printbus; 03-06-2015 at 01:01 PM.
-
01-03-2015, 02:32 PM #159
DISPLAY BEZEL
I had to replace the LCD on my i3v due to an inadvertent static discharge that damaged the driver for a column of pixels. It wasn't easy to unsolder the 16 pins between the LCD and the reprapdiscount board, so I wanted to minimize the need to replace the LCD again. I've learned on other projects that using a bezel over one of these LCD modules is helpful in protecting them from static, and obtained another Electronic Assembly EA017-9UKE bezel to use on the printer.
The bezels are meant to mount on a panel, with the display module recessed behind the panel. The design of the i3v printers, however, has the LCD module protruding from the face of the LCD mounting bracket. To provide a mount for the bezel, I used hobby basswood to form a small frame that sits on the LCD module. The bezel frame was fashioned from wood since it was quick and easy to do, and could be painted to have a wood finish like the rest of the printer. I used narrow strips of double-sided tape to attach the bezel to the wood frame, and small dabs of glue to attach the bezel frame to the printer.
This provides a gap between the anti-glare acrylic glass and the LCD module that should help minimize static being discharged into the LCD.
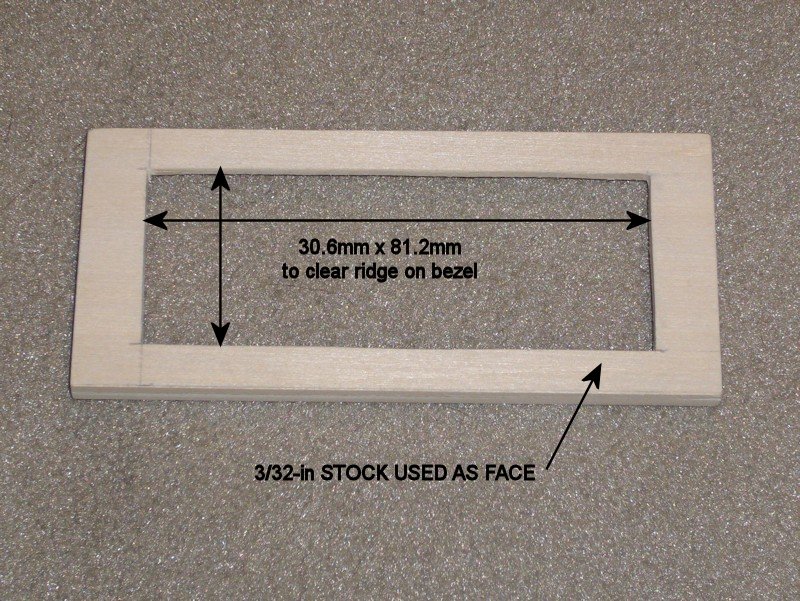
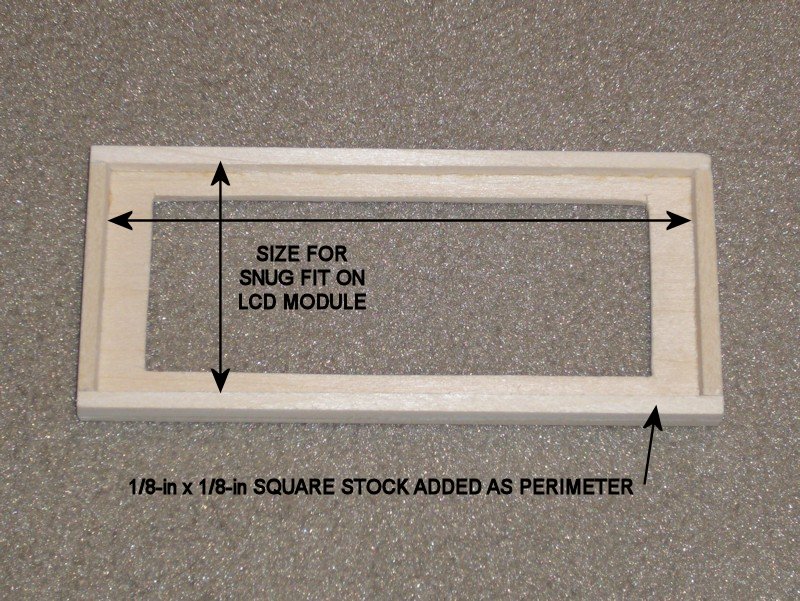
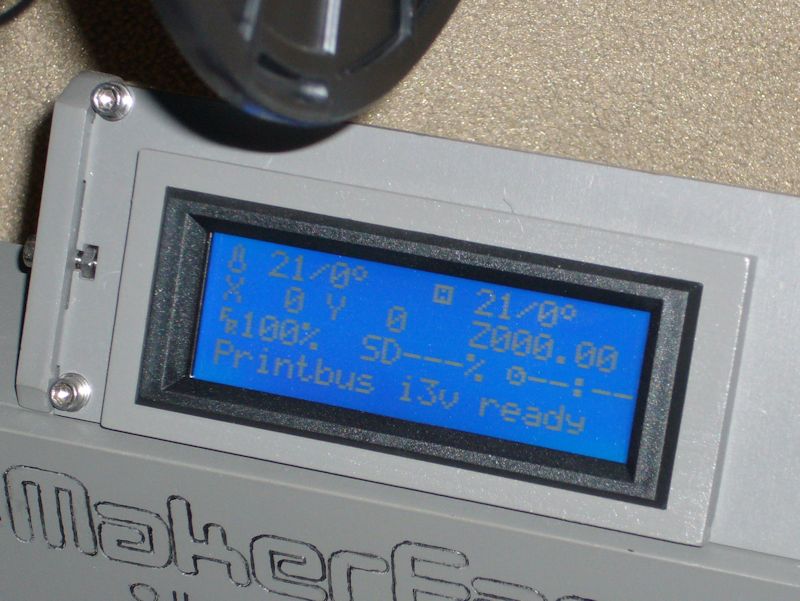
Last edited by printbus; 05-03-2015 at 03:37 PM. Reason: migrated to offsite image storage due to 3DPrintBoard issues
-
01-03-2015, 08:31 PM #160Engineer

- Join Date
- Dec 2014
- Location
- Canada
- Posts
- 498
Your attention to detail is incredible. Im about to start my build, and I hope I can get it atleast half as clean as your build is, well done


 Reply With Quote


Ender 3v2 poor printing quality
10-28-2024, 09:08 AM in Tips, Tricks and Tech Help