


Results 11 to 20 of 26
-
10-23-2021, 04:01 AM #11Technologist

- Join Date
- Apr 2021
- Posts
- 186
Ok, Did a reprint of the iris box to get things underway.
Tried to get it under 1 hour for a standard sized iris box (63mm). Ended up completing the print in 59 minutes. I've attached pics showing the print time, underside of the box, and box closed as well as a PrusaSlicer project with the settings.
-
10-23-2021, 08:42 AM #12Super Moderator
- Join Date
- Jul 2014
- Posts
- 8,816
nice - now we just need speed and temperature settings.
That's more the idea than just pictures of prints.
and please, NO BENCHIES !
There is a special circle of hell reserved for people who print benchies.
It's above the circle reserved for creality engineers, but below that reserved youtubers who push the ender 3
And why does the position of the circle matter ? Effluent flows downwards ;-)
Unfortunately gifs don't seem to work on this forum.
I'll have another go later :-)
-
10-23-2021, 09:32 AM #13Staff Engineer
- Join Date
- Jul 2016
- Location
- South Florida, USA
- Posts
- 1,248

Aside from Prusaslicer settings can you please post up a screenshot of your Marlin movement settings. And not steps but speed. Because the actual movement of our printer is gonna be the lesser of the Marlin settings vs. the slicer settings. That is both sets of numbers are limiters that say no more than so we can have real high numbers in our slicer but actual movement of the robot might be much less because of restricting firmware settings. So for control we need to see both.
Also can you tell us about the filament you used? What type, brand, and/or the amount spent on the 1kg or 2.2lb spool. Again for control. Cheap filament is cheap filament and we will work to make it print nice. Expensive filament just prints nice and makes our rigs look better than the cheap filaments will. The same can be said for PLA vs. PETG or other filament types.
And I will try to get one printed out at some point today and share all of my settings as well. Then we can try printing with each others settings and see what we get. Under an hr. is good time for a working iris box.
-
10-23-2021, 02:00 PM #14Technologist
- Join Date
- Apr 2021
- Posts
- 186
All included in the project file. Originally Posted by curious aardvark

-
10-23-2021, 02:04 PM #15Technologist
- Join Date
- Apr 2021
- Posts
- 186
My marlin settings match the slicer settings pretty closely. Slicer estimate was 57mins. Time taken was 59 mins. I’ll add some pics to this post shortly. Originally Posted by AutoWiz
Filament was 3d fillies pla+, transparent grey. ~$27 AUD/kg (one of the cheaper filaments we can buy here, similar price to eSun).
The larger one was 3d fillies pla-steel in copper (no longer available) and the white micro one was some trash pla sample that came with the tronxy.Last edited by Martin_au; 10-23-2021 at 03:37 PM.
-
10-23-2021, 07:11 PM #16Technologist
- Join Date
- Apr 2021
- Posts
- 186
I know we aren't looking at this print, but I did it anyway as I need one. Just noticed this design needs a bit of support under the outer edges of the "wings" (it's a really old design). Done in eSun's ABS plus at 260/110. 0.2mm layers. Time was ~2 hours
Last edited by Martin_au; 10-23-2021 at 07:16 PM.
-
10-23-2021, 11:53 PM #17Staff Engineer
- Join Date
- Jul 2016
- Location
- South Florida, USA
- Posts
- 1,248
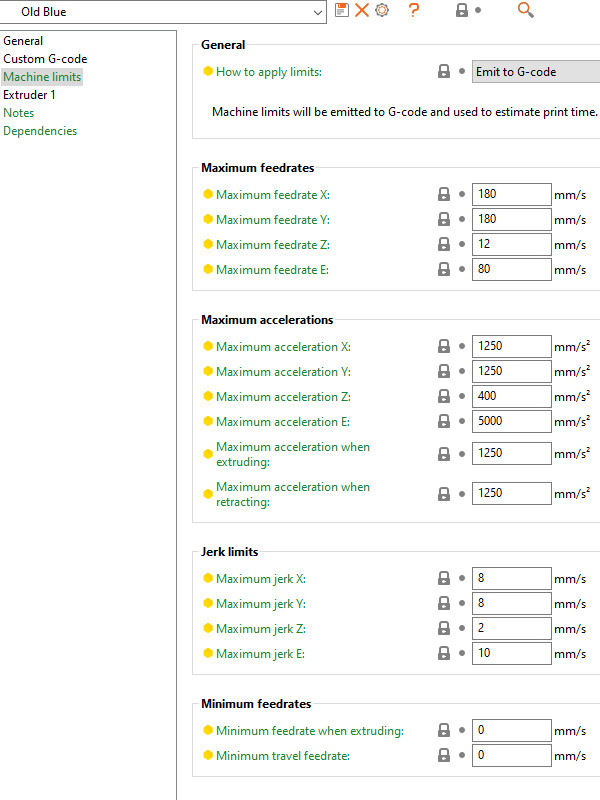
Can you show me this on your Prusaslicer please under printer settings..
And this in your Marlin settings in configuration.h..
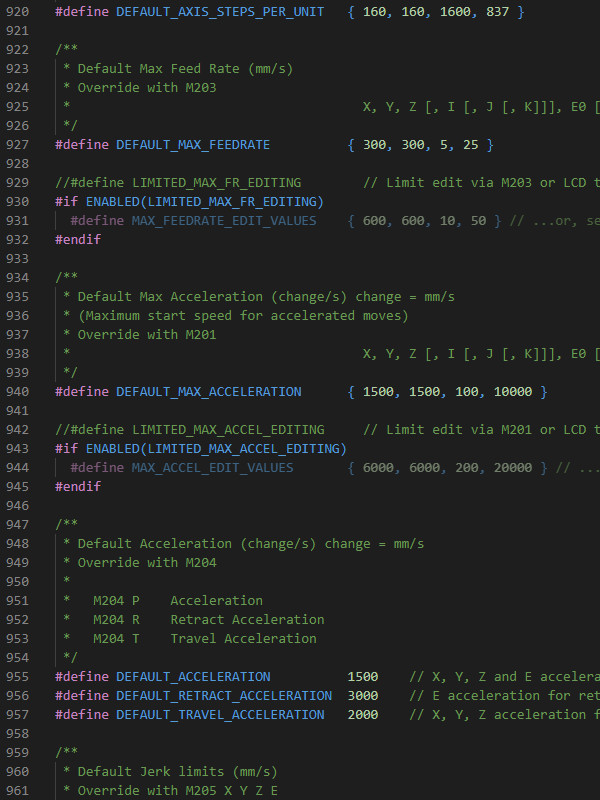
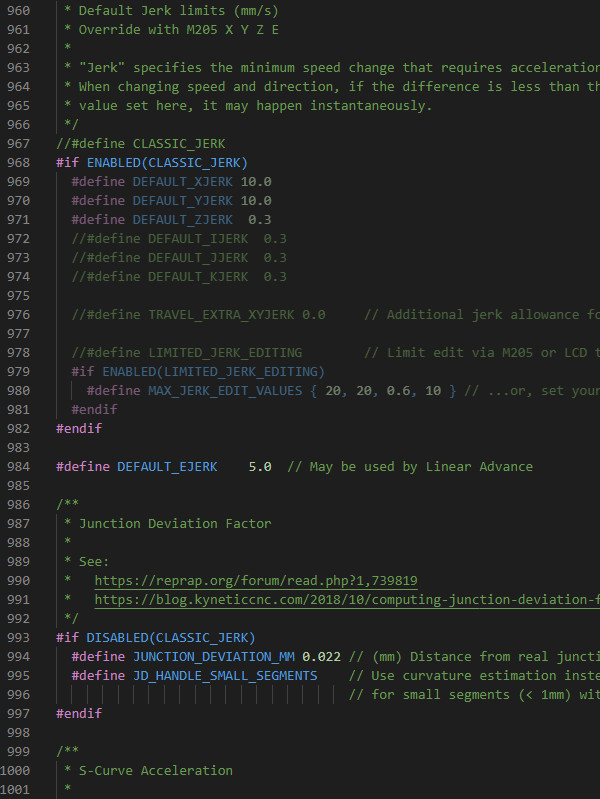
You might notice my numbers are low. I have been printing with PETG for a while now and aside from comparison am eager to try known good speed settings from someone else's rig.
-
10-24-2021, 12:26 AM #18Technologist
- Join Date
- Apr 2021
- Posts
- 186
Not sure if my "known good" settings are necessarily suitable for your rig.
All the slicer settings are also available in the linked project file.
-
10-24-2021, 01:58 AM #19Staff Engineer
- Join Date
- Jul 2016
- Location
- South Florida, USA
- Posts
- 1,248
Maybe not but it sure is fun to watch my i3 try. https://www.youtube.com/watch?v=d2kWS-r8uXg
-
10-24-2021, 12:49 PM #20Super Moderator
- Join Date
- Jul 2014
- Posts
- 8,816
the 3mf file just comes up as the iris box.
what slicer does it do something else in ?

 Reply With Quote


Printer will print perfect...
06-14-2024, 10:44 AM in Tips, Tricks and Tech Help