


Results 11 to 20 of 189
Thread: Show your MODS
Hybrid View


-
08-10-2014, 07:29 AM #1Super Moderator

- Join Date
- Oct 2013
- Location
- Belgium
- Posts
- 502
After Autoleveling, Some cylinder to support the Z screws rotating normaly, and a spool holder on the back i've made now a small switch holder,
http://www.thingiverse.com/thing:414857
Now i'm kinda looking for a 40-50mm fan duct that supports the makerfarm gregs extruder with the auto leveling, might design one myself once i have more time.
Owye i also added a new Y stepper motor holder, as the old one wasnt very straight, at all.
-
08-10-2014, 09:43 PM #2Engineer
- Join Date
- May 2014
- Location
- Meridian, ID
- Posts
- 418
Extruder Motor Fan Shroud
Like many other people, I had a lot of trouble with the extruder motor overheating. Mine got hot enough to soften the extruder block and the motor screws pulled through. There are many ways to solve this problem, but I built a fan shroud to mount a 40mm fan to keep the motor cool.
The shroud is designed to keep stray air from blowing on the bed, which I found caused problems with print adhesion. With this shroud, the motor peaks at around 45C, even with the current set as recommended by the MakerFarm instructions.
The parts can be downloaded here: http://www.thingiverse.com/thing:343026
2014-05-26_23.42.18_preview_featured.jpg2014-05-25_19.13.28_preview_featured.jpg2014-05-25_18.55.21_preview_featured.jpg2014-05-25_18.55.04_preview_featured.jpg
-
08-10-2014, 09:47 PM #3Engineer
- Join Date
- May 2014
- Location
- Meridian, ID
- Posts
- 418
RAMPS LCD Spacer
My LCD was rattling and buzzing as the printer was printing, and I was never comfortable with the way the LCD screws caused the PC board to flex, so I printed some spacers so I could tighten the LCD screws down without causing damage to the board. I re-mounted the LCD with the spacers and nylon lock nuts, and this solved the vibration problem.
I also used sandwiched some strips of double-sided tape between the boards to keep them from rattling against each other.
The spacer can be downloaded here: http://www.thingiverse.com/thing:335589
2014-05-18_15.45.34_preview_featured.jpg
-
08-10-2014, 09:56 PM #4Engineer
- Join Date
- May 2014
- Location
- Meridian, ID
- Posts
- 418
Sorbothane Vibration Isolator Feet
A lot of the noise generated while printing is actually being transmitted into the surface the printer is sitting on and from there into the room, the floor and the structure of the house. I have my printer in an upstairs room in my house, and I could even hear it downstairs, transmitted through the floor.
After doing a bunch of research, I happened on a vibration damping material called Sorbothane. We use it at work to damp vibrations in laser systems. It's readily available from Amazon and other sources in a variety of shapes.
I designed some round feet that clip to the bottom of the printer frame, allowing me to mount 3/4" hemispherical Sorbothane feet to the printer. Using six of these feet with the Durometer 70 Sorbothane, the sound is reduced substantially, and it no longer transmits through the walls and floor of my house.
You can download the parts here: http://www.thingiverse.com/thing:322915
2014-05-06_23.01.58_preview_featured.jpg2014-05-06_23.00.38_preview_featured.jpg
-
08-11-2014, 12:35 AM #5Staff Engineer
- Join Date
- May 2014
- Location
- Highlands Ranch, Colorado USA
- Posts
- 1,437

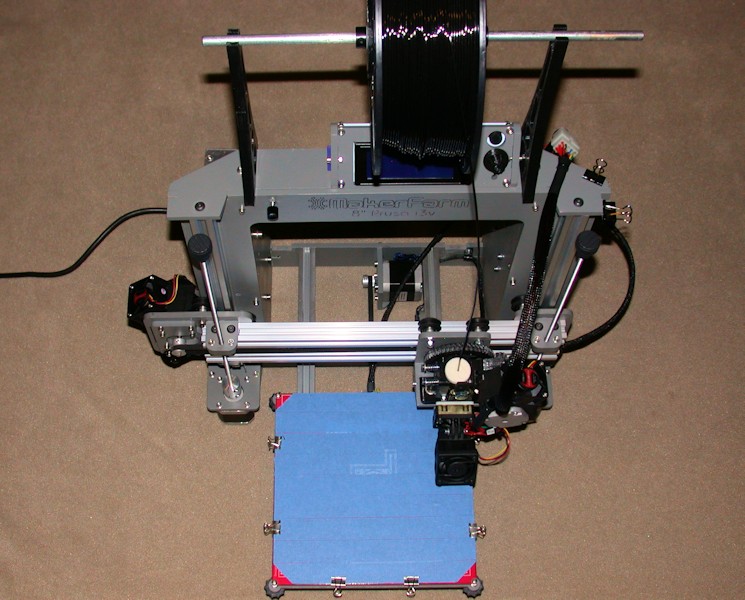
I didn't care for the add-on spool mount MakerFarm includes for the i3v, so I went with a top-side mount - http://www.thingiverse.com/thing:192510 (not my design). There are several designs that hang a spool off to the rear of the i3/i3v , but these brackets keep the weight of the spool in-line with the frame uprights. I've had three full spools on this mount with no issue. The 1.75mm filament clip I found that fits on all three of the different types of spools that I have is http://www.thingiverse.com/thing:181356.
Rather than repeat them here, all my details for "modding" the 8-inch i3v kit into a fairly refined printer are in my build thread at MakerFarm 8" i3v Prusa build by Printbus.
Last edited by printbus; 05-29-2015 at 10:37 AM. Reason: migrated to offsite image storage due to 3DPrintBoard issues
-
08-11-2014, 09:11 AM #6Super Moderator
- Join Date
- Oct 2013
- Location
- Belgium
- Posts
- 502
Jelly on dat i3v :P Originally Posted by printbus

I actualy am thinking to buy it, The upgrade kit,
But i just aint sure yet.. if its a big diffrence, and worth the money and time to take apart my old printer,
Oh well :P
-
08-11-2014, 11:06 AM #7Engineer
- Join Date
- May 2014
- Location
- Meridian, ID
- Posts
- 418
The v-slot is nice because it's quiet. It doesn't resonate and since it's screwed to the frame, you don't have the vibration of the rod ends clamped in the X assembly. You also don't have to worry about lubrication. Originally Posted by DrLuigi
Is that worth $200 to you? It was to me.
It also gave me the chance to lacquer the frame black.
-
08-10-2014, 10:04 PM #8Engineer
- Join Date
- May 2014
- Location
- Meridian, ID
- Posts
- 418
Print Cooling Fan System
I designed an articulated print cooling fan shroud and mount that uses a 40mm fan to direct a stream of air onto the part being printed, to aid in cooling the plastic. The shroud controls the air and directs it right around the tip of the hot end to reduce spill onto the bed and other parts of the print.
A print cooling fan helps to keep edges and especially overhangs crisp when printing PLA, helps keep the hot end from re-melting the part when it spends a lot of time over a small layer and even helps when bridging with ABS. With this shroud, I've been able to bridge up to 200mm with ABS:
The parts for the shroud and mount can be downloaded here: http://www.thingiverse.com/thing:351280
2014-06-03_23.03.43-b_preview_featured.jpg2014-06-03_23.14.19_preview_featured.jpg2014-06-03_23.02.04_preview_featured.jpg
-
08-10-2014, 10:13 PM #9Super Moderator
- Join Date
- Nov 2013
- Location
- Baltimore, MD
- Posts
- 897
Wow, very impressive, a 200mm bridge....yikes....nice going. It looks dead straight too. Also, really like the black frame. I guess you painted that or is Colin offering black frames now? Originally Posted by clough42
Bambu P1S/AMS
NVision4D http://nvision4d.com
-
08-10-2014, 10:31 PM #10Engineer
- Join Date
- May 2014
- Location
- Meridian, ID
- Posts
- 418
I guess that's a mod, too. I used a can of black spray lacquer to coat all of the wood parts of the printer before assembly. I just laid them out on a big sheet of cardboard and sprayed two or three coats on each side, spraying each coat from four different directions to make sure all of the edges were coated. Originally Posted by RobH2
I did my first frame with clear lacquer, just to try to cover up the smell of the laser burned wood, but when I got the i3v upgrade kit, I decided to try black. I'm very happy with it.
I have thought about getting some black-anodized v-slot and a black heat bed to go with the black frame. I may yet do it someday.Last edited by clough42; 08-10-2014 at 10:33 PM. Reason: Added quote.


 Reply With Quote


New to 3d printing looking for...
Yesterday, 12:56 AM in Tips, Tricks and Tech Help