


Results 1 to 10 of 18
Hybrid View


-
07-01-2020, 06:05 AM #1Super Moderator

- Join Date
- Jul 2014
- Posts
- 8,818
wow - that's pretty impressive.
I don't have that kind of patience :-)
I'd have been inclined to make a basic frame (looking at it, probably wood or lasercut acrylic - although it would 3dprint easily enough ), print the board on thin card normally, with ink, laminate it and then glue the laminated and trimmed board onto the frame :-)
But your way is way more complicated and nerdy :-)
Also very impressive !
Not a game I've ever heard of, going to have to find out the rules now.
-
07-01-2020, 02:23 PM #2Student
- Join Date
- Jun 2020
- Posts
- 10
Yep, I'm very much a nerd! Originally Posted by curious aardvark

 But then, I LIKE the fiddle-faddle of trying to coax this bit of Chinese kit to impress me!
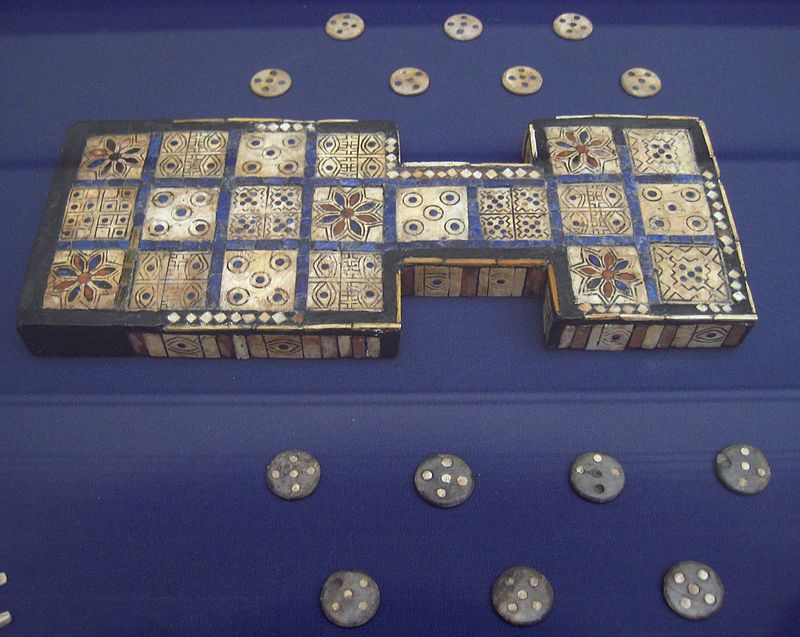
I suppose one could grab a bit of wood, carve it into shape and then paint it up to look like King Tut's game-board. But then I'd have to post in a totally different forum!
BTW. There's a bit of an argument over the rules as, after all, the game is 5,000 yeras old. I quite like the Brit Museum's rules as even I can follow them. I'll find you a link to a man who has proved that Darwin was right, "All evolution results in erudite b*gg*rs with enormous beards, just like me." Mind you, anyone who can read Babylonian cuniform and translate it is allowed to look distinctly weird.
Long version: https://www.youtube.com/watch?reload=9&v=WZskjLq040I
Shorter: https://www.youtube.com/watch?v=wHjznvH54Cw
Tomorrow I'll upload the Tinkercad file which has all the various stl files embedded in it for others to play. Very much a WIP as I need to design the counters and dice yet. Finkle says that the dice are tetrahedrons but that's a real pain. Luckily there are examples which use sticks blackened on one side as dice which is a million times easier for me. May be the way to go?
Best,
Chris
-
07-02-2020, 04:24 AM #3Student
- Join Date
- Jun 2020
- Posts
- 10
OK. 13Mb stl file with job as it is currently.
https://www.dropbox.com/s/yndin6qwcb...r_WIP.stl?dl=0
If anybody does decide to give it a whirl I'd be very grateful for comments and ideas on where to go with this.
Some notes:
Slicer settings. 0.2mm nozzle height and standard O.4 mm nozzle. As I said, Z-hop enabled; I've set it to 0.2 for these thicknesses, it'll need to be higher if we can get the two-layer version working.
I slice with a skirt to help purge the previous colour filament. Works well for all colours except the blue that I use which seems to need much more purging so the gold that follows isn't contaminated.
Strange layout of the individual stl files is because I find that the file selection on the Ender is a real pain when there's more than a couple of files to choose from. So I Have A and B directories on the TF card with 1, 2, 3 and 4 sub-directories to hold the gcode files.
My order of printing. Black, White, Green, Brown, Red, Blue and Gold. Then the final white 'cover' print.
Don't forget to peel off the purge-line, skirt and 'register box' between each colour.
I don't have much of a stringing problem but I do use a soft brush after the first black print to make sure that the following white print is nice and clear.
Enjoy,
Chris


 Reply With Quote


Please explain to me how to...
05-13-2024, 03:08 PM in 3D Printer Parts, Filament & Materials