


Results 221 to 230 of 255
Hybrid View


-
02-03-2019, 04:05 PM #1Staff Engineer

- Join Date
- May 2014
- Location
- Highlands Ranch, Colorado USA
- Posts
- 1,437

X-CARRIAGE AND EXTRUDER REPLACEMENT
I've had the same Greg's Wade extruder components on my MakerFarm's wood X-carriage since early 2015, and they were continuing to hold up well. The Greg's Wade components used are my refined versions mentioned in the Smoothieboard and Other Upgrades post. Even though my printing has been somewhat infrequent since then, I think it's significant that I've been able to keep the same printed 9-tooth and 47-tooth gears on the printer all this time. Seems like the small gear in particular was always wearing out and needing replacement before. I offer the following reasons for the gears lasting this long: 1) Correcting what appeared to be motor-to-large gear spacing based on an older gear configuration such as 11/45 instead of 9/47, 2) Reducing the amount of edge chamfer on the gear teeth, which essentially made all the teeth wider, and possibly most significant, 3) Reversing the direction of the herringbone pattern so the smaller gear would "dig into" the larger gear during normal extrusion rather than push away from it in the original herringbone gear design.
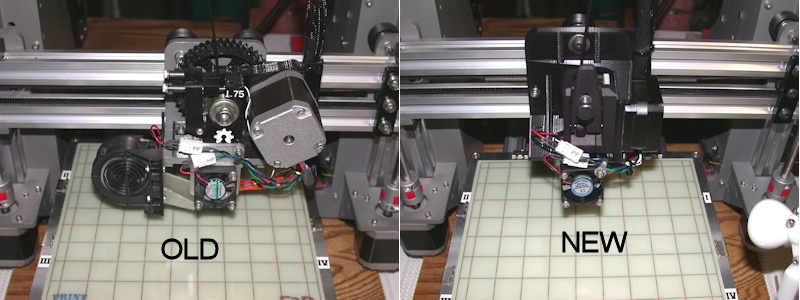
All that said, I wanted to do something different. I could see my wood x-carriage had a warp or deflection along the upright edge, so it was begging to be replaced. When I would run some thin-wall extrusion tests, I'd see different wall thicknesses on X vs. Y, perhaps caused by the warped carriage tipping the hot end off-kilter a bit. The x-carriage just had an overall clunky look to it, with the large gear, the large stepper motor, the end of the hobbed bolt sticking out, and my hefty part-cooling blower hanging off to the left of the carriage. Finally, I wanted to take apart the e3dv6 for nozzle replacement and some major inspection/cleaning, but doing that on the Greg's Wade installed on the box-style MakerFarm x-carriage is quite an undertaking.
I've migrated to a custom x-carriage plate that holds a Bondtech BMG extruder and an e3d MT-1701 short-body stepper motor. This certainly leads to a cleaner, neater, and likely substantially lighter solution than what I had before. The e3dv6 remains as the hot end, but I've reverted to using the original e3d snap-on cooler instead of my earlier (unpublished) carriage mounted cooling shroud. I liked the concept of a carriage mounted shroud and wanted to retain it, but accommodating something like it was going to complicate the carriage design. For now, I'll just use the e3d cooler. I have, however, retained my preference for flipping the hot end fan so airflow is pulled through the hot end and exhausted to the front of the printer. I've also retained the use of a 10-degree wedge to angle the exhaust airflow up off the bed a bit, should I decide to once again give ABS or some other filament a shot that is sensitive to drafts across the print surface.
As time permits, I'm still working through adjustments and calibrations, but initial prints suggest I've gotten rid of a lot of the ringing or ghosting that I've seen on my prints since day 1. That's a bonus. On the bad side, I hadn't realized how much I always glanced at the large herringbone gear to see what the printer was doing. There's nothing to see on this new setup, and I can't even hear the stepper motor over the hot end fan noise.
The part-cooling blower I had been using with the Greg's Wade configuration is more powerful than the thinner, more common 5015 style, but I opted to shelve it since I believe it is no longer available. Migrating to a new part cooling scheme is another reason why I wanted to redo my x-carriage configuration. Can you see where I mounted a 5015 blower? Hopefully not, since I printed a cover for it in some special stealth-mode filament that I'm testing.
Seriously though, I put the 5015 blower where I always felt the part cooling fan/blower should be on the i3v - behind the carriage, with the blower mounted so the exhaust duct is below the carriage and facing the heater block & nozzle. Glancing at the above images again, you'll see I've changed the wheel configuration of the carriage around so the single adjustment wheel is on top and the two fixed wheels are on the bottom. The duct from the blower will pass from rear to front in the space between the two lower wheels, with mounting holes on the bottom of the carriage to keep it in place.
I haven't finished design work on the duct. Perhaps in a month or so I'll have another update with a completed duct and results from additional printing experience.
I haven't decided whether I'll publish the new x-carriage. I'm not sure how much interest there is in it, especially since it is specific to the i3v (and possibly Pegasus) v-rails, the Bondtech BMG, a short body stepper motor, and the e3dv6 hot end. Many may not like the idea of the rear-mounted part cooler, or the use of e3d's snap-on hot-end cooler. The carriage also requires the right side to be clear of anything, something I already had achieved by relocating my x-endstop to the left side of the printer and my Z-endstop to one of Cloug42's endstops on the far right end of the x-rails. This new carriage also requires use of a specific x-axis cable mount that I'd also have to release. So, we'll see.
Oh - one more thing. It doesn't stand out in the photo, but there is an additional mounting provision on the left side of the carriage, beside the Bondtech. I haven't bought one, but the carriage is also designed for a BLTouch bed sensor. You never know - one of these days I may end up finally jumping on the auto-leveling bandwagon.
-
02-04-2019, 10:19 PM #2Student
- Join Date
- Jan 2017
- Posts
- 7
Awesome. I have been looking at the Bondtech Extruder as an upgrade. . I am still running the stock Wades on the i3v. There will be a change to it in the future. Originally Posted by printbus

Your new carriage would be a direct bolt on for the Pegasus. NP. I would find it useful.
I love the BLtouch probes. I have them on all 3 printers. No more dinking around with adjustments. I think you will like it. I have a hell of a lot fewer issues with prints not sticking these days. The printers are pretty much no touch now.
-
02-05-2019, 06:17 PM #3Staff Engineer
- Join Date
- May 2014
- Location
- Highlands Ranch, Colorado USA
- Posts
- 1,437
Thanks for the feedback. I'm pretty much out of pocket the next couple of weeks, so give me some time to work out the cooling duct. If nothing else, I'll share the openSCAD source privately since you expressed interest. Originally Posted by 1911ly
-
02-06-2019, 11:31 AM #4Student
- Join Date
- Jan 2017
- Posts
- 7
NP, and no hurry. I have a bunch of current projects keeping me busy at the moment.
-
02-02-2019, 05:38 PM #5Student
- Join Date
- Jan 2017
- Posts
- 7
My son got us in to 3d printing. He really wanted one. That is what got us started. We print with mostly PLA. i have PETG and ABS I use for some projects. I bought some Ninja Flex to try but haven't used it yet. Originally Posted by printbus
I have a RPi project box I designed on the plater at the moment. I'm having a lot of fun with this stuff.
I have a couple Orange Pi Lites I use for cameras on homebrew. I am using a program called motion. I am using the GPIO pins to control canceling prints if I see a issues and turn cabinet lights on and off. I am using Python to control the GPIO. It works good. I don't print over WiFi. I have used Octoprint. It does work good. I used the OPi's because they were dirt cheap.
I am putting another RPi setup to replace the OPi's. I am having as much fun with the harderware/software stuff as I am with printing.
-
02-15-2020, 12:13 PM #6Super Moderator
- Join Date
- Nov 2013
- Location
- Baltimore, MD
- Posts
- 897
Speaking of dusting off, I still have my Maker Farm 8" wood with rods printer still running. It has a dual IttyBitty print head but the printer still works great. I don't use it very often but dusted it off last month after a year of non-use and it worked perfectly straight away. I even used the PETG filament that's been hanging over it for two years, out in the humid open. I had no printing issues and the parts were perfect. Go Maker Farm and PETG.
Bambu P1S/AMS
NVision4D http://nvision4d.com
-
02-15-2020, 12:23 PM #7Student
- Join Date
- Jul 2015
- Posts
- 27
RobH2 that’s great to hear! Im curious if the rod version before the v-rails lends more stability. This week as I’ve been looking at newer printers to see what has been going on in the industry I couldn’t help but notice the highly praised Original Prusa MK3 uses rods.
While I have only adjusted my x-carriage rollers, they do give some play if they loosen.
-
02-15-2020, 12:36 PM #8Super Moderator
- Join Date
- Nov 2013
- Location
- Baltimore, MD
- Posts
- 897
I always assumed the rail version was more stable but I have no way to compare. I'm guessing the rail version is better though. I was planning to upgrade with the rail kit but never did. I bought this printer to do quick prototypes of items for clients. I soon found that I could order much, much better parts online as prices dropped and quality got better so I began using my printer less and less and never bought the rail upgrade kit. Now I just make parts for friends boats or cars now and then. It's still a great printer.
I would be curious to see what the current top rated do-it-yourself printer is. Maybe it's still the Maker Farm. I just haven't researched it.Bambu P1S/AMS
NVision4D http://nvision4d.com
-
02-16-2020, 12:54 PM #9Student
- Join Date
- Jul 2015
- Posts
- 27
I did see your revision to Greg Wade’s Extruder and thank you for the comments. Has there been a noticeable increase in print quality with the BMG? With the lighter weight I would assume there would be less lash/play but maybe it only comes into play at higher speeds.
-
02-17-2020, 08:27 AM #10Staff Engineer
- Join Date
- May 2014
- Location
- Highlands Ranch, Colorado USA
- Posts
- 1,437
I don't think it would be fair for me to try to address that, based on the limited printing that I've done. I also know that the filament I have now prints crappier than the filament I used to have, so there's that significant factor as well. Originally Posted by CoffeeCup
As you suggest, I think the BMG approach has a lot of potential over the Greg's Wade. No gear backlash. Better grip on the filament - perhaps especially beneficial in precise retraction & recovery control. Yes, the lighter extruder, especially along with the smaller/lighter stepper motor I used should lead to a lighter carriage that is quicker to accelerate/decelerate. I remember running some mechanical tests to determine what settings I'd use, but I don't recall how the settings compare to what I used to run.
Improving cooling airflow was a driver in the carriage redesign and migration to the BMG. I'm pretty sure the new approach provides better print cooling airflow, so that has potential for improved print results if the cooling is applied properly.


 Reply With Quote


Qidi X Plus 3 Paper thin first...
05-27-2024, 01:15 AM in General 3D Printing Discussion