


Results 191 to 200 of 255
Hybrid View


-
05-08-2015, 10:12 PM #1Staff Engineer

- Join Date
- May 2014
- Location
- Highlands Ranch, Colorado USA
- Posts
- 1,437

One, I started looking at the mess I had on the electronics side of the printer and figured there had to be a simpler way. The Arduino/RAMPS/stepper driver stackup, the heat bed relay, a triple MOSFET switch board added to provide more switch controls than RAMPS offers, a 5v/12v fanout board to deal with the extra power distribution, and all the wiring in-between. Two, I spent several days putting together a cross reference showing the mapping flow from MEGA2560 processor pins to the Arduino 2560 schematic, the Arduino 2560 board (which is marked different in some ways than the schematic), the RAMPs schematic, and the RAMPS board (which is also labeled different from the schematic), and simply concluded the almost incoherent mapping was nuts. Three, then there's the nibble data transfers with the LCD that would get out of sync and garble up my display data far too often... Originally Posted by TopJimmyCooks

Four, in general, I think Marlin has seen it's day. I've never had much of anything good to say about Arduino base Marlin is built on except it's great for kids building simple school projects. Having been around a long time, Marlin has underwent countless mods. Some of these have been made by people who understand programming microcontrollers, but many were not. The lack of consistent coding style is frustrating in trying to review Marlin code. Marlin is just getting more and more complex as far as processing needs, and if the MEGA2560 processor isn't up against it's bandwidth limit, it will be soon. The latter drove me to a 32-bit processor solution, not just an integrated board solution like RAMBO or RUMBA, and I wanted to jump to a fresh start of a firmware baseline, perhaps better designed from the ground up for what it is doing. And perhaps a firmware baseline subjected to more revision scrutiny than Marlin.
So why Smoothieboard and not some other 32-bit solution? I admit I could have or should have probably done more research on that. Sure there are other 32-bit options either in the pipeline or already on the table. I guess I'd say with Smoothieboard I'm using a product with around two years of legacy behind it now. I'm not sure how many other 32-bit solutions can say that. Firmware is still arguably a bit weak, but the basic functionality for our type of 3D printer is there. I've seen a few reliability quirks, but I'm still early in the game with it. It's also too soon to say whether I see any substantial difference in the printing process or in print quality from the tweaked Marlin baseline I was running, but those weren't significant factors in wanting to switch.Last edited by printbus; 06-17-2015 at 02:07 PM.
-
07-10-2015, 03:09 PM #2Student
- Join Date
- Jun 2015
- Posts
- 2
printbus - thanks for posting all of the great information. I'm finishing building a 10" i3v, and have included a smoothieboard from the start. Can you share your smoothieware config settings? I have the basic machine config items (pins, steps, etc.) worked out, but would appreciate your experience with speeds, accelerations, etc. I have also reviewed your detailed thread on marlin configuration, so I'm aware of what you've learned & documented there. I'm not 100% clear on mapping that over to the smoothie config.
Thanks again, this is such a great resource you have provided.
-
07-10-2015, 03:45 PM #3Staff Engineer
- Join Date
- May 2014
- Location
- Highlands Ranch, Colorado USA
- Posts
- 1,437
This is the config file I'm currently using with the April 27 2015 Smoothieware build - https://dl.dropboxusercontent.com/s/...525_config.txt Originally Posted by David Carter
Changes I've made from the distribution config.txt file are annotated with comments that include initials KJB and a date code consisting of YYMMDD. IIRC, I started with the same feedrates I had been using in Marlin, and left jerk/acceleration at the Smoothieware defaults. I've been pretty happy with things as they are, and have been busy on a lot of stuff unrelated to 3D printing. So, I haven't undertaken the effort to push the Smoothieware settings much.
I like the Smoothieboard solution, but I do have to watch out for two problems that occur fairly randomly. I have the hot end fan controlled so that it runs only when the hot end is above room temperature. For some reason the fan isn't turned on about one out of every 4th or 5th print and I'll have to reset the printer and try again. I've also had issues with the printer locking up mid-print. The latter may be a USB communication error with Simplify3D, but it occurs infrequent enough that I haven't done anything about it other than log when it occurs. After a year with Marlin I had no qualms letting it run for hours unattended. Due to the occasional lock up, I try to stick in the area now when the printer is running.
-
07-09-2016, 02:32 PM #4Staff Engineer
- Join Date
- May 2014
- Location
- Highlands Ranch, Colorado USA
- Posts
- 1,437
Not much point to responding, but since the thread was reactivated...
It hasn't helped that MakerFarm typically isn't open with specifications for motors they use, or very helpful in explaining how the suggested 0.39 to 0.5V Vref stepper motor driver setting correlated to a motor current value. People were left to figure that out for themselves. Colin's position on the old motors was that users shouldn't worry about how hot the motors got, since stepper motors are designed to run hot (typically 100 degrees C). Unfortunately, the extruder motor in particular was troublesome since it was just a matter of print duration before the printed motor mount or the shaft-mounted small Greg's Wade extruder gear would start to soften.
For the MakerFarm subforum here, the first news I remember regarding the 9V 0.5A specifications for the old motors was from clough42 in thread MakerFarm Prusa i3 and i3v 66 oz. in. Stepper Motor Specifications
For those older 0.5A motors, the theoretical optimal Vref adjustment on a stepper motor driver based on the Allegro A4988 chip with the typical 0.05 ohm current sense resistors is I * 0.4 or 0.2V. So, one *might* argue that the build guides (at least older ones; I don't know of current ones still suggest the 0.39v to 0.5v setting) do have the proper value for dual Z motors on one driver, but are overdriving the single motors on X, Y and the extruder.
However, it's arguably almost impossible to over drive those old motors with too much current. The 18 ohm (I measure about 18.5 ohms on one of my old motors) coil resistance will itself limit the current to 0.66 amps for a 12V source (12V / 18 ohms). Factor in any voltage drop in the wiring from the power supply to the electronics, voltage drop in the 5A polyfuse (RAMPS assumed), and voltage drop in the stepper motor drivers themselves and you're going to be running even closer to that 0.5A motor spec, even though the driver may actually be set to a higher current than that.
Then there's another major limiting factor with those old motors that applies when you're actually trying to step them, not just letting them sit in holding mode. The unusually high inductance of those motors meant they were slow to respond. Inductance in a circuit limits the rate that current can change; a high motor inductance hinders the ability to instantaneously step the motor current to the set value. I never attempted cranking through the math or monitoring the motor drive with an oscilloscope, but I always figured we had a real bad combination on the Z-motors, with high inductance motors and a high step frequency driven by wanting to adjust Z as fast as we could while being burdened with a ridiculously high 4000 steps per mm for the M5 threaded Z-rods and level 16 microstepping. Here, that inductance is probably kicking in as a limitation even more than the coil DC resistance. For all I know, the stepper driver turned off the step pulse or moved to the next step before the motor current had actually reached what it was intended to.
Until I put together gcode scripts to specifically test motor movements for the brain-busting thread Marlin Motion Related Configuration.h Settings for MakerFarm i3v, I never felt the stepper motor driver adjustments really did much. Perhaps the adjustment was being overcome by the limitations of either the motor coil resistance or inductance. It took those test scripts to reveal what my motor limitations were.
I'm aware of at least three different methods for adjusting the motor current limit setting. So far, we've been talking about setting the voltage adjustment for the motor current specification. Some argue that gives you the most torque and the best positional accuracy, especially if you run without microstepping. But I've also seen a position from Pololu (originator of the stepper driver concept) that the voltage adjustment isn't very accurate, and a better way is to actually measure the motor current and set the trimpot as needed to obtain the desired motor current, ignoring the actual voltage. Then there's the camp that suggests ingoring the value and just adjusting the motor currents empirically by how the printer actually works.
While I was running Marlin and MEGA2560/RAMPS, I ended up in that latter camp. I found that adjusting the motor currents for what were actually quite low values still kept the motors from skipping, would still give me good prints, and coincidentally eliminate resonances and belt flutter that made the printer sound like a crappy toy. I don't remember what the voltage values were on the settings, but I do remember they were quite a bit lower than what they would have normally been set to for a theoretical limit.
When I migrated to running Smoothieware on Smoothieboard , I don't recall having the issues with resonances and belt flutter like I had with Marlin/Ramps, even with my Kysan motors driven to their limit of 1.5 amps. None the less, I did back off the digital motor current settings to 1.0A as part of some initial futzing and I've just left them set to that for over a year now. I also have my Smoothieboard configured to dedicate a driver for each Z motor, so I don't need to worry about the issue of shared driver current for the dual Z-motors. As mentioned in a prior post, I can always revisit that should I want to use that 5th motor driver for another extruder.Last edited by printbus; 07-09-2016 at 06:55 PM. Reason: detail
-
02-01-2019, 06:02 PM #5Staff Engineer
- Join Date
- May 2014
- Location
- Highlands Ranch, Colorado USA
- Posts
- 1,437
RobH2 - great to hear from you after so long. 4 or 5 downloads a month, huh? Yeah, I typically glance at my stuff on Thingiverse just about every day to see what the traffic has been. I used to get real excited when something hit a couple of hundred total downloads. That bubble recently burst, though. Whatever time I spend these days helping people with 3D printers seems to be with Ender 3 discussions. Looked at some Creality widget the other day that had something like 45,000 downloads.
Always wondered how many machines Colin sent out. Had to be a pretty small number compared to machines like that.Last edited by printbus; 02-01-2019 at 06:18 PM. Reason: clarity
-
02-01-2019, 07:03 PM #6Student
- Join Date
- Jan 2017
- Posts
- 7
Hello Printbus. Your thread was my first and only post up till this moment. I did get my sons I3v up and running flawlessly. It has given me very little trouble. I've read your thread form end to end several times. I ditched the stock end of limits switches and have added ABL. 2 years and very happy with it.
The only issue we really have had was just having one printer. We print a lot. About a month after the first printer I got the wild and crazy idea to build a homebrew. It evolved in to a fully enclosed printer 300x300x 400mm print size. It is the most used printer in the house. We usually print 3-4 rolls a month on that one. The boy uses his I3v a lot too.
I also picked up a 12in Pegasus that was someones failed build. I have that up and running too. It is a spare but we do use it from time to time. I should probably post up some pics and info on the 3 printers we have.
So, I have you to blame for the 3 I have now. lol. It is a fun hobby. I am doing things in CAD I never dreamed I could ever do. Zero regrets. Thanks for the inspiration! I will pull some pictures together and do a thread soon. I also have some designs on Thingiverse, same screen name. Thanks for the inspiration! And all the great tips and I deals I got from this thread!
Larry
PS I have been collecting the stuff to do a SLA as the next project.
-
02-01-2019, 07:16 PM #7Super Moderator
- Join Date
- Nov 2013
- Location
- Baltimore, MD
- Posts
- 897
Larry, I'd like to welcome you to this forum. It's populated with some very, very gifted people. Do take advantage of them and you'll enjoy the journey.
Bambu P1S/AMS
NVision4D http://nvision4d.com
-
02-03-2019, 11:21 AM #8Staff Engineer
- Join Date
- May 2014
- Location
- Highlands Ranch, Colorado USA
- Posts
- 1,437
Z-AXIS LEAD SCREW UPGRADE
I was never thrilled with the 5mm threaded rods MakerFarm used for the Z-axis. They worked, but were so S-L-O-W. As a result of testing for an upper limit, I ran a z-axis feed rate of 2.5mm/Sec. A full 200mm of z-axis travel would mean 80 seconds of travel time.
From what I recall back in the i3v heyday, lead-screw upgrades always involved new Z-axis motor mounts that moved the motors farther from the frame. Since I overachieved and glued together all the fixed joints in the i3v wood frame during my initial assembly, swapping out the Z-axis motor mounts would not have been an easy thing to do. So, I just put up with the slow feed rate of the 5mm rods.
In a recent scan of i3v stuff on Thingiverse, I realized there were options for lead screw upgrades that retained the original motor mounts. With the right style of nut on the lead screws, new Z-axis nut plates is all that would be required. The i3v Lead Screw Nut Plate by cperiod even provided openSCAD source, so I went for it. I used 8mm diameter, 400mm long 4-start (8mm travel per turn) lead screws and brass nuts from ZYLTECH, along with their 5mm to 8mm shaft adapters. I debated whether single-start (2mm travel per turn) would be a safer bet than the 4-starts, but figured if 4-starts work on the latest Prusa MK3, they ought to work for me, especially knowing my Smoothieboard has a dedicated stepper driver for both Z-axis motors.
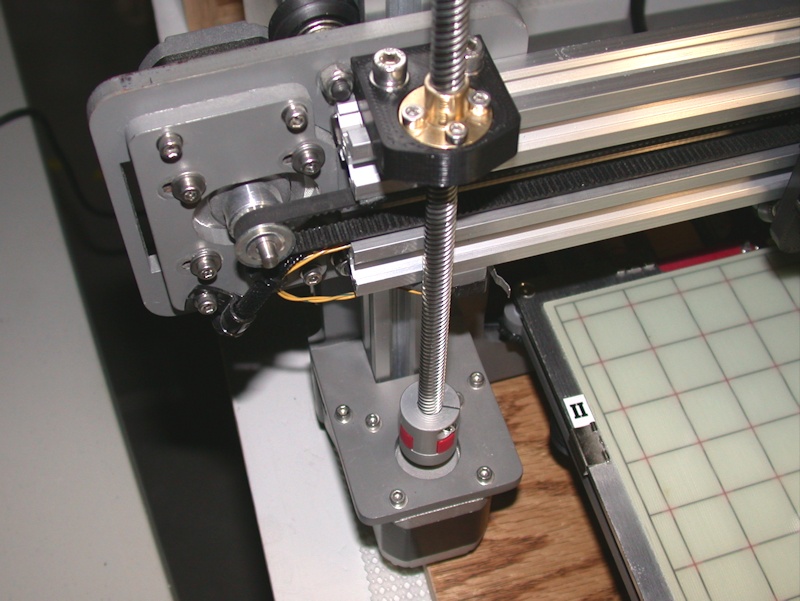
I haven't tested for a higher upper feedrate limit, but the i3v is currently configured and running fine with a Z-axis feed rate of 25mm/sec. That's quite swift compared to the original 5mm threaded rods. While the higher rate might help reduce time spent on layer shifts and lead to some marginal print quality improvement, the major benefit will likely just be in homing.
One brass nut in particular took a lot of shimming under one side for it to mount flush in the nut plate, and I had issues with the right-side screw being off-kilter from the vertical rail on that side when I mated the Z nut plate on that side to the x-idler plate. It appeared like the square hole on the x-axis idler plate for the Z-nut plate wasn't properly centered over the rail. Filing the hole wider and the tab on the nut plate narrower achieved the proper alignment. Until I can better understand what caused the misalignment, I'm holding off on posting the refinements I made to the Z nut plate to Thingiverse.Last edited by printbus; 02-03-2019 at 02:28 PM. Reason: typo
-
07-10-2015, 04:02 PM #9Student
- Join Date
- Jun 2015
- Posts
- 2
Thanks! This is very helpful.
I have my hotend fan wired directly to the power supply, so the temp-controlled fan issue you mention should not be a problem for me.
Interesting to see that we both chose the same route to connect the second z motor, slaving epsilon to gamma. At some point I'm planning to add a second extruder, so will need to add an external stepper driver at that time.
-
12-29-2016, 08:59 PM #10Staff Engineer
- Join Date
- May 2014
- Location
- Highlands Ranch, Colorado USA
- Posts
- 1,437
DECEMBER 2016 STATUS UPDATE
For those still interested in this ancient thread, I'm evaluating a mod that I'll summarize later in another post. To keep that future post focused on the mod, here's an interim status update.
Since May 2015, my modified MakerFarm printer has simply been there when I needed or wanted to print something. The *only* hardware mod or repair I've made since then is the installation of the new silicone insulator boot for the e3dv6 hot end. I'm even still running the same gears on my refined version of the Greg's Wade extruder. From a firmware perspective, I'm still running the version of Smoothieware that I first installed in April 2015. I just haven't had a reason to search out a newer version. Every now and then I log the traffic on the Smoothie IRC channel to see what's up, but right now I lean towards leaving things alone and predictably usable as opposed to migrating to something new and possibly spending time battling new issues.
Am I still happy with the migration to Smoothieboard? Yeah, probably. At the time, I wanted a hardware solution that was simpler than the RAMPS stackup and wanted to get away from the Arduino core. Smoothieboard running smoothieware met those objectives. I haven't had a need to tweak my Smoothieware baseline since the original migration, but having Smoothieware configuration parameters in a text file that can be updated without needing to recompile was pretty slick. Would I migrate to Smoothieboard today if I was doing it again? That's a tough question. There are options out there that didn't exist in early 2015, and through the work of Roxy and others, Marlin is perhaps currently reaching the tested baseline that I was looking for in 2015.
Looking at my gcode archives, the printer has sat unused for as long as two months between uses, mainly in the summer days when I've got a lot of other time distractions. At the other extreme I've printed several items back to back in the same day. Prints have mostly been for things that I needed around the house or needed for one electronics project or another. Most have been pretty small items that print in less than a couple of hours. openSCAD is still my design tool of choice, mainly since it is the only tool I've ever used. In a nutshell, the script language fits well with the engineering approach I tend to apply to everything I do. That likely doesn't make openSCAD the fastest design approach. While I've cranked out the design for some simple things I've needed in perhaps a few minutes, I've spent countless hours working through the parametric details of some complicated designs. Only a portion of my openSCAD designs make their way to Thingiverse.
I'm happy with purchasing Simplify3D. I think it's been an important part of having a solid baseline that simply works when I expect it to. Really the only issue I've had with Smoothieware on Simlify3D gcode files is an occasional freeze-up of the printer, supposedly due to infinitesimally short line segments Simplify3D was requesting of the printer that other firmware like Marlin would filter out. Updating Simplify3D a while back seems to have fixed that problem. It took a while, but experience has got me to the point where I can do a fair job of looking at a design and tweaking number of perimeters, infill, supports, etc. with fairly predictable print results.
Everything I print now is done with PLA. I futzed with ABS in my early days, but grew weary of making it stick with my open-frame i3v. PLA fills my needs - it's as simple as that. I print hot - I can't remember the last time I printed anything with the hot end set to less than 210 degrees C. But, I like glossy print results, which comes with the high temp. In my current setup, I'd say the most important factor to my print quality is the filament. It's easy to make good filament print like crap, but tough to make poor filament print well. Second to that it's adjusting the slicer for the actual filament diameter and applying just the right amount of print cooling airflow.
There's only two options to my choice of a print surface. If I'm striving for a smooth or glossy bottom finish, I'll print on a heated bed with glass sprayed with Garnier Fructis Style #5 hair spray. If I want a matte bottom finish or have a print with a lot of bottom layer detail that could be affected by overzealous first layer squish, I'll print on a cold bed and 3M painter's tape swabbed with alcohol. That's it.
Still no bed leveling or bed compensation here. Having it might have saved a few minutes when switching between hairspray and painter's tape print surfaces a few times, but I simply haven't wanted to hassle with implementing a bed compensation scheme and getting it to work. The thumbwheel screws on the four corners of my Y-bed and the bed leveling wizard in Simplify3D that moves the print head around the print bed in a square for checking the nozzle gap works fine enough for me. It probably helps having a printer with the smaller 8-inch print bed, and I think it's arguably important that I spent a lot of time squaring/truing up the printer during my initial build and then glued most of the wood joints into a fixed alignment. Little can likely change or drift at this point.
What I haven't cared for is what seems like a hodge-podge approach of the bed heater that is upside down, the bed heater mount screws with heads sticking up that force use of a glass plate with the corners cut off, and some random arrangement of binder clips used to hold the print surface together. That is the focus of my mod to be discussed after some time running with it.Last edited by printbus; 01-04-2017 at 07:02 AM.


 Reply With Quote


Please explain to me how to...
05-13-2024, 03:08 PM in 3D Printer Parts, Filament & Materials