


Results 171 to 180 of 255
-
01-15-2015, 02:18 PM #171Engineer

- Join Date
- Nov 2014
- Posts
- 522
Yeah, I'm printing at 50mm/s right now, without issues. It makes me want to try and push it a little further. I don't have much experience myself only being in this for around a month :-)
-
01-15-2015, 02:23 PM #172Engineer-in-Training
- Join Date
- Mar 2014
- Location
- USA
- Posts
- 388

Many thanks! I made a cart for a threaded rod (P/N 25DM77) and M5 SS nuts (P/N 22YK31) with shipping for $16.57. Very surprisingly, the shipping is only $10 so I might just go for it Originally Posted by printbus


-
01-15-2015, 03:11 PM #173Staff Engineer
- Join Date
- May 2014
- Location
- Highlands Ranch, Colorado USA
- Posts
- 1,437
Printing speeds are also pretty tough to compare. A set speed can't be met unless both Marlin and the slicer are configured for it or the slowest setting will dominate. Set speeds may not be realized if the slicer is configured for print thermal management that slows things down to maintain a minimum layer time. Even when high print speeds are observed in a viewer like gcode.ws, they may not be realized if a lot of the printed movement is spent in acceleration and deceleration. So, without knowing the overall context, hearing about someone's print speed may not mean much. Originally Posted by sniffle
Being a month in, you're likely still fascinated by the printing process. Nothing wrong with that. I got to the point where printing started to get kind of boring, and I began wondering whether prints had to be going as slow as they were.
-
01-15-2015, 06:05 PM #174Engineer
- Join Date
- Nov 2014
- Posts
- 522
Originally Posted by printbus
yeah i'm still in the honeymoon stage :-P
but as an example i just printed the kossel platterx3.stl in 6hrs 15 min. which is pretty decent
-
01-18-2015, 09:13 PM #175Engineer
- Join Date
- Jul 2014
- Location
- Eastern Colorado
- Posts
- 536
I have to replace my Z threaded rods too. The one on the RAMPS side is worn out from ABL raising and lowering over the same area repeatedly. It's so bad I can't print anymore, that Z nut keeps slipping down over the worn area. Thanks guys for the Grainger part numbers, that made it easier to find replacements.
edit: Though it occurs to me now after I've placed the order, that I could just flip the rods over so that the worn area is higher up, where it won't interfere with shorter prints. >_
-
01-31-2015, 07:10 PM #176Staff Engineer
- Join Date
- May 2014
- Location
- Highlands Ranch, Colorado USA
- Posts
- 1,437
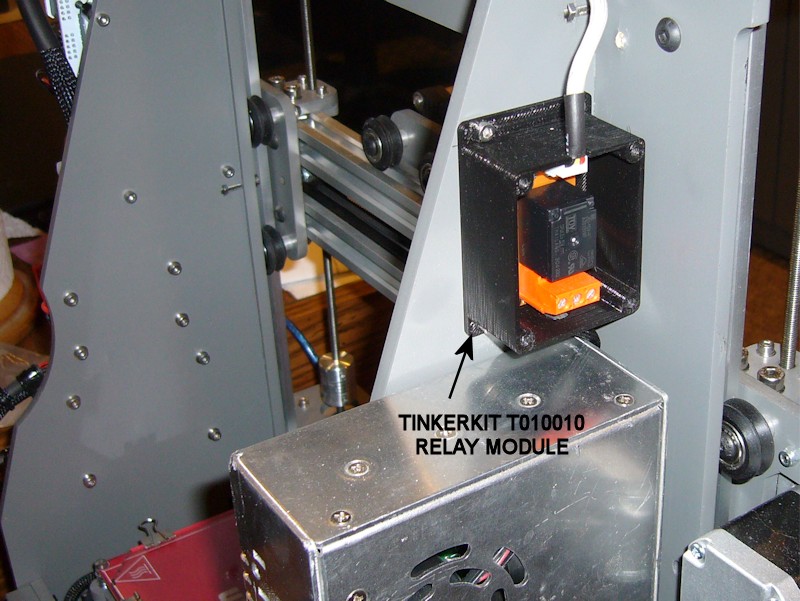
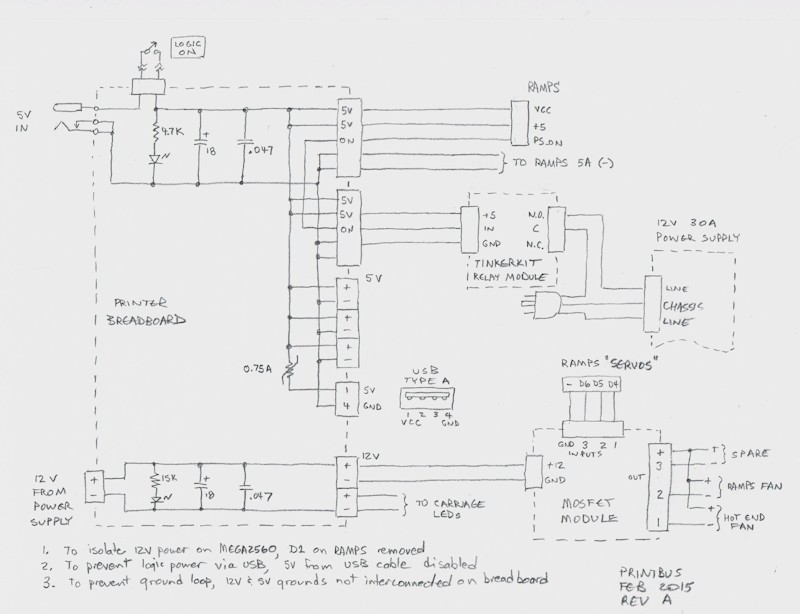
POWER MODIFICATIONS
These changes wouldn't be for everyone, but I wanted to modify how power is handled on my i3v printer:
- Provide capacity for 5V loads beyond what USB and the MEGA2560 on-board regulator can support
- Add a distribution scheme for 5V power other than connecting loads to RAMPS
- Be able to power up logic (MEGA2560 and LCD) without any fan noise being present
- Take advantage of Marlin provisions of power on/power off via LCD control or gcode
- Take advantage of Marlin provision for turning on extruder fan above a set extruder temperature
- Take advantage of Marlin provision for turning on RAMPS cooling fan when motors are being used
Use of an ATX power supply with a 5V standby output would have solved some of these expectations, but I didn't have a spare one that I wanted to use. I also preferred to keep the integrated feel of the MeanWell mounted on the i3v frame, so I came up with ways to adapt the MeanWell power supply to what I wanted. To provide a 5V source, I used a 5V 3A wall adapter that I had available. Yes, this will now require two power cords plugged into an AC outlet. I left the +5 connection disabled in my USB cable so that the MEGA2560 and LCD aren't powered by the USB connection.
I added a Tinkerkit T010010 Relay Module inline with the AC source for the MeanWell power supply. This relay is controlled by the PS_ON signal on RAMPS. The custom case I created for the Tinkerkit Relay Module is available at http://www.thingiverse.com/thing:643351
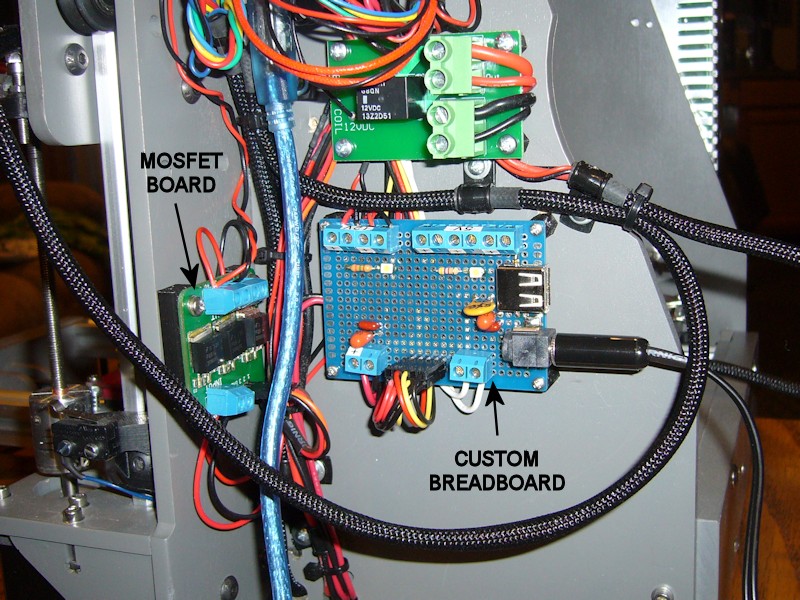
A MOSFET breakout board module switch relay (15A, 60V) 3-outputs for Arduino/PIC module from eBay was added to expand the 12V switching capacity of RAMPS. Inputs to the switch board are currently connected to D4, D5 and D6 on the RAMPS Servos connector, but I can repin connectors as needed in the future for AUX-1 or AUX-2 connections instead. The custom spacer developed for the MOSFET module is available at http://www.thingiverse.com/thing:1872958.
A custom breadboard was made to provide the necessary 12V and 5V connections and fanout. White SMD LEDs were used as power indicators, and I added a USB Type A connector for possible future use. I took advantage of building a custom breadboard and added both low frequency and high frequency decoupling capacitors to the board.
Marlin firmware changes associated with the wiring modifications include:
- Verified file pins.h has PS_ON defined as Arduino pin 12
- In file configuration.h, changed the definition of POWER_SUPPLY from type 1 to type 2 for an active-high power-on control and uncommented PS_DEFAULT_OFF so the 12V power supply starts in the off state
- In file configuration_adv.h, defined EXTRUDER_AUTO_FAN_PIN to Arduino pin 4 and set EXTRUDER_AUTO_FAN_TEMPERATURE to 35 so extruder fan is on any time the extruder reads over 35 degrees C
- In file configuration_adv.h, defined CONTROLLERFAN_PIN to Arduino pin 5
- In file ultralcd.cpp, rearranged the prepare menu so power control is at the top of the menu
I already don't like how the 12V power supply is shut off when host software connects to the printer and resets the MEGA2560. If I continue to find that unacceptably annoying, I'll add a diode-OR means of using another panel switch to force the 12V supply to stay on when I want it to. It would help if the folks at Simplify3D would have included a power control button in their machine control interface. I can consider migrating to a fabricated circuit board after resolving this and any other changes I want to make. The circuit board would likely include the MOSFET switches.
Marlin provides a speed setting for both the extruder fan and the RAMPS cooling fan. I was hoping to use those speed settings as a way to reduce fan noise, but found the PWM whine from anything other than full speed to be unacceptable. I'll have to look into how the high frequency PWM on the print cooling fan output is set up to see if I can replicate that on these fan outputs.
Here's an informally drawn schematic of the wiring changes -
Last edited by printbus; 11-05-2016 at 03:49 PM. Reason: added link to spacer for MOSFET module
-
01-31-2015, 07:21 PM #177Super Moderator
- Join Date
- Nov 2013
- Location
- Baltimore, MD
- Posts
- 897
Nice work. Hmmm, now you have me thinking about modding again.
Bambu P1S/AMS
NVision4D http://nvision4d.com
-
02-02-2015, 11:17 AM #178Student
- Join Date
- Jan 2015
- Location
- Minnesota
- Posts
- 5
This is a wonderful read for me, I've looked at a number of printers, and I'm intrigued by the prusa I3v line, I'm pretty well set on a 10/12" model. At this point, I haven't ruled out more expensive printers, but like the idea of building it myself to get a feel for the printer, as well as its community base.
I've been considering adding a few components to the assembly out of the box so I can do it on first assembly rather than later, though indubitably I will have to do this in the future, anyway. I was considering the kysan motors as one such addition. Do you have any recommendations on parts to add to the initial build either due to increased quality, or difficulty in adding them at a later time?
I've already got an area set aside, and plan on making an enclosure and filament storage container for the printer.
-
02-02-2015, 11:23 AM #179Technologist
- Join Date
- Aug 2014
- Location
- Oklahoma
- Posts
- 191


Msmnick, check out this thread, some of the same questions about upgrades have been posted and answered . http://3dprintboard.com/showthread.p...rinter-Ordered.
Where in MN are you? I just moved to OK this summer from the cites.
-
02-02-2015, 11:51 AM #180Super Moderator
- Join Date
- Nov 2013
- Location
- Baltimore, MD
- Posts
- 897
Glad these threads are helping. You might also want to have a look at this thread I started a few months ago: Originally Posted by Msmnick
http://3dprintboard.com/showthread.p...Show-your-MODSBambu P1S/AMS
NVision4D http://nvision4d.com

 Reply With Quote


Extruder not feeding during print,...
04-24-2024, 01:59 AM in Tips, Tricks and Tech Help