


Results 1 to 10 of 14
-
04-29-2015, 06:59 AM #1Administrator

- Join Date
- Jan 2014
- Posts
- 7,697

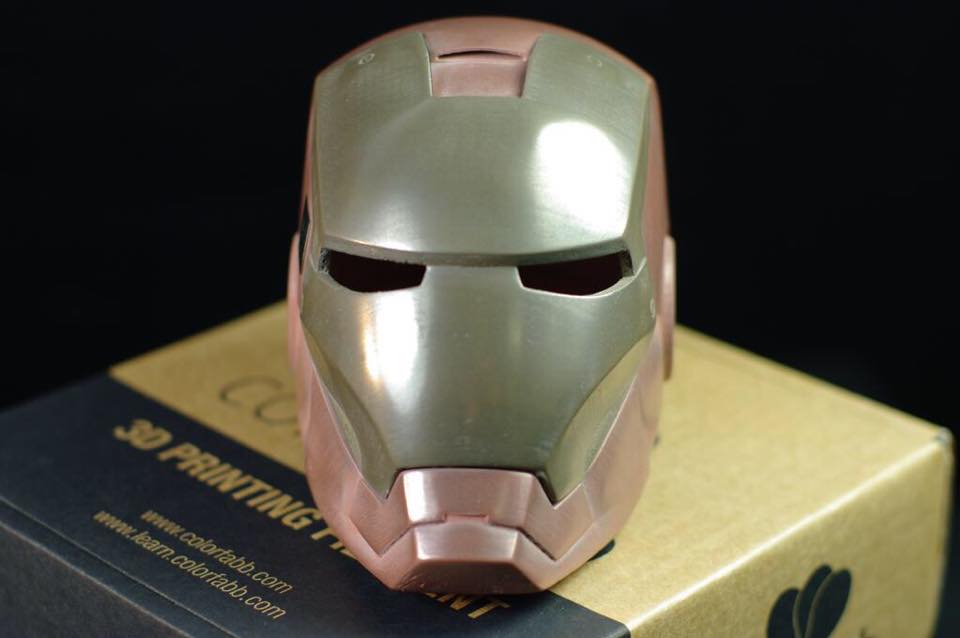
Incredible 3D Printed Metal Iron Man Helmet -- Using Colorfabb Filaments
Latvian 3D printer manufacturer Mass Portal 3D printer an amazing replica of Iron Man’s helmet, as seen in the upcoming The Avengers: Age of Ultron movie, using ColorFabb's metallic 3D printing filaments. The helmet was printed using their Pharaoh ED delta style 3D printer using CopperFill and BronzeFill filaments. You can read more about the awesome build over on 3DPrint.com: http://3dprint.com/61305/mass-portal-iron-man-helmet/
Below is a photo of the Iron Man helmet:
-
05-01-2015, 05:44 AM #2Super Moderator
- Join Date
- Jul 2014
- Posts
- 8,818
lmao - you wish !Each 1 kg spool of their metallic filament will only set you back about $54.
it's 750 grams. But bear in mind it's 3times denser than standard abs or pla. So you only get a third as much for the same weight. IE: it's like buying a 250gm roll of abs or pla.
In equivalent printing terms it actually costs $216 to print the same amount that you could print with 1kg of pla or abs.
Add to that the fact that for large items you need pretty heavy infill as the filament is just too heavy and soft to bridge, and it's a pretty expensive material to work with.
That said it prints really easy and small items will print hollow with no problems.
It also requires a little more than just 'polishing' to get that metallic shine. You have to go through several grits of sandpaper and steel wool before you get close to metallic. For anything with fine detail it's a real pita.
In it's un sanded form it resembles a rough ceramic. Which is quite a nice finish by itself.
Nice helmet - but probably easier to print with pla and paint it with metallic paint.
-
10-23-2015, 08:13 AM #3Engineer
- Join Date
- Jan 2015
- Posts
- 445
I did this printed upside down (head to the plate) and cut out about 40% of the filament, and used less than 1 full spool of PLA. Total cost of this was about 11$ given what I paid for the filament (hatchbox PLA).
Did this on my Taz 5, with 1.75mm filament (i inserted an aluminum tube from hobbed bolt to the hotend and it works to guide the 1.75mm all the way without issue).
No heat creep due to a quick 2 second electrical tape mod.
Cant believe it finished the first time. I know the WTFGAMINGBBQ guys had a hell of a time with this print on the older taz
QUality is .2mm, and not great, because i have a z banding issue on this printer. Its actually going back to amazon today, the new one i have here now has none of the z banding issues... so thats good.. Rough sanding, few coats of paint and this thing will be all good to go.


-
10-23-2015, 08:44 AM #4Super Moderator
- Join Date
- May 2015
- Posts
- 989
Lighter too... Originally Posted by curious aardvark

-
10-23-2015, 08:45 AM #5Super Moderator
- Join Date
- May 2015
- Posts
- 989
That actually looks very neat. Have you started sanding yet? Originally Posted by dunginhawk
-
10-23-2015, 08:48 AM #6Engineer
- Join Date
- Jan 2015
- Posts
- 445
A little bit... I sanded the top of the head down where the most roughness is , because that was on the support/raft... that will sand down well though... I sanded a little bit along the ear sides where the artifacting occured. I know those little bits are starts of layers, even though i have it inside out... not sure how to get those out of there. Either way, i dont think its going to be a hard process to get this ready for paint. 2-3 coats of paint will hide most of it.
-
04-09-2016, 11:08 AM #7Student
- Join Date
- Apr 2016
- Posts
- 6
Do you know where I can get the file for this? Thanks, Kyle
-
04-09-2016, 01:16 PM #8Engineer
- Join Date
- Jan 2015
- Posts
- 445
-
04-09-2016, 01:36 PM #9Student
- Join Date
- Apr 2016
- Posts
- 6
How was the Iron Man Helmet printed in both copperfill and bronzefill when the file on thingiverse is one piece?
-
05-01-2016, 08:06 PM #10Student
- Join Date
- Apr 2016
- Posts
- 6
Was this printed in 3 separate pieces?


 Reply With Quote


Extruder not feeding during print,...
04-24-2024, 01:59 AM in Tips, Tricks and Tech Help