


Results 11 to 20 of 29
Thread: my i3v 10" build
-
12-09-2014, 11:58 AM #11Engineer-in-Training

- Join Date
- Jul 2014
- Location
- Ontario, Canada
- Posts
- 257
I agree! I should have added originally that there were a lot more threads of interest. I would, like you say, read though the entire forum, and even other areas of the forum here too, as much of it is helpful for all of us. This forum, and it's users were the reason I picked up a MakerFarm, and it's this forum that continues to spur me towards upgrading, tweaking and continuing to develop my printers to this day! Originally Posted by printbus

-
12-09-2014, 03:36 PM #12Student
- Join Date
- Nov 2014
- Posts
- 34
I've put in about 7 hours so far, 3 hours last night and 4 today (had the day off). I've completed the frame up to the step where the threaded rods are put in. Nothing difficult so far, it's been a pretty smooth ride.

-
12-09-2014, 03:39 PM #13Student
- Join Date
- Nov 2014
- Posts
- 34
Now I did run into one issue. I haven't really looked into it yet. After placing the Y bed in place and running the belt, I noticed that if i lightly grab the rear right hand corner it shifts up and to the right. The same thing happen on the rear left hand corner. Nothing happens to the corners in the front. What needs to be adjusted?
-
12-09-2014, 03:44 PM #14Staff Engineer
- Join Date
- May 2014
- Location
- Highlands Ranch, Colorado USA
- Posts
- 1,437

Are you referring to the rear corners of the Y-bed? If so, it sounds like the rearward eccentric spacer on the Y-bed might need some adjusting. Originally Posted by danrodz
-
12-09-2014, 03:51 PM #15Student
- Join Date
- Nov 2014
- Posts
- 34
Yes, that's it. I will try adjusting that then and see if that tightens up things. Thanks! Originally Posted by printbus
-
12-09-2014, 09:02 PM #16Engineer-in-Training
- Join Date
- Jul 2014
- Location
- Ontario, Canada
- Posts
- 257
With those spacers you should be able to get it pretty tight! For me, without the belt in place I could set the spacer so that the bed would not move freely on its own.....of course that's a bit too tight but you do want to get rid of whatever play you can. Nows the perfect time to get everything just right too.
-
12-09-2014, 11:38 PM #17Student
- Join Date
- Nov 2014
- Posts
- 34
Put in another couple of hours and got the LCD put in, the Z motors and the threaded rods. Ran into a bit of a roadblock, none of the last 3 nuts would thread onto the rod smoothly. I almost gave up for the evening but ran down to the basement and pulled a nut off a bicycle that fit perfectly! I wasn't able to make the spool holder because somehow I ran out of regular nuts. A quick trip to home depot tomorrow should take care of that.
The last roadblock I hit before calling it a day was looking all over for the thermistor kit (the 2 thermistors and heat shrink tubing) and not finding it. I watched the whole video in dismay, realizing that I hadn't seen anything that looked like those pieces. Then at the very end, when Colin put the completed part in front of the camera, I remembered seeing something that looked like it...YES! The thermistors had already been soldered up! One less thing to do tomorrow.
I'm hoping I can get most of this tomorrow (I'm off again) because Thursday is a double shift for me and I want to play with my new toy this weekend.
-
12-09-2014, 11:39 PM #18Student
- Join Date
- Nov 2014
- Posts
- 34
Playing with the eccentric spacers I was able to see exactly what you guys were telling me and I was able to get rid of all the play. I also adjusted the other carriages and everything is moving very smooth right now. This has been very entertaining Originally Posted by MiniMadRyan

-
12-12-2014, 01:28 PM #19Student
- Join Date
- Nov 2014
- Posts
- 34
So several hours later I've made quite a bit more progress. Well over a foot of snow and work have kept me from doing much. I've made it to the extruder assembly. That is all done and taped up. All I need at this point is to mount it to the frame and then do the electronics. I did run into a couple of issues so far that have slowed things down (and I document so that those who might glance this over before they make their own can know what is coming):
1. ran out of regular m3 nuts. Not really a big deal, 10 at home depot were $1.50
2. should have gotten a piece of glass while i was there. i had a slightly bigger piece of glass but trying (more like failing) to trim it down didn't really work, now i've got an uneven edge that is about an inch short. I will get a piece soon, however i think there is enough glass there to keep it moving for now
3. there was some confusion assembling the extruder. the videos are somewhat outdated. i opted for the standard j-head but it now come with a ceramic catridge heater so to install it i needed to watch the magma video. now, it didn't seem that much different but this is the first time I've done this sort of thing so it kind of threw me off. i'm pretty sure i did everything right though.
4. in my kit the thermistors were already assembled. some of the wood parts were upgraded parts so they didn't quite match up with the instructions in the video. Something to keep in mind when you are looking for parts and can't find them
These are pretty minor gripes compared to the comments I've read of people building other kits. The instructions are very clear, the videos are very instructive, the parts are of good quality. I also appreciate the engineering, it's almost immediately apparent what each piece does once you assemble it and slot it into place and you can spot pretty quickly when something is not right. I'm very pleased so far.
-
12-13-2014, 09:47 PM #20Student
- Join Date
- Nov 2014
- Posts
- 34
Success!!
Pictures have been a bit sparse die to phone issues. I finally finished up the printer build after about 15 hours put in. A couple of little issues cropped up in the end run:
The cheap 12v power supply didn't come with mounting screws. Another trip to home depot is in the works. I also realized I only had red wire for the power connections. So all those will be re-done after the home depot trip.
I should have followed Ryan's advice with the extruder build. It was the only video that I felt was a little rushed and when it was done I didn't feel 100% confident about it. Of course, when the assembly was complete filament wouldn't feed, it wouldn't even load into the slot. So I removed it, took everything apart and watched a different video that went more in detail about aligning all the pieces, how loose to keep the hobbed bolt, etc. I popped it back on and set up for the 1st print!
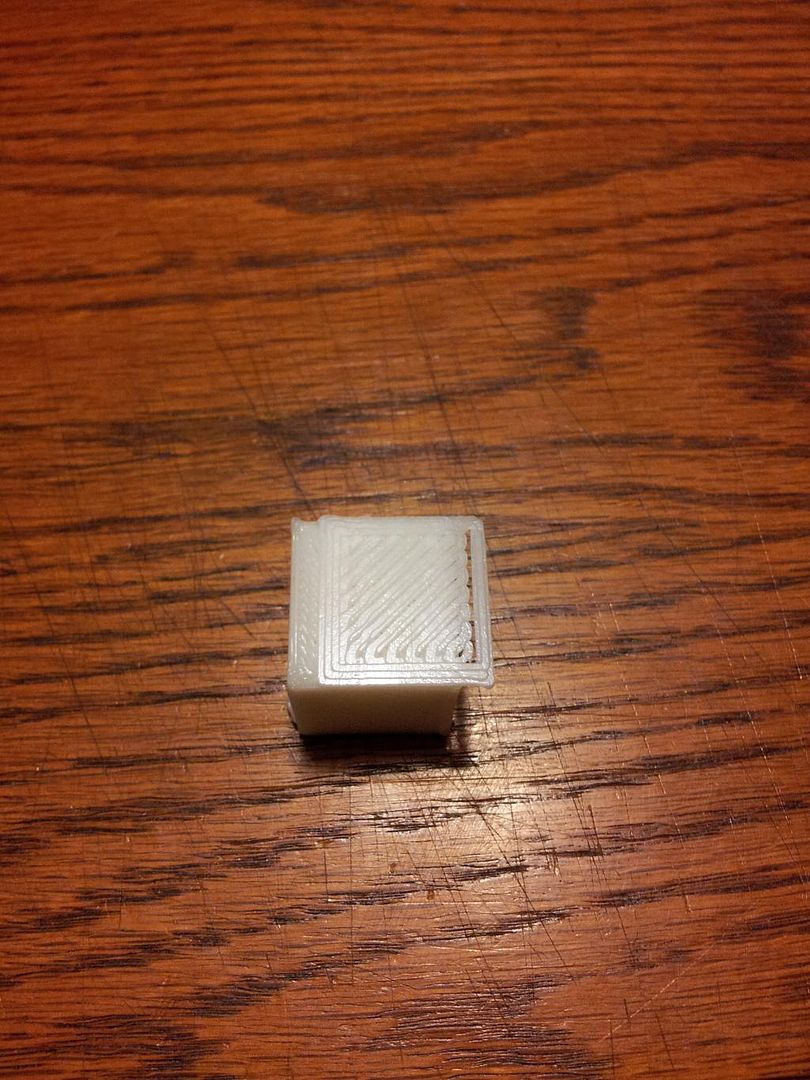
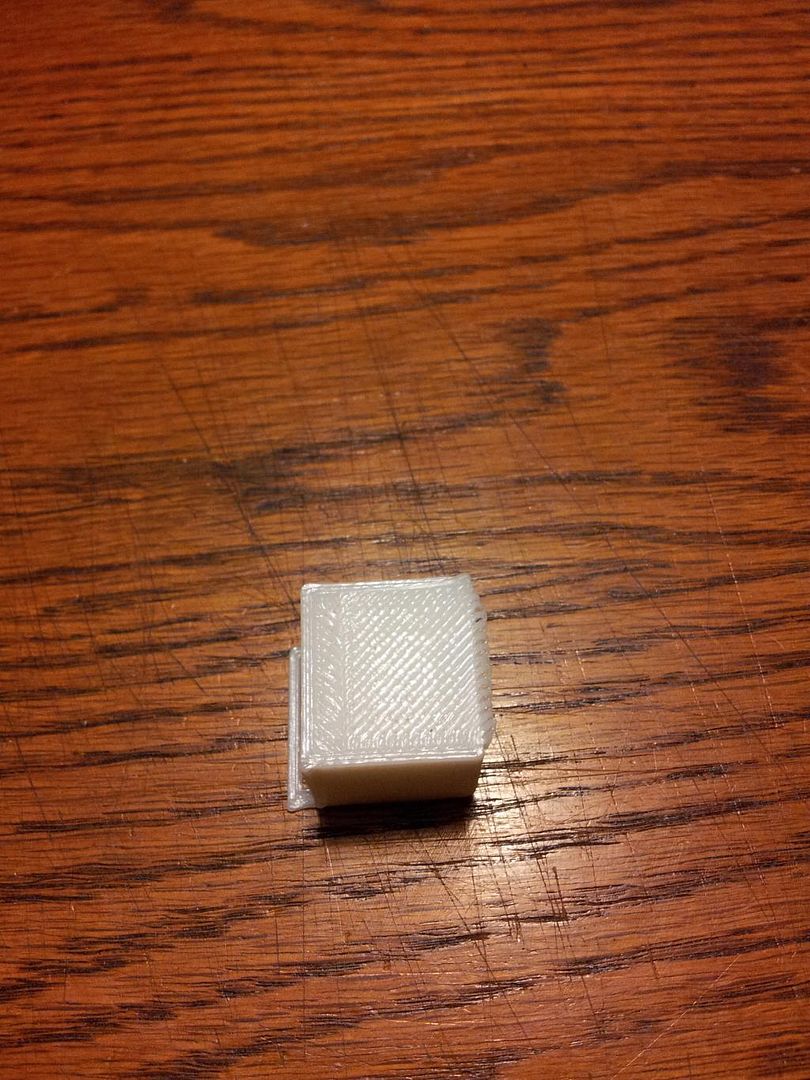
The Y axis belt was too loose which led the belt to skip, shifting the print after the 1st layer. Most of the cube printed well except at the last layer where the loose belt skipped again. The next picture shows that. I removed the belt and shortened it by making the loops longer. The problem seems to be gone.
Now cubes are all well and good but I wanted to do something fun. Make magazine recently released their 3d printer issue and there is a load of good tests in there to pick from. But why not be ambitious? I decided to go for the MakerFaire robot (www.thingiverse.com/thing:331035/). It's a printed in place articulated robot (joints at feet, knees, hips, shoulders and neck). I loaded up the code from slic3r and then went grocery shopping. When I got home:
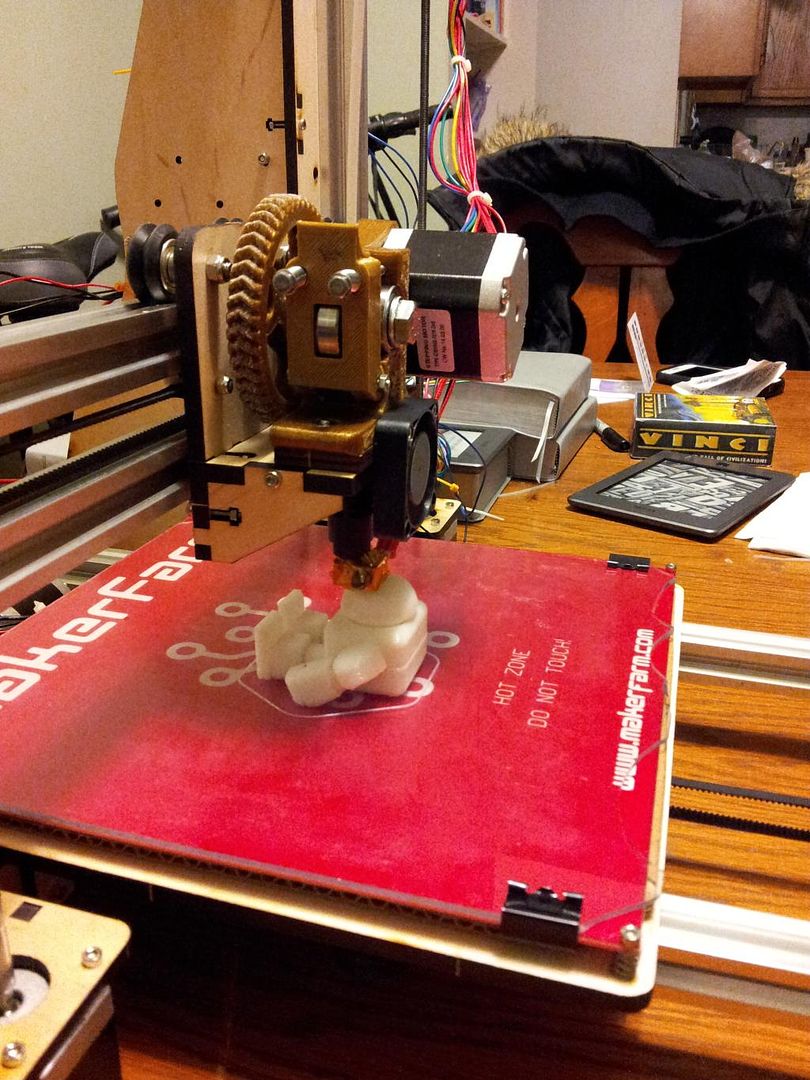
95% done. The print finished in 2:40. I had lowered the feed rate to 84% thinking that the slower feed would make the details smoother. Here is the robot next to the cube for comparison (I did the 65% version)
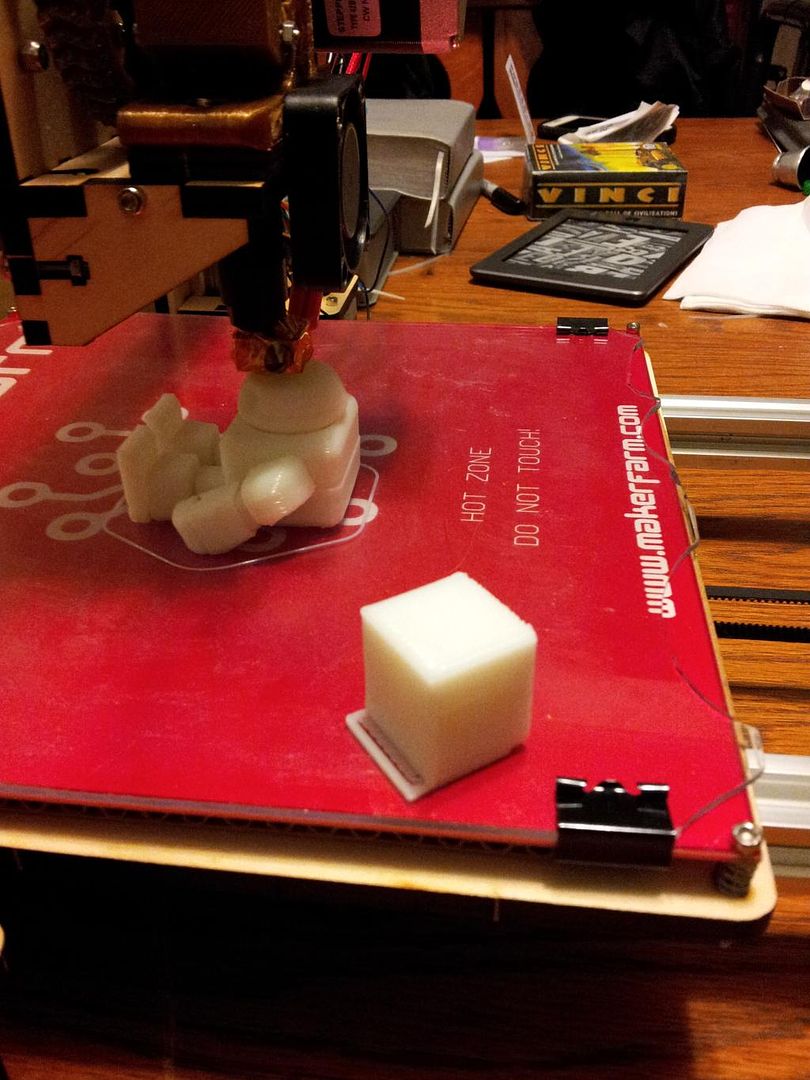
It looked great when the print ended. Now, I've been using Elmer's glue stick for adhesion and it is a bit of a bear getting stuff off. The robot had no intentions of coming off, it too a bit of doing. Looked nice but would the articulations work?
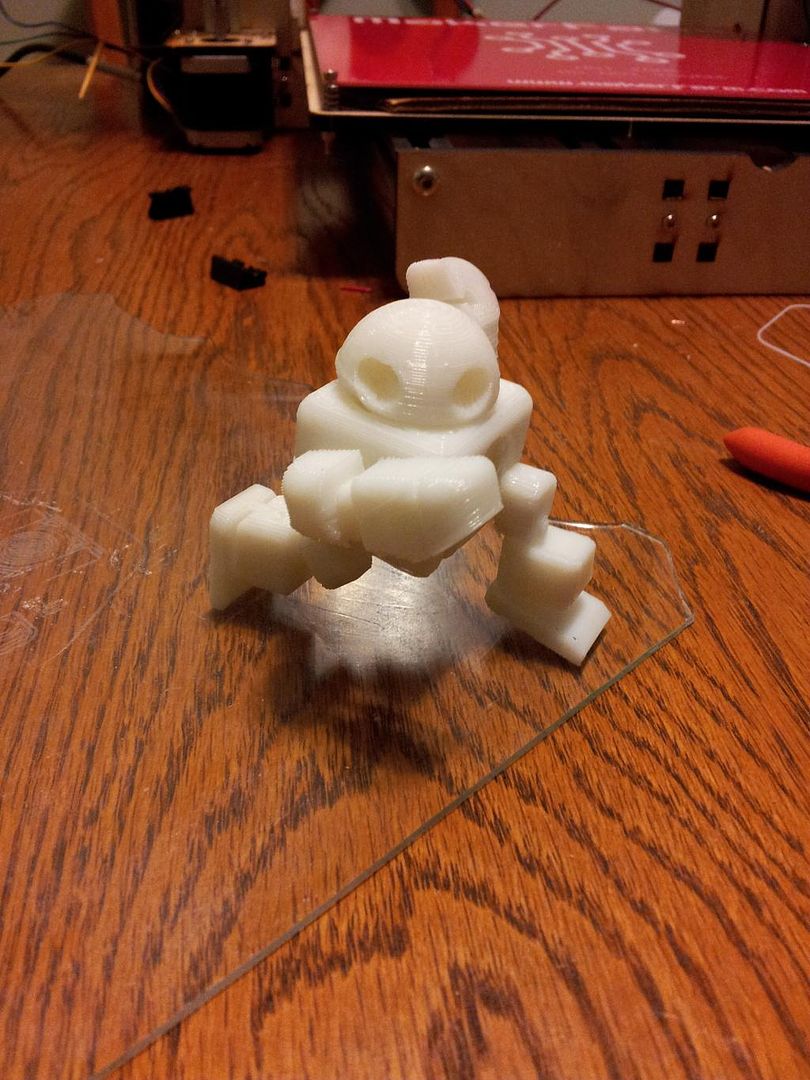
They did! Now, to be completely honest, I snapped one of the legs off at the hip. I was a little too vigorous when I was trying to loosen up the joint and it broke off (I may have also damaged it trying to get the robot off the glass). Nonetheless, it's impressive considering this is my 2nd print on this machine, I've done no calibrations (all I did was load the file Colin provides for slic3r) and machines that cost $2-3,000 had trouble completing this print. I followed dacb's suggestion and had my family come over to see what the printer can do and everyone is extremely impressed. My kids especially. I have a feeling the machine will be busy.

 Reply With Quote


Extruder not feeding during print,...
Yesterday, 02:02 PM in Tips, Tricks and Tech Help