


Results 161 to 170 of 255
-
01-03-2015, 09:09 PM #161Staff Engineer

- Join Date
- May 2014
- Location
- Highlands Ranch, Colorado USA
- Posts
- 1,437

Thanks. Yeah, the detail in the build thread sort of got out of control. My original intent was just to provide some pay back to the 3D PrintBoard community for the few i3v build threads before mine that sold me on the i3v. I seriously believe I couldn't have made a better choice for getting a start in 3D printing. Of course, YMMV. Originally Posted by adamfilip

If you haven't read me harp about it before, I'm all about sharing. The more we all share, the easier it can be for people to pick up on ideas that fit their situation and the better the i3v community becomes. Here and elsewhere, my posts also tend to be verbose so that people have enough background information to make their own decisions.
A challenge in starting a build is in guessing where you want things nice and tidy vs. really want to keep things flexible. While my printer looks quite nice, I admit that can be a hindrance. For example, right now I've got new stepper motors that will require a major effort to install due to the neatly sleeved and tightly routed wire bundles...Last edited by printbus; 01-17-2015 at 07:16 AM.
-
01-03-2015, 09:12 PM #162Engineer
- Join Date
- Dec 2014
- Location
- Canada
- Posts
- 498
perhaps its best to get it running and tuned, once your happy then do a wiring overhaul to make it all tidy?
-
01-03-2015, 09:18 PM #163Staff Engineer
- Join Date
- May 2014
- Location
- Highlands Ranch, Colorado USA
- Posts
- 1,437
That's worth considering. I know a few people have cleaned up the wiring (mostly by shortening the wire lengths) after they had the printer working. Originally Posted by adamfilip
-
01-07-2015, 05:42 PM #164Staff Engineer
- Join Date
- May 2014
- Location
- Highlands Ranch, Colorado USA
- Posts
- 1,437
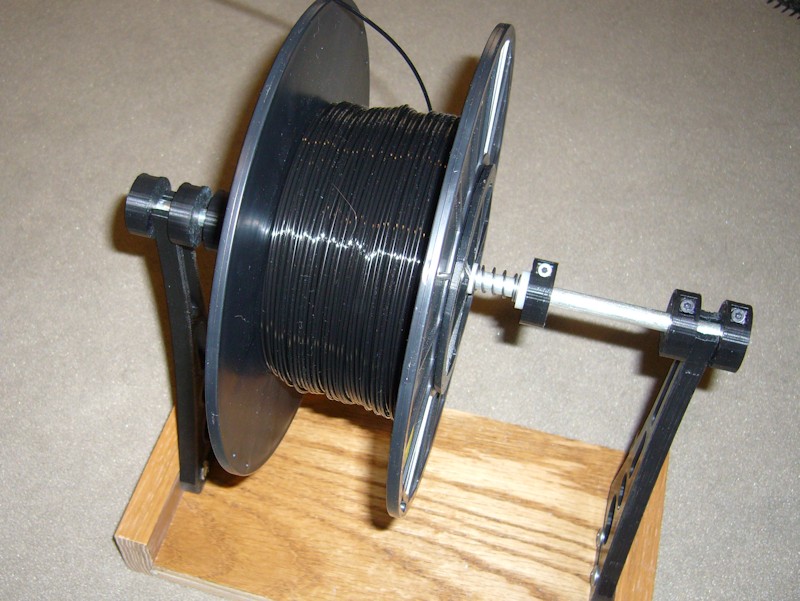
REPURPOSED FILAMENT SPOOL MOUNT
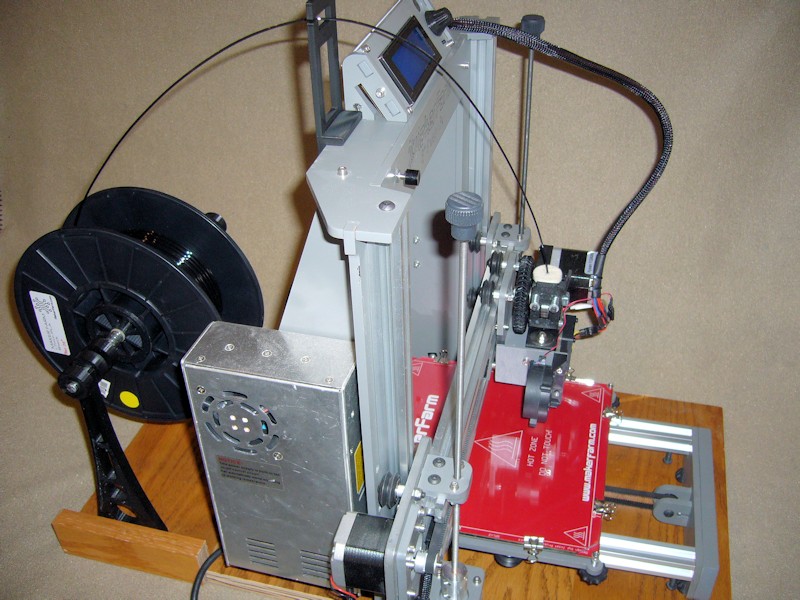
Although I've had no problem with the filament spool mounted above the printer, I opted to move the filament spool to the table surface behind the printer. The spool holders I looked at on Thingiverse all seemed to be limiting in what size spools they would hold, or required dealing with nuts on threaded rods when exchanging spools. To get by until I find a better option, I decided to repurpose the upright supports and the horizontal rod from the spool holder I've been using. This allows me to keep using the three or four different types of spool hub adapters that cover the different styles of spools that I have.
The upright brackets designed to slip onto the top plate of the i3v were screwed onto some wood scraps. This provides about 7-3/4 inches of clearance below the 5/16-inch rod used as a cross member, more than enough clearance for the 10-inch diameter spools. If I upgrade to a dual extruder, there's enough space between the uprights to hold two of the 3-inch wide spools. Printed shaft collars are used to clamp the cross member into the uprights, and to keep the hub adapters in place. Pressure from springs and nylon washers on the cross bar provides just enough drag to keep the spool from unwinding by itself and loosening the filament, especially as the filament nears the end of the spool.
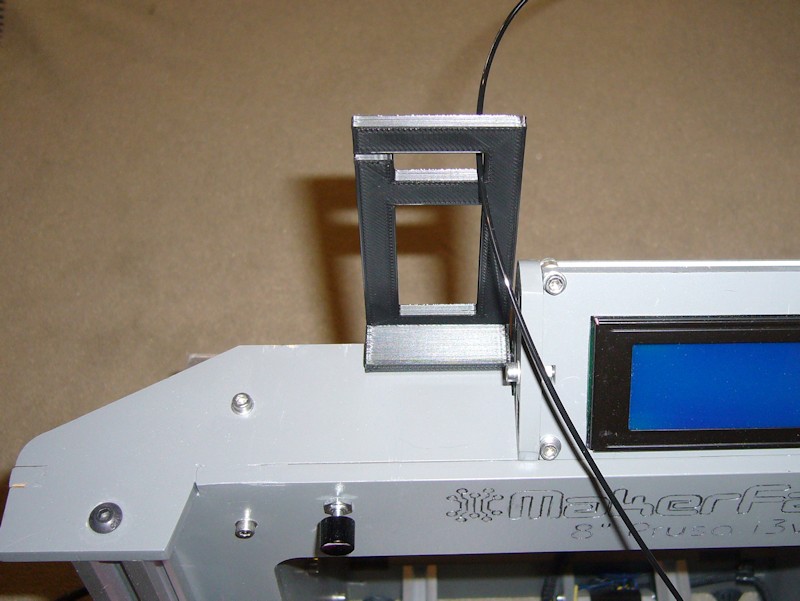
The filament guide was designed to clip behind the i3v LCD, but I opted to locate it to the left of the LCD. It's far enough to the rear to not hinder access to the SD card slot.
Last edited by printbus; 05-03-2015 at 03:43 PM. Reason: migrated to offsite image storage due to 3DPrintBoard issues
-
01-15-2015, 12:31 PM #165Staff Engineer
- Join Date
- May 2014
- Location
- Highlands Ranch, Colorado USA
- Posts
- 1,437
NEW MOTORS AND MORE
Based on testing in Marlin Motion Related Configuration.h Settings for MakerFarm i3v that suggested the CW 42BHH48-050-24A motors from my older i3v kit were limiting my max Z feed rate, I opted to replace all the CW motors in my 8-inch i3v with more Kysan 1124090 motors. A Kysan has worked out well on the extruder for the last couple of months. Replacement of the motors was no easy feat since I had dressed and bundled all the printer wiring. The Kysan's have heavier gauge wires than the CW motors, so I didn't want to just cut off the wiring at the CW motors and splice on the Kysans.
The Kysans run cooler, so I took out all the motor fans and related wiring that had been added for the hot-running CW motors. Good riddance.
By leveraging additional torque provided by using 1/4 microstepping (1000 steps per unit for Z) instead of the MakerFarm default of 1/16 microstepping, the Kysans seem to be able to reliably drive the Z axis at over 3mm/sec feed rate. As an incremental increase, I'm now testing 2.5mm/sec for a while. This provides a worst-case Z home duration of about 90 seconds on my 8-inch printer.
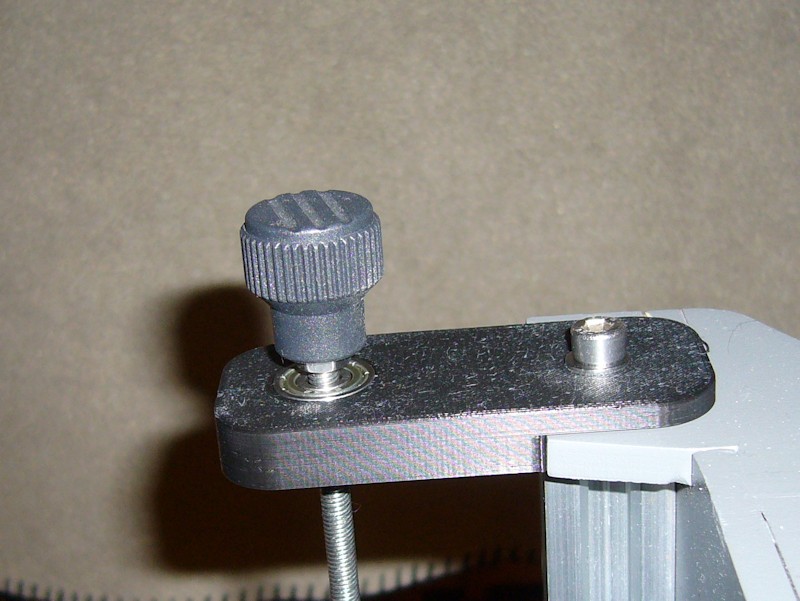
Taking advantage of the disassembly required to swap out the motors, additional preventive maintenance was completed. The X and Y belts are now tighter than before, and I replaced both Z threaded rods and the Z nuts in the X-carriage. I worked to straighten the replacement threaded rods as best I could. To prevent accidents like the granddaughter grabbing one of the Z rods and bending it over, I've added support brackets at the top of the Z rods to protect them - http://www.thingiverse.com/thing:636381.
I've also been pretty aggressive in cleaning out the hexagon hot end nozzle a few times. Thinking I might have enlarged the nozzle tip in this cleaning, I wanted to replace the tip. Unfortunately, 0.40mm tips for the hexagon never seem to be available individually. I've installed a 0.40mm tip intended for use on the E3Dv6 hot end.Last edited by printbus; 05-03-2015 at 03:47 PM. Reason: migrated to offsite image storage due to 3DPrintBoard issues
-
01-15-2015, 12:58 PM #166Engineer-in-Training
- Join Date
- Mar 2014
- Location
- USA
- Posts
- 388
I hear you on this process! I totally redid my wiring and fixed some of the safety issues (soldering screw down power wires). It took forever but was definitely worth it to swap out our old hot motors for the Kysans . Originally Posted by printbus
Looks fantastic! Any chance you may be able to provide links to the replacement rods and nuts you ordered? I bent the tops of mine trying to get them into the clear plastic tubing the first time around and would like to swap em. Originally Posted by printbus
I ordered the 0.3mm hexagon tip from makerfarm and really like it. Could be worth a future try Originally Posted by printbus

-
01-15-2015, 01:02 PM #167Technologist
- Join Date
- Aug 2014
- Location
- Oklahoma
- Posts
- 191


With having a newer printer, with the motors that don't get hot, are the Kysan motors something to consider later on?
-
01-15-2015, 01:40 PM #168Staff Engineer
- Join Date
- May 2014
- Location
- Highlands Ranch, Colorado USA
- Posts
- 1,437
Probably not, unless perhaps if one of your motors dies. If that be a Z-motor, I'd replace both to keep them the same. An advantage of using the Kysan is you'd at least have the full specs for the motor available to you. Originally Posted by usarmyaircav
I cut them myself from 1-meter stainless steel rods obtained through Grainger - their P/N 25DM77. I use Grainger for as much hardware as I can since stuff gets shipped for no charge to the local Grainger store. Can't imagine what the shipping cost would have been on the four-foot tube my $2.60 USD threaded rod came in. SS nuts from the local Ace Hardware were used. I see the rods are now $2.70 USD. Must have been a price increase at the beginning of the year. Originally Posted by gmay3
Last edited by printbus; 01-15-2015 at 01:53 PM.
-
01-15-2015, 01:58 PM #169Engineer
- Join Date
- Nov 2014
- Posts
- 522
Printbus, I know you have been focusing on speed and understanding how speed works lately.
Generally speaking what is considered "fast" or "normal" for the Prusa i3 styles?
-
01-15-2015, 02:14 PM #170Staff Engineer
- Join Date
- May 2014
- Location
- Highlands Ranch, Colorado USA
- Posts
- 1,437
I don't have a broad enough experience with other printers to answer that with any confidence. That said, IMO the MakerFarm i3v printers should likely do better than any standard Prusa i3 using rod stock and linear bearings, as well as any printer where the frame is formed with printed corners that can deform or loosen with time. Originally Posted by sniffle
I've seen a lot of reprap related info where people talk about printing in the 30 to 50 mm/sec range. Is that the "normal" then? IDK. These printers can definitely do better than that.


 Reply With Quote


Do bed magnets deteriorate.
04-29-2024, 01:35 AM in General 3D Printing Discussion