Close


Page 301 of 411 FirstFirst ... 201251291299300301302303311351401 ... LastLast
Results 3,001 to 3,010 of 4110
  1. #3001
    Excellent work. I think I might try this out as I learn more about 3D printing.


    Quote Originally Posted by wirlybird View Post
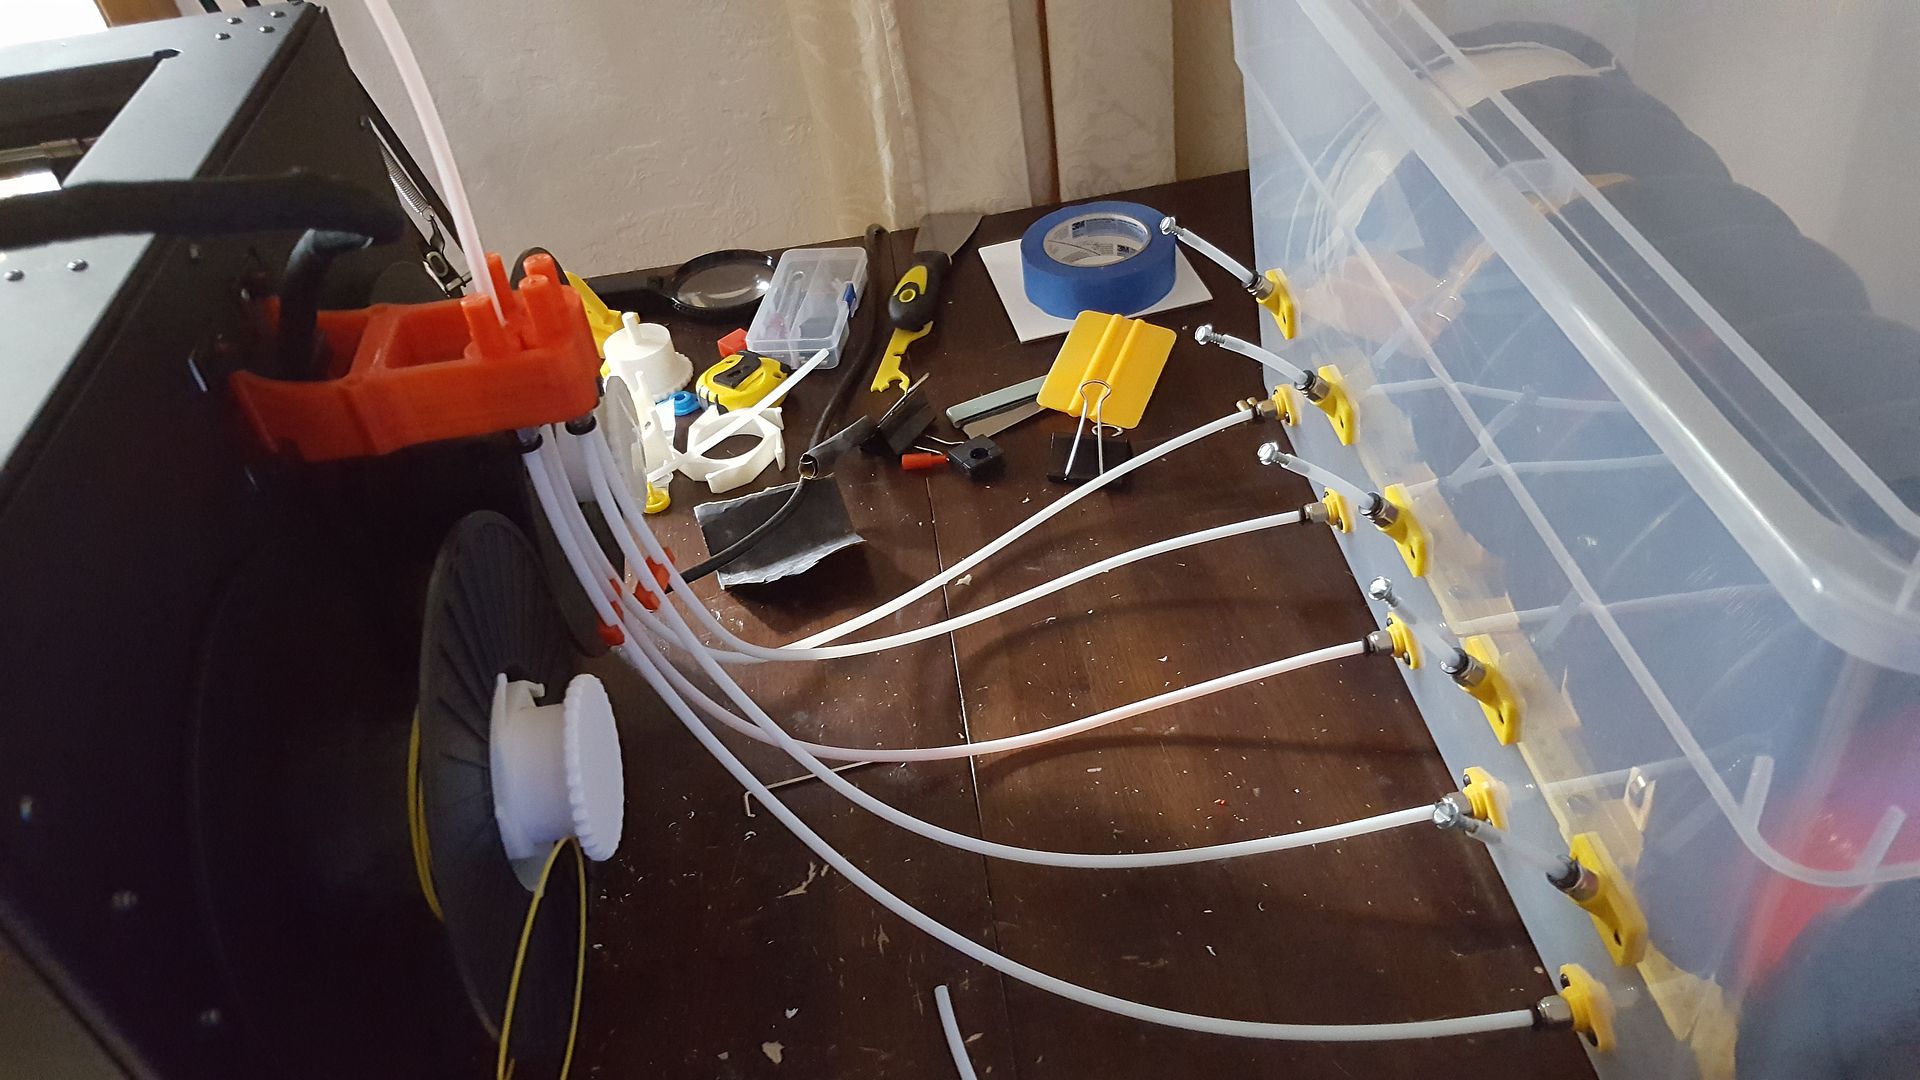
    OK!! The dry box project is now functional. The first pic is the overall setup - pardon the mess in the background. The upper filament flanges where a first design where the box was going to be below the printer and that is why they are angled up. For now it will sit behind the printer hence the lower flanges. Five rolls can be loaded at once each on its own roller base making changes easier.
    The feed tubes go into the manifold on the back of the printer. The manifold has plugs for the filament that is not in use. The filament goes up through a small hole in the plug which allows you to grab the one you want and feed it from there rather than opening the dry box.


    [IMG][/IMG]


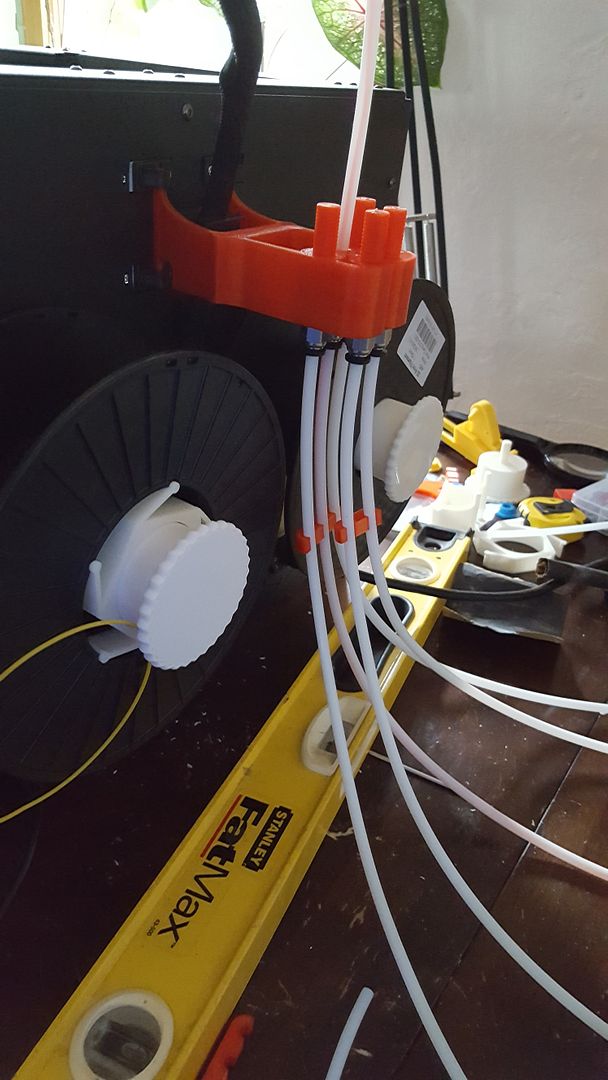
    A closer look at the manifold and the plugs. Also my first attempt at knurling.

    The tubes go in between and further out from the back of the two spools on the back of the printer allowing easy access to throw on a roll for a quick (in 3D printing terms) print.


    [IMG][/IMG]


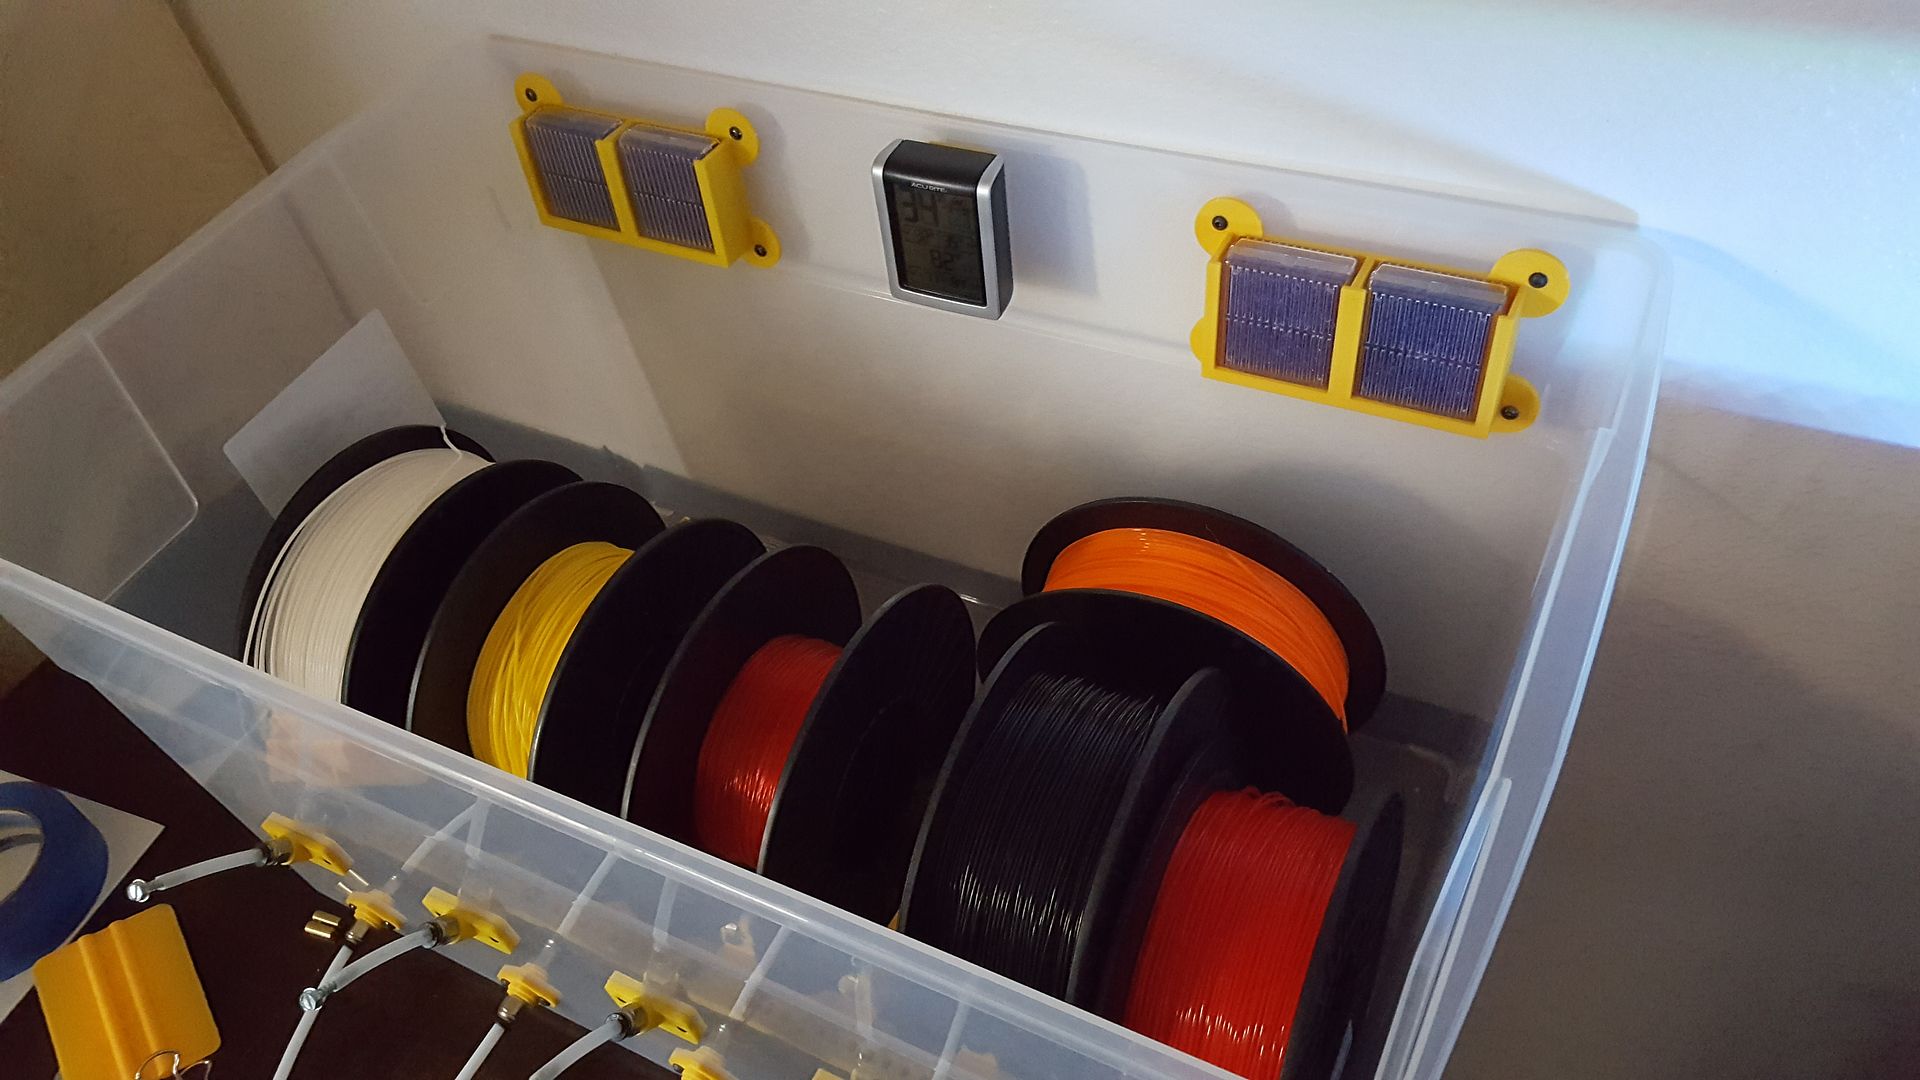
    ON the inside we have dual rechargeable desiccant packs and a temp/humidity sensor in the middle.

    Each roll is on its own roller base so change out is easy and quick. There is also storage space behind the active rolls.


    [IMG][/IMG]


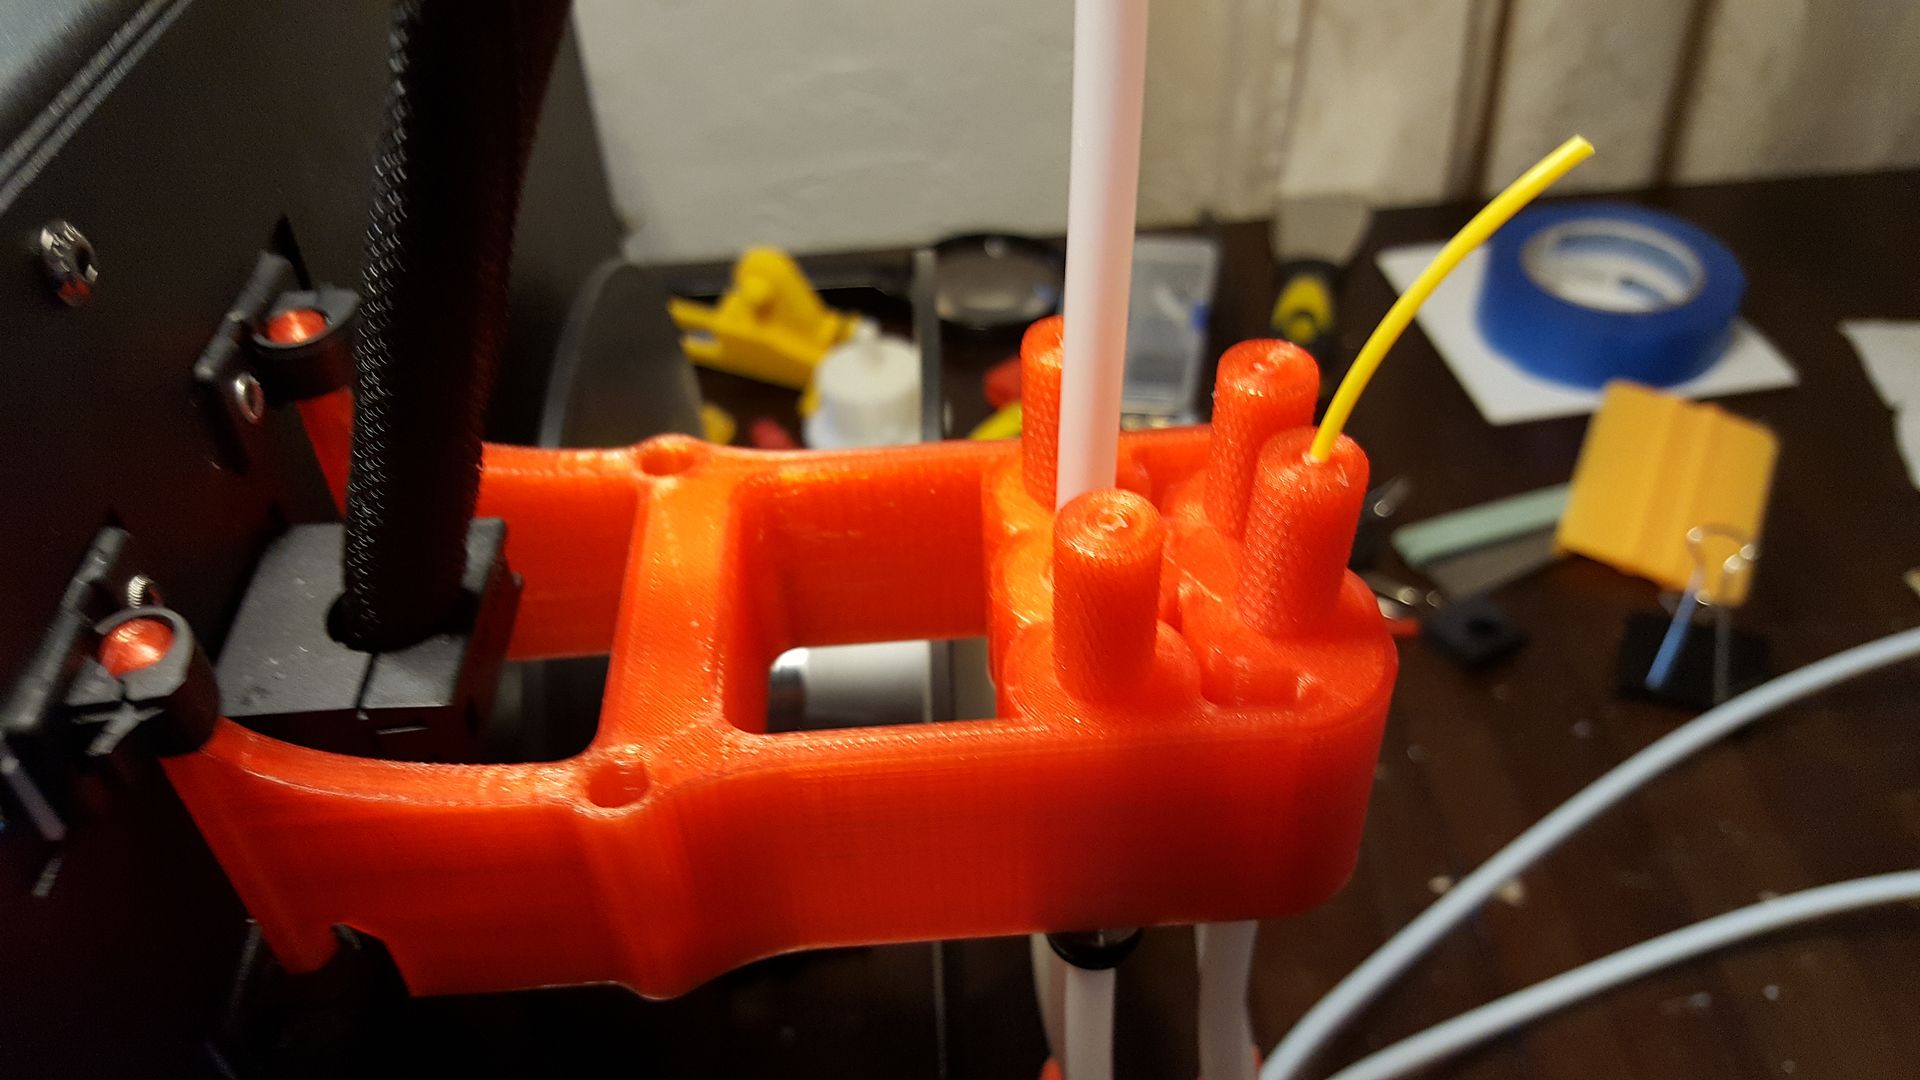
    Here is a close up of how the filament holder/plug works. I am guessing not much humidity will get past this.


    [IMG][/IMG]

  2. #3002
    What nozzles do you guys recommend when it is time to replace them?
    I have seen a few in here with the Swiss Micro looked great but expensive.
    Editor in Chief
    Bitsonline

    Tips Appreciated But Not Expected
    BTC: 16wxHvKd3oU6SVjv6FrenqhkvRmc8t7sPy
    DASH: XqyaWxH896j9YeV1M35Gzb5gmRPmPbNDGq

  3. #3003
    Engineer
    Join Date
    May 2016
    Location
    Annapolis, MD
    Posts
    523
    If my introduction to printing with PLA was as finicky as getting ABS to print what you want is being, this machine would have been cut into pieces a long time ago.

  4. #3004
    Technician
    Join Date
    May 2016
    Posts
    55
    Quote Originally Posted by DaveB View Post
    If my introduction to printing with PLA was as finicky as getting ABS to print what you want is being, this machine would have been cut into pieces a long time ago.
    I haven't had much trouble printing ABS with the Qidi, once I disconnected the side fan. What issues are you having?

  5. #3005
    Super Moderator
    Join Date
    Jun 2016
    Location
    Oklahoma
    Posts
    904
    Quote Originally Posted by JSensebe View Post
    I haven't had much trouble printing ABS with the Qidi, once I disconnected the side fan. What issues are you having?

    ABS has been reasonably cooperative for me also. The main thing I have contended with is some lifting of corners from the bed. I find that it just really needs a good fresh hairspray glass.

  6. #3006
    Super Moderator
    Join Date
    Apr 2014
    Location
    KS
    Posts
    907
    Add jfkansas on Thingiverse
    ABS and hairspray has never worked for me especially on large flat bottom parts. Small parts its ok. I've tried all the tricks, several coats, let it build up etc.

    Lately I've been scraping bed clean with a single edge razor window scraper. Then wiping the glass with AquaNet on a paper towel. Then heating bed to 70c and applying a thin coat of abs slurry. I have some white and clear mixed up and I keep in small mason jars. Also have some colors mixed up if needed. Once the bed fully cools the part generally just lays there un stuck to the glass and you just lift it off.

  7. #3007
    Engineer
    Join Date
    May 2016
    Location
    Annapolis, MD
    Posts
    523
    Quote Originally Posted by jfkansas View Post
    ABS and hairspray has never worked for me especially on large flat bottom parts. Small parts its ok. I've tried all the tricks, several coats, let it build up etc.

    Lately I've been scraping bed clean with a single edge razor window scraper. Then wiping the glass with AquaNet on a paper towel. Then heating bed to 70c and applying a thin coat of abs slurry. I have some white and clear mixed up and I keep in small mason jars. Also have some colors mixed up if needed. Once the bed fully cools the part generally just lays there un stuck to the glass and you just lift it off.
    I've been working on printing JFkansas' extruder mechanism in ABS. This is my first tight tolerance experience with ABS. Had some serious over extrusion issues and have dropped the extrusion multiplier from 1.00 to 0.80. Switched to using ABS slurry, which adheres wonderfully with ABS (big surprise...not) but does not adhere so perfectly with the glass bed. I have found that for some prints I must turn on the blower to prevent thinner "shelves" from turning upward into the extruder.

    PLA was just easy, everything worked right off. ABS has been a fight every step of the way.

  8. #3008
    Wow, I pretty much only print ABS and it's been no problem at all.
    I use a borosilicate build platform. I load it up with a nice solid heavy coat of aguanet. One aquanet treatment will work for a large number of prints. (At least 20)
    I run the bed at 110C for the first 10 layers, 100C for the next 10 layers and 90C from there on up. When the bed cools down after printing the parts pop right off with no trouble.
    I did see some lifting with large thin ABS parts until I started using the aquanet.
    I run the extruder at 230C with the fan turned off for ABS. I use the right extruder for ABS, and the left extruder for PLA.

    I've not had any issues with PLA either though. For that I do bed temp of 80C, extruder temp of 210C and fan on.

  9. #3009
    Engineer
    Join Date
    May 2016
    Location
    Annapolis, MD
    Posts
    523
    Quote Originally Posted by jfkansas View Post
    ABS and hairspray has never worked for me especially on large flat bottom parts. Small parts its ok. I've tried all the tricks, several coats, let it build up etc.

    Lately I've been scraping bed clean with a single edge razor window scraper. Then wiping the glass with AquaNet on a paper towel. Then heating bed to 70c and applying a thin coat of abs slurry. I have some white and clear mixed up and I keep in small mason jars. Also have some colors mixed up if needed. Once the bed fully cools the part generally just lays there un stuck to the glass and you just lift it off.

    How do you usually apply the ABS slurry? I've been wiping it on with a paper towel.

  10. #3010
    Super Moderator
    Join Date
    Apr 2014
    Location
    KS
    Posts
    907
    Add jfkansas on Thingiverse
    With a short bristle paint brush. I keep several colors of slurry in shorty mason jars they are about 4" tall jars but could use the super short "Jam" jars too. I've been cleaning with razor scraper, then spraying aquanet onto a paper towel and cleaning plate with that. Then Preheat to 70c or so and brush on the slurry. The slurry can be mixed to a whole milk like state or thicker or a little thinner.

    Quote Originally Posted by DaveB View Post
    How do you usually apply the ABS slurry? I've been wiping it on with a paper towel.

Page 301 of 411 FirstFirst ... 201251291299300301302303311351401 ... LastLast

Tags for this Thread

Posting Permissions

  • You may not post new threads
  • You may not post replies
  • You may not post attachments
  • You may not edit your posts
  •