


Results 31 to 39 of 39
Thread: Looking for a new 3d printer
-
04-03-2021, 01:42 AM #31Staff Engineer

- Join Date
- Jul 2016
- Location
- South Florida, USA
- Posts
- 1,248

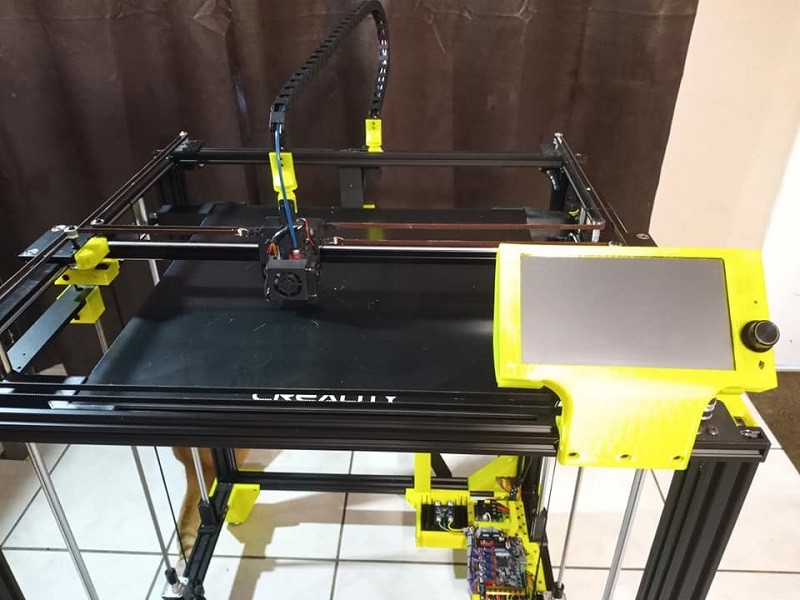
lol. I deserve that. Well just for fun this what I am building for myself currently:
TronXY X5SA 500 PRO (500x500x600mm) ---------------- $900
SKR PRO mainboard ------------------------------------------- $ 45
tft70 v3.0 dual mode 7" touchscreen ----------------------- $ 75
TMC2226 drivers ----------------------------------------------- $ 60
1000watt silicone mains powered bed heater ------------- $180
High quality SSR ----------------------------------------------- $ 50
External Mosfet for extruder --------------------------------- $ 25
Meanwell HRP-450-24v 1U power supply ------------------ $150
18ft of gates reinforced gt2 belt ----------------------------- $ 70
frame hardware ------------------------------------------------ $120
Five 2.2lb spools yellow PETG filament -------------------- $125
Bondtech BMG extruder -------------------------------------- $80
Gates toothed idler pulleys ---------------------------------- $ 40
Electrical (wires, pigtails, and connectors ----------------- $200
510x510x4mm carbon silicone glass Ultrabase ----------- $100
Genuine Capricorn XS series tubing ------------------------ $20
Labor from the AutoWiz -------------------------------------- Priceless
That's where I am at with it so far. My jaw is still on the floor at the thought of wiring for $29. Personally I go hunt down all the correct mini JST or whatever the correct connectors are to be using so I have both a finished look and a stable electrical system. For the stepper motors I get sets of long pigtails so I don't have to splice in extra lengths. And I will get a ribbon kit so I can build custom length ribbons for the lcd12864 mode of the tft70. And small assortment of different gauge wire and in a small assortment of colors.
-
04-03-2021, 01:56 AM #32Staff Engineer
- Join Date
- Jul 2016
- Location
- South Florida, USA
- Posts
- 1,248
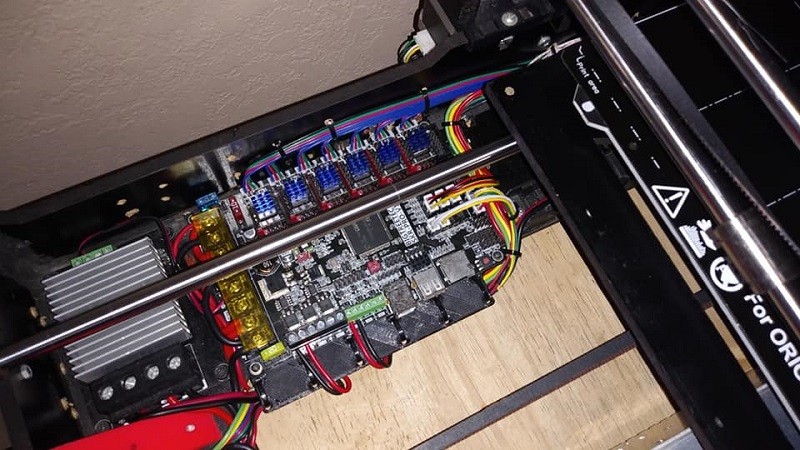
But I mean you see it right? How correct the right pigtails with matched wires leading away from the controller in a sensible way looks? It took a while and cost a chunk to get it all wired in this manner. But the end result is rewarding to look at..
-
04-03-2021, 02:07 AM #33Staff Engineer
- Join Date
- Jul 2016
- Location
- South Florida, USA
- Posts
- 1,248
TronXY hotend. TronXY extruder motor. TronXY bed hardware along with some printed parts I drew up..
 And I am not saying those are better. Just that I am using them until I figure out what I want to go with. The extruder motor is gonna be the same 1.8 degree 200 step/rev stuff that comes on most printers. I will get some 0.9 degree motors at some point as I have with all my other machines. So you are right about that. I just am not there yet on this build and that is what I was listing for a build price.
-
04-03-2021, 10:08 AM #34Staff Engineer
- Join Date
- Jul 2016
- Location
- South Florida, USA
- Posts
- 1,248
I listed a price to buy parts to build an awesome machine to the specs the OP requested in his OP.
Micro motion and fretting within connectors on electrical things with moving components is a thing. On the moving components it is all the more important to properly fix the electrical just so it is not gonna succumb to the connections breaking down internally. And a well built printer doesn't need to be worked on regularly. That is why we build the printer right. So it can achieve stability and allow us to focus on using the tool to do it's intended job without all the back sass.Last edited by AutoWiz; 04-03-2021 at 10:39 AM.
-
04-03-2021, 08:35 PM #35Staff Engineer
- Join Date
- Jul 2016
- Location
- South Florida, USA
- Posts
- 1,248
But wait, If you find yourself changing a non wearable part like a thermistor cable doesn't that imply a poor design at play? Or poor assembly of the wires within the cable chain or w/e caused the chaffing that would lead you to change such a component? Your point is solid I am just saying a well built machine shouldn't need wires changed. Ever. Because it was well built. And even the cheap fans with the sleeve bearings have generally 20k-30k hr. life expectancy. If we go with ball bearing that number doubles. Wearable parts need to be easily accessible sure. But the parts you are listing should last the life of the printer. Or most of it at any rate.
-
04-03-2021, 08:58 PM #36Staff Engineer
- Join Date
- Jul 2016
- Location
- South Florida, USA
- Posts
- 1,248
And also about the service life of a fan in a well built rig one of the things I like to do is wire my fans into the extruder heater #2 port on my mainboards and set them in the firmware to turn on only when the extruder temp is above 50c. I wire all the frame fans to this along with the extruder. This way when the printer just sits at idle not only is it silent and drawing less power but it is also not in the process of wearing itself out just at idle. The fans can come on as the printer heats up and gets ready to start working. And shut off as it cools.
Last edited by AutoWiz; 04-03-2021 at 09:14 PM.
-
04-03-2021, 09:20 PM #37Staff Engineer
- Join Date
- Jul 2016
- Location
- South Florida, USA
- Posts
- 1,248
Well not labeled on the board anyways. But we go in and change pin assignments in Marlin and we can drive more fans if we like. second extruder heater would be the first thought because it can handle the greatest amount of load out of all the other pins on the board you might assign, but that is no big thing. Hell I had to do this to a SKR 1.4 Turbo on my Geeetech i3 rework. I plugged the layer fan in backwards and it burnt the driver in the mainboard. But the rest of the board is fine and dandy. That 24v printer has a 12v noctua fan for the extruder powered via a lm2596 step down converter and so e2 heater was open and I assigned the layer fan to extruder heater 2 and my hurt SKR 1.4 Turbo has been printing like a dream for some time now.
-
04-04-2021, 12:34 PM #38Staff Engineer
- Join Date
- Jul 2016
- Location
- South Florida, USA
- Posts
- 1,248
 Originally Posted by Martin_au

Can you please explain your last 2 posts together? Originally Posted by Martin_au
-
04-04-2021, 07:59 PM #39Staff Engineer
- Join Date
- Jul 2016
- Location
- South Florida, USA
- Posts
- 1,248
I don't know you from a hole in the wall and so I made no assumptions. I just found it odd that you would say you wish there were more fan pins on a mainboard and then in the same breathe say re assigning mainboard pins with firmware is basic and commonplace. And so I asked instead of assuming.

 Reply With Quote


QIDI Slicer "Plater" is...
04-12-2024, 02:21 AM in QiDi 3D Printer Forum