


Results 1 to 10 of 15
-
06-07-2014, 07:56 AM #1Administrator

- Join Date
- Jan 2014
- Posts
- 7,697

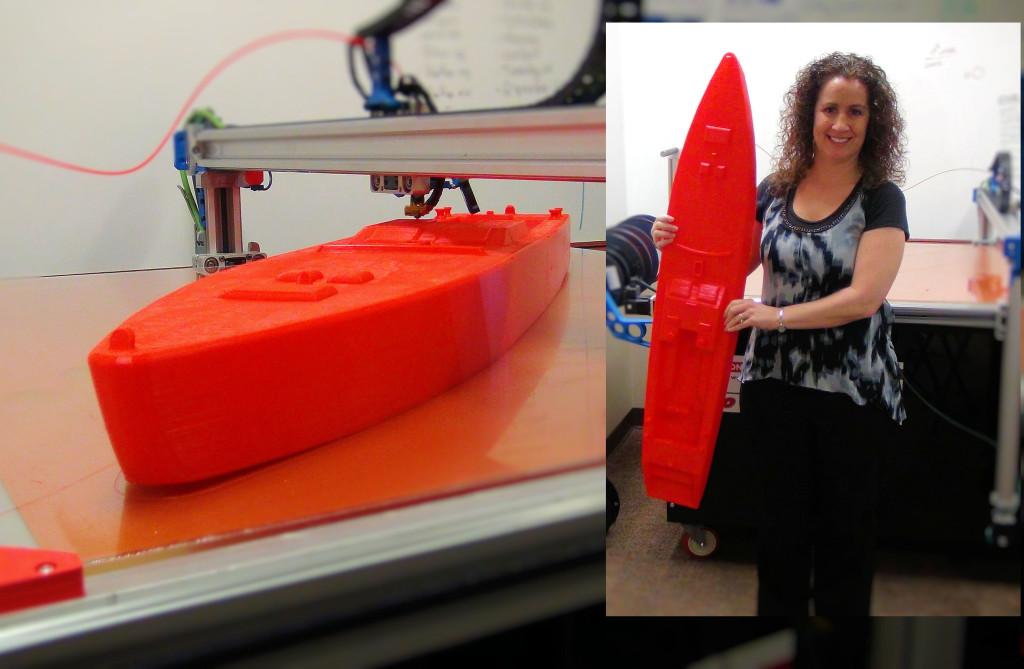
3DP Unlimited's 3DP1000 Giant 3D Printer
Most 3D printers we post here are typical printers which have build dimensions of under 12 inches in each direction. Not this printer however. 3DP Unlimited's 3DP1000 is a massive device capable of a build envelope of 39" x 39" x 19". The printer costs $15,999 for the base model and comes tethered to an industrial cart. The specs of the 3DP1000 are as follows:
- Print Technology: FFF
- Material Compatibility: PLA, ABS, and others
- Filament Diameter: 3mm
- Build Area: 1m x 1m x 0.5m (39″ x 39″ x 19″)
- Layer Resolution: As low as 70 micron
- Extruder Nozzle Diameter: 0.4mm
- Print Bed: Heated borosilicate, 5mm thick
More details here: http://3dprint.com/5485/3dp-unlimited-3dp1000/
Check out one of the printers from this massive device:
-
06-07-2014, 09:57 AM #2Engineer-in-Training
- Join Date
- Mar 2014
- Posts
- 223
That print must have taken a week.

As I would expect they ran into shrinkage problems with such a massive print, you can clearly see the front and back of the boat have separated from the print bed, I think for such a size a temperature controlled enclosure is necessary, a heated bed just won't cut it.
-
06-07-2014, 09:15 PM #3Engineer-in-Training
- Join Date
- Apr 2014
- Posts
- 228
I've read an article by a guy that has a Gigabot, and prints often take a week. This thing seems to have twice the build volume.
I don't understand why they show a rendering of a gigantic shell that is projected to go with this machine when they're showing the machine without it. And yes, I would say it needs an enclosure, even if not directly heated, to trap the heat so shrinkage can be managed better.Last edited by JRDM; 06-07-2014 at 09:18 PM.
-
09-06-2014, 09:53 PM #4Student
- Join Date
- Sep 2014
- Posts
- 5
My 3DP1000
So I've been fine tuning and calibrating my 3DP1000 printer... had a clogged nozzle that set me back during the calibration... but with a nozzle replacement, all seems fine so far.
I haven't run any large prints, however, many are scheduled...
I'm curious, with rafts, skirts, bottom layer refinements, do you think warping and shrinkage will still happen? Is there NO chance for large prints to be made with out warping and shrinking?
What tricks/tips would you do, if you had this printer, and wanted to reduce this potential problem??
thanks
-
09-07-2014, 05:38 AM #5Super Moderator
- Join Date
- Jul 2014
- Posts
- 8,818
warpage and shrinkage will depend on the material.
Were I you I'd work out how to hack the cartridge and get some madesolid pet + filament.
By accounts it's at least as versatile as abs and a LOT less subject to warpage.
You don't want to be 24 hours into a print to see it bend - so spending more on a filament that's less likely to warp would actually work out cheaper in the long run.
Pla might work - but I've pretty much only used abs, so far.
Also - I've found with rafts, on longer heavier prints, it will fuse to the bottom of the model and be almost impossible to remove. So I'd go with brims.
But given the sheer length of some of the extruded plastic, I can't see any way to reduce warpage entirely. Short of building an oven around the whole thing.
Looking at it I'd spring the extra $700 for the fully enclosed model. And get a heater in there as well.
And how the hell do you reliably calibrate a bed a meter square ?
Something it says on the blurb:
How ? Multiple prints increase travel time and take a lot longer than the bits done one at a time.An additional benefit of the large build area is that several parts can be printed at once, saving the user a great deal of time.
All that said - for the money and as long as you are prepared to wait a couple of days for a print. It's currently decent value for money .Last edited by curious aardvark; 09-07-2014 at 05:45 AM.
-
09-07-2014, 02:32 PM #6Student
- Join Date
- Sep 2014
- Posts
- 5
Well, once an enclosure is offered from the company, I'll probably look into purchasing it. Otherwise, a DIY solution may be in order.
Here's some tips and tricks I found on the Makerbot forum. Right now, 3DP Unlimited doesn't have a forum or area for it's users, I'm sure they will eventually.
As a new user, I'm having to go to all the boards/forums I can, to try and figure out tips and tricks.
How to avoid warping: I think they all make sense...and I'll probably use as many as I can...
Use a heated build platform. A heated build platform helps keep the lowest levels of a print warm as the higher layers are printed. This allows the overall print to cool more evenly. A heated build platform, sometimes abbreviated as HBP, helps tremendously with just about any ABS print and large PLA prints.
Print with a raft. Rafts are a printing option in ReplicatorG and Skeinforge. They’re basically a large flat lattice work of printed material underneath the lower-most layer of your printed object. They’ll also help reduce warping and curling by allowing your printed object to adhere better to your flat build surface. Other variations on this are to print with a larger raft and/or a thicker raft comprised of more layers.
Calibrate your starting Z height. A good first layer makes all the difference. If your starting Z axis height is too high, the extruded filament won’t be able to make a good bond with the platform. If you think your Z axis starting height is too high, try lowering it by 0.05mm increments until you find a good first layer.
Get the right build surface. Some people have experimented with different surfaces such as steel, titanium, glass, different kinds of plastic, different kinds of tape, and foam board. However, I find both ABS and PLA seem to stick really well to hot or warm Kapton tape.
Clean your build surface. ABS and PLA stick better to a clean build surface. Keep it clean of dust, pieces of old prints, and any other debris.
Print slower. Printing slower allows finer detail, better adhesion to the build surface and lower layers, and gives the printed part more time to cool evenly.
Print cooler. Printing at a lower temperature isn’t always an option. Ideally, you should be printing at the lowest temperature required for extrusion and that allows good interlayer adhesion. However, trying lower temperatures isn’t for the faint of heart. Printing at a too low a temperature could cause harm to your extruder motor or extruder.
Eliminate drafts or enclose your robot. Forrest Higgs found that having his 3D printer too close to an open window caused very uneven heating across his build surface. This in turn caused the side of his prints closest to the window to curl. Since keeping the window closed wasn’t an option for him, he compensated for the window drafts by adding a heat lamp. Cupcake and Thing-O-Matic owners might have an easier time of eliminating drafts by simply enclosing two or three of the sides of their robots. It will also have a fortunate side effect of helping to control fumes.
Design with mouse ears. Zach Smith’s solution was to add little discs to corners of an object to help those corners stick to the platform. These essentially serve as “mini-rafts” to give those corners more surface area and better adhesion without having to print an entire raft.
Design with aprons to hold down corners. Forrest Higgs suggested adding “aprons” around an object to be printed, while that object was being printed on a raft. These low thick pieces of plastic help keep the raft flat and help prevent any curling or warping from affecting the desired printed object itself.
Design with surrounding thermal walls. While Forrest Higgs’ apron approach provides a mechanical advantage of essentially holding down corners with a chunk of plastic, Nophead has added thin surrounding walls to his designs to act as baffles to keep warm air around the printed object as it moves around. He’s postulated that a very thin surrounding wall could have the same beneficial effect as printing inside an enclosed build chamber. Interestingly, it seems that Nophead suggests that designing objects with more rounded corners might also help avoid curling and warping at those corners.
Reduce infill. When printing a model you can chose to print it hollow, completely solid, or some percentage between zero and 100. However, as Nophead points out even the plastic inside a model exerts a force on the entire printed object as it cools. It stands to reason that the more plastic you have, the more those pieces of plastic will pull against themselves and the build surface as they cool. By reducing infill there will a reduced amount of internal tension as the object cools. Reducing these internal forces by printing with a lower infill ratio can help reduce curling and warping as well.
EDIT: Sand the Kapton. Charles Pax has suggested that sanding a Kapton tape build surface will increase the surface area, making it easier for the molten plastic to stick.
EDIT: ABS surface. Some have suggested essentially painting the build surface with liquid ABS.2 This is has the same effect of laying down a big flat raft.
- See more at: http://www.makerbot.com/blog/2011/06....43LOZIty.dpuf
-As for calibrating the bed, They did a very good job of machining the bed, placing a large heating element, and using thick borosilicate glass. This layered bed is all held down by precise corner holders. How you level this bed, is by adjusting set screws placed around the bed. Once this is adjusted, I'm hoping this won't change. So, ideally you just calibrate the bed once and your done forever.
I'll know as I get more projects completed. So far, just calibration items completed...
Last edited by nycprinter; 09-07-2014 at 02:37 PM.
-
09-07-2014, 11:50 PM #7Super Moderator
- Join Date
- Nov 2013
- Location
- NSW, Australia
- Posts
- 1,824

Still not worth it sorry, if it could do that size print in a reasonable time maybe, but we can all print at that speed, albeit in smaller parts right now. We're getting pretty handy at joining parts together.
-
09-08-2014, 09:48 AM #8Student
- Join Date
- Sep 2014
- Posts
- 5
Fastest speeds?
 Originally Posted by Geoff

Hi Geoff,
I'm not sure how fast I can push the 3DPUnlimited, so far I'm using the configuration they provided with Slic3r and RepH. Ideally, I would push the speeds up faster to compensate for large build times. How fast are you and others running your smaller units? From some of these small kits I've looked at, the components don't seem to be industrial grade. Surely there must be something to be said for high quality components, yes?
PBC Linear is the parent company of the printer, and they seem like specialists in linear motion devices. I think the components they used are high precision and quality.
(PS) I'm looking to make very large works, and I should be able to join large parts together too... I guess it just depends on what you plan on making. What do you make?
-
09-08-2014, 10:46 AM #9Staff Engineer
- Join Date
- Dec 2013
- Location
- Georgia
- Posts
- 934
Big build area, high resolution, fast print speed. You can only choose two.
This one happens to choose the first two and it appears to have done quite well at them.
-
09-08-2014, 11:15 AM #10Student
- Join Date
- Sep 2014
- Posts
- 5
2 out of 3
Originally Posted by Feign
Just curious, as I'm learning everything... what determines 'high resolution?' Are you talking about the build layer (70microns) or a XY resolution (like in a ppi printer)?
As for fast print speed, it looks like Slic3r and RepH allow all kinds of adjustments and controls. How fast are people pushing their speeds? I'm reading that some materials prefer faster speeds (BronzeFill, Laywoo)
so the risk of nozzle clogging is reduced...
I'll look at the default config settings, and tell you what I'm currently running at...


 Reply With Quote


QIDI Slicer "Plater" is...
04-12-2024, 02:21 AM in QiDi 3D Printer Forum