


Results 1 to 7 of 7
-
06-04-2014, 07:19 AM #1Administrator

- Join Date
- Jan 2014
- Posts
- 7,697

The Perfect 3D Printer Build Platform
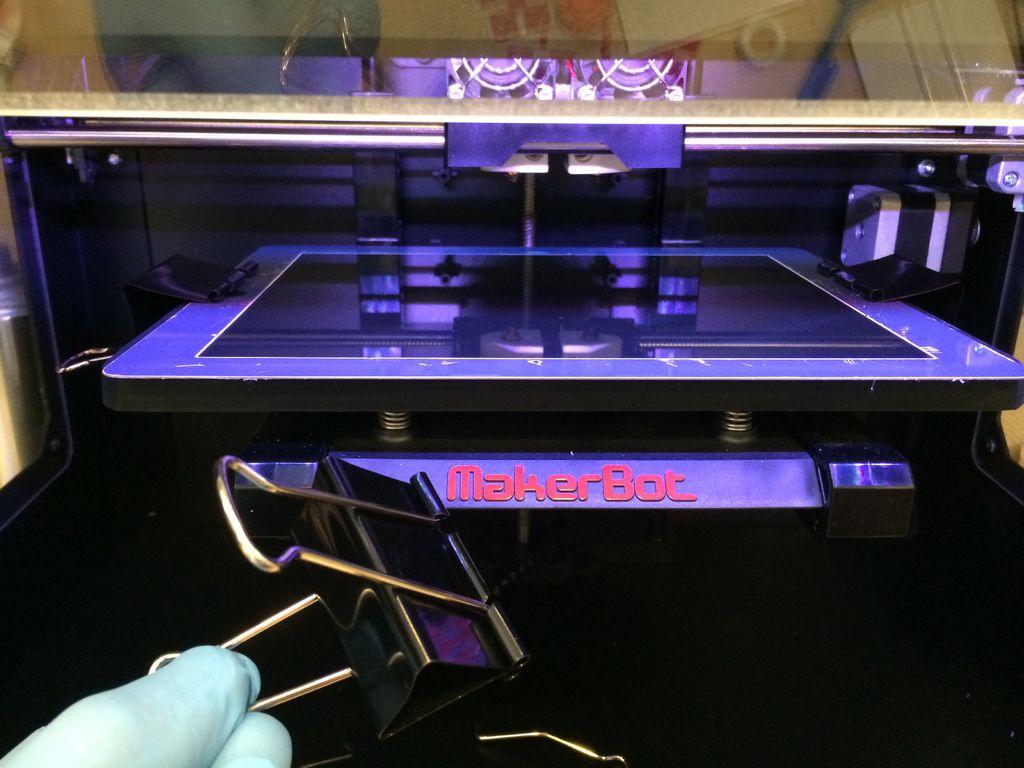
We have all had trouble with build platforms before I'm sure. Whether it is the sticking, the scratching of the platform while trying to remove an object, or other issues, there is always room for improvement. One Instructables man however, has found the ultimate solution, a solution you likely would never have thought of. The glass from an Apple iPad makes the perfect platform for whatever you are 3D printing. In fact he uses it without and sprays or tape, and it works quite well still. The following article goes over what he did, and how you too can install the perfect 3D printer build platform for under $20. http://3dprint.com/4969/ipad-3d-printing-build-platform
Check out the installed iPad screen below on a Makerbot Replicator 3D Printer:
-
06-12-2014, 02:52 PM #2Student
- Join Date
- Jun 2014
- Location
- hunter valley nsw
- Posts
- 3
great idea as I'm fixing some ipad screens for a customer I threw an extra screen in the basket and will try this out when it gets delivered I'm using a flashforge creator dual. just wanted to know if I should remove the metal build plate and mount the glass on the heating pad itself
-
06-16-2014, 05:48 PM #3Student
- Join Date
- Jun 2014
- Location
- hunter valley nsw
- Posts
- 3
will be getting my ipad screens today I'll post some pics once I have it installed and have printed something on to it . I'm looking forward to how we'll it should work
-
06-17-2014, 10:32 AM #4Student
- Join Date
- Apr 2014
- Location
- Ocean Springs, MS
- Posts
- 7
Are you thinking of just placing it on top of your existing platform? Originally Posted by DEATHGUYJ

-
06-18-2014, 01:42 PM #5Student
- Join Date
- May 2014
- Posts
- 36
I'm curious to see your photos and know how it went. Can't wait for your to share. How did it work? Originally Posted by DEATHGUYJ
-
06-18-2014, 10:06 PM #6Student
- Join Date
- Jun 2014
- Location
- hunter valley nsw
- Posts
- 3
ok so I have installed it with some 50mm clips from the newsagent and printed some small bezels raftless and face down so the face you will be looking at is very smooth and shiny and I'm very happy with it. however as it was my first time trying this I cracked the glass when I was seperating the touch panel I was using a heat gun and trying to be very careful but it cracked I have it held together with kapton on the under side and it's just clipped ontop of the alu build plate. the next order of ipad digitsers I make I will get another one and be even more careful but as what I'm using is working well I'm not in a hurry I'll post some pics soon as I'm just home from work and will probly get some sleep soon
-
07-02-2014, 06:35 AM #7Student
- Join Date
- Jan 2014
- Posts
- 24
Who would have thought that an Apple iPad screen could be a perfect platform for 3D printing? We will try it for sure, very cheap for only $15. I just want to ask… aside from Makerbot Replicator 3D Printer, does it also fit in to other printer like Printrbot or Velleman?


 Reply With Quote


QIDI Slicer "Plater" is...
04-12-2024, 02:21 AM in QiDi 3D Printer Forum