


Results 1 to 7 of 7
-
05-12-2015, 06:51 AM #1Administrator

- Join Date
- Jan 2014
- Posts
- 7,697

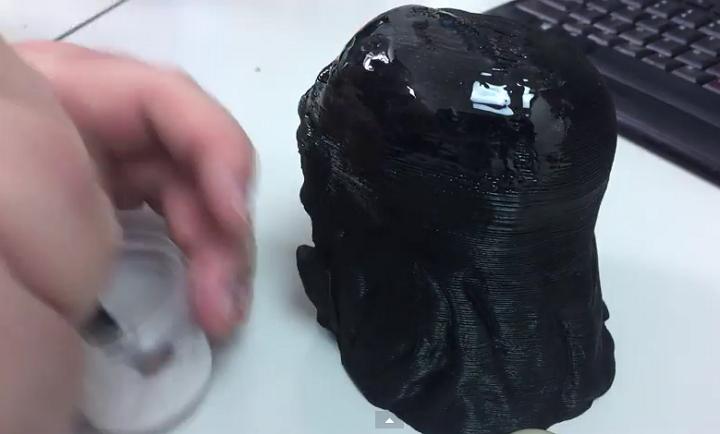
How to Smooth Your 3D Prints With Epoxy
Jonathan Russell, who calls himself TechWiz, is a graphic designer and web developer who lives near Sydney, Australia, and he operates a website and a YouTube channel under his TechWiz brand. One of his recent posts is an examination of alternatives to using acetone to smooth his 3D printed models. Russell says he wasn't happy with cold vapor smoothing with acetone or the hot method of that technique, so he tested out smoothing using epoxy instead. Russell uses Z-Poxy PT-39 30 Minute epoxy solution to smooth out his models. You can check out the whole story and see his results here: http://3dprint.com/63408/smoothing-with-epoxy/
Below is a photo of Russell's Darth Vader helmet 3D print smoothed with epoxy:
-
05-12-2015, 08:22 AM #2Engineer
- Join Date
- Sep 2014
- Posts
- 629

Not sure why this is 'news' worthy, as many people (myself included) use epoxy to smooth and bind all the time.
I use everything from 5 minute to 60 minute epoxy. The slower the cure time, the stronger the bond, usually. I then will often cut whatever epoxy I'm using with Denatured Alcohol. I usually use 4 parts epoxy, 4 parts hardener, and 1 part alcohol to make the mixture much runnier. It does increase the cure time significantly, but this allows it to run a bit and penetrate where I need it too. The amount of alcohol can be varied based on the desired viscosity.
For example, if I want to reinforce a part that I designed to weak for the application, I'll coat the part with 5 minute. If I have a deep void (Like the keel of a boat that I'm casting with Lead shot), I'll use 60 minute cut with alcohol to let it ooze down into voids and openings. If you're looking for a decently strong, but ultralight weight filler, West System has a powder filler that really adds bulk to the epoxy without adding mass, but it does look like peanut butter, so it's not good for surface finishing, but is easily sanded and holds paint well.
Epoxy is a good smoother for nice even surfaces, but you can lose a bit of recessed detail with epoxy filling in the holes. If I know a part will be stressed alot, I'll Acetone smooth it to bond the layers better, and then do a coat of epoxy to harden the outside shell.
Remember, at low infills, unlike 'normal' materials, there is very little load bearing structure to 3d printed parts, kind of like how the world trade center was designed, the stress is transferred to the outside of the building / part. So unless a part will only receive compression loading, and even then, bonding the layers, and adding epoxy will greatly increase the strength.
If I'm going to be bonding two parts together, I try, if possible, to design the bonded sides to be the first layer of the print. That is usually your most well bonded horizontal layer, and takes sanding the best. I'll use a dremel with a medium sanding drum to roughen up the flat sides, and then epoxy.
If you want to get into epoxy use, I recommend the separate bottles instead of the dual syringe type. You will occasionally get uneven flow resulting in unbalanced mixtures. Excess epoxy or hardener will continue to stay soft, and even flow like tree sap if the mix off enough (My dad's boat has a tiny hole in the keel that has been oozing epoxy for 16 months now, looks like pine tree sap, and feels like it too). I've had structural failures from improperly mixed epoxy, as it never fully hardened. Get a jewelers scale (this is the one I use, it's great and cheap) that will do upto 100g, at .01g accuracy. Then pour in the desired amounts, using the scale to get within +/- 5% of each mixture. That will allow for a solid cure. For most applications, I'll use 1-2g of each, and .25-.5g of alcohol if needed.
-
05-11-2017, 05:16 AM #3Engineer
- Join Date
- Nov 2013
- Location
- Tilburg, the Netherlands
- Posts
- 533


There is a special epoxy developed for 3D printing now, XTC-3D. It is superior to other epoxies I have used and has a good price. It smooths the print much more and seals very well. Disadvantages being that it is a bit too viscous causing local buildups and open spots, as well as a slight yellowing but overall this is the epoxy to go for.
-
05-11-2017, 07:09 AM #4Engineer
- Join Date
- Sep 2014
- Posts
- 629
Ralph, what makes it better for 3d printing? Does it contain a bit of solvents to bind with the material better?
If you are having viscosity issues, try adding some denatured alcohol (or extremely high proof drinking alcohol) to your epoxy when you mix it. It will require more stirring to get it thouroughly mixed, but it will be runnier and take longer to setup, so you can turn 5 minute epoxy working time resins into 30 minute working time. I have not found any strength issues with this technique, but I have not done any tests to failure to compare the extreme end of the material.
Yellowing would be an issue for me. I use the resins i mentioned above mainly still, but have started using West systems some too. Never had any yellowing issues, especially with the west systems, except when I have used their materials specifically intended to yellow.
-
05-30-2017, 11:47 AM #5Engineer
- Join Date
- Nov 2013
- Location
- Tilburg, the Netherlands
- Posts
- 533
The XTC3D just works well on PLA and is cost-effective. It is easy to apply and due to the viscosity the thick layer that forms adds strength while retaining some flexibility in the part. If used well it can work great. A big disadvantage is that if you live in a warm area, I found over 25 degrees C it rapidly starts to become exothermic, within 5-10 minutes after mixing and generates enormous amounts of heat and even smoke, before rapidly hardening up, so you can only use it in cool places. So I am looking for an alternative epoxy to use during the summer - Tarbender looks good.
-
05-30-2017, 05:26 PM #6Engineer
- Join Date
- Sep 2014
- Posts
- 629
That..... that is scary. I know epoxy is exothermic by nature, but I've never seen some smoke before. I do know, though, that some epoxies will react with the material they are contained in, ie the cup. I've heard of some getting too hot to hold onto anymore. Try using something nonreactive to mix your epoxy and see if it results in better working temps. Like HDPE or stainless steel (Or titanium if you can get some).
-
03-13-2018, 04:44 AM #7Engineer
- Join Date
- Nov 2013
- Location
- Tilburg, the Netherlands
- Posts
- 533
Thanks for the alcohol tip (adding it to the epoxy), the 2-cup method is also a good way to keep viscosity consistent I found.
XTC3D has a 100:42 mixing ratio by weight and that comes quite precise, the overheating was due to it being closer to 100:50 which is the volume ratio.
I am now looking at Amazing Clear Cast as it is also foodsafe, has better viscosity and hopefully also will be more rigid than XTC3D.


 Reply With Quote


What's wrong with this prting?
04-14-2024, 05:15 PM in General 3D Printing Discussion